The children were inspired by Isabella’s experimentand wondered if they could make their own paper. Isabella and Adalyn volunteered to use the shredded paper that the children had collected to create new paper.
They began by conducting research, reading books and watching a video to learn how to make paper using used or unwanted paper scraps.
Isabella and Adalyn took notes as they watched the video, using pictures, words, and sentences to create their own ‘how-to’ book. In this information booklet, they provided step-by-step instructions on the process of paper-making.
They were careful to include pictures for each step and detailed instructions that guide the reader through the process of making paper.
Several weeks of research and note-taking were required to create the instructional book. Finally, Isabella and Adalyn were ready to put their research to the test, by following the instructions to make their paper.
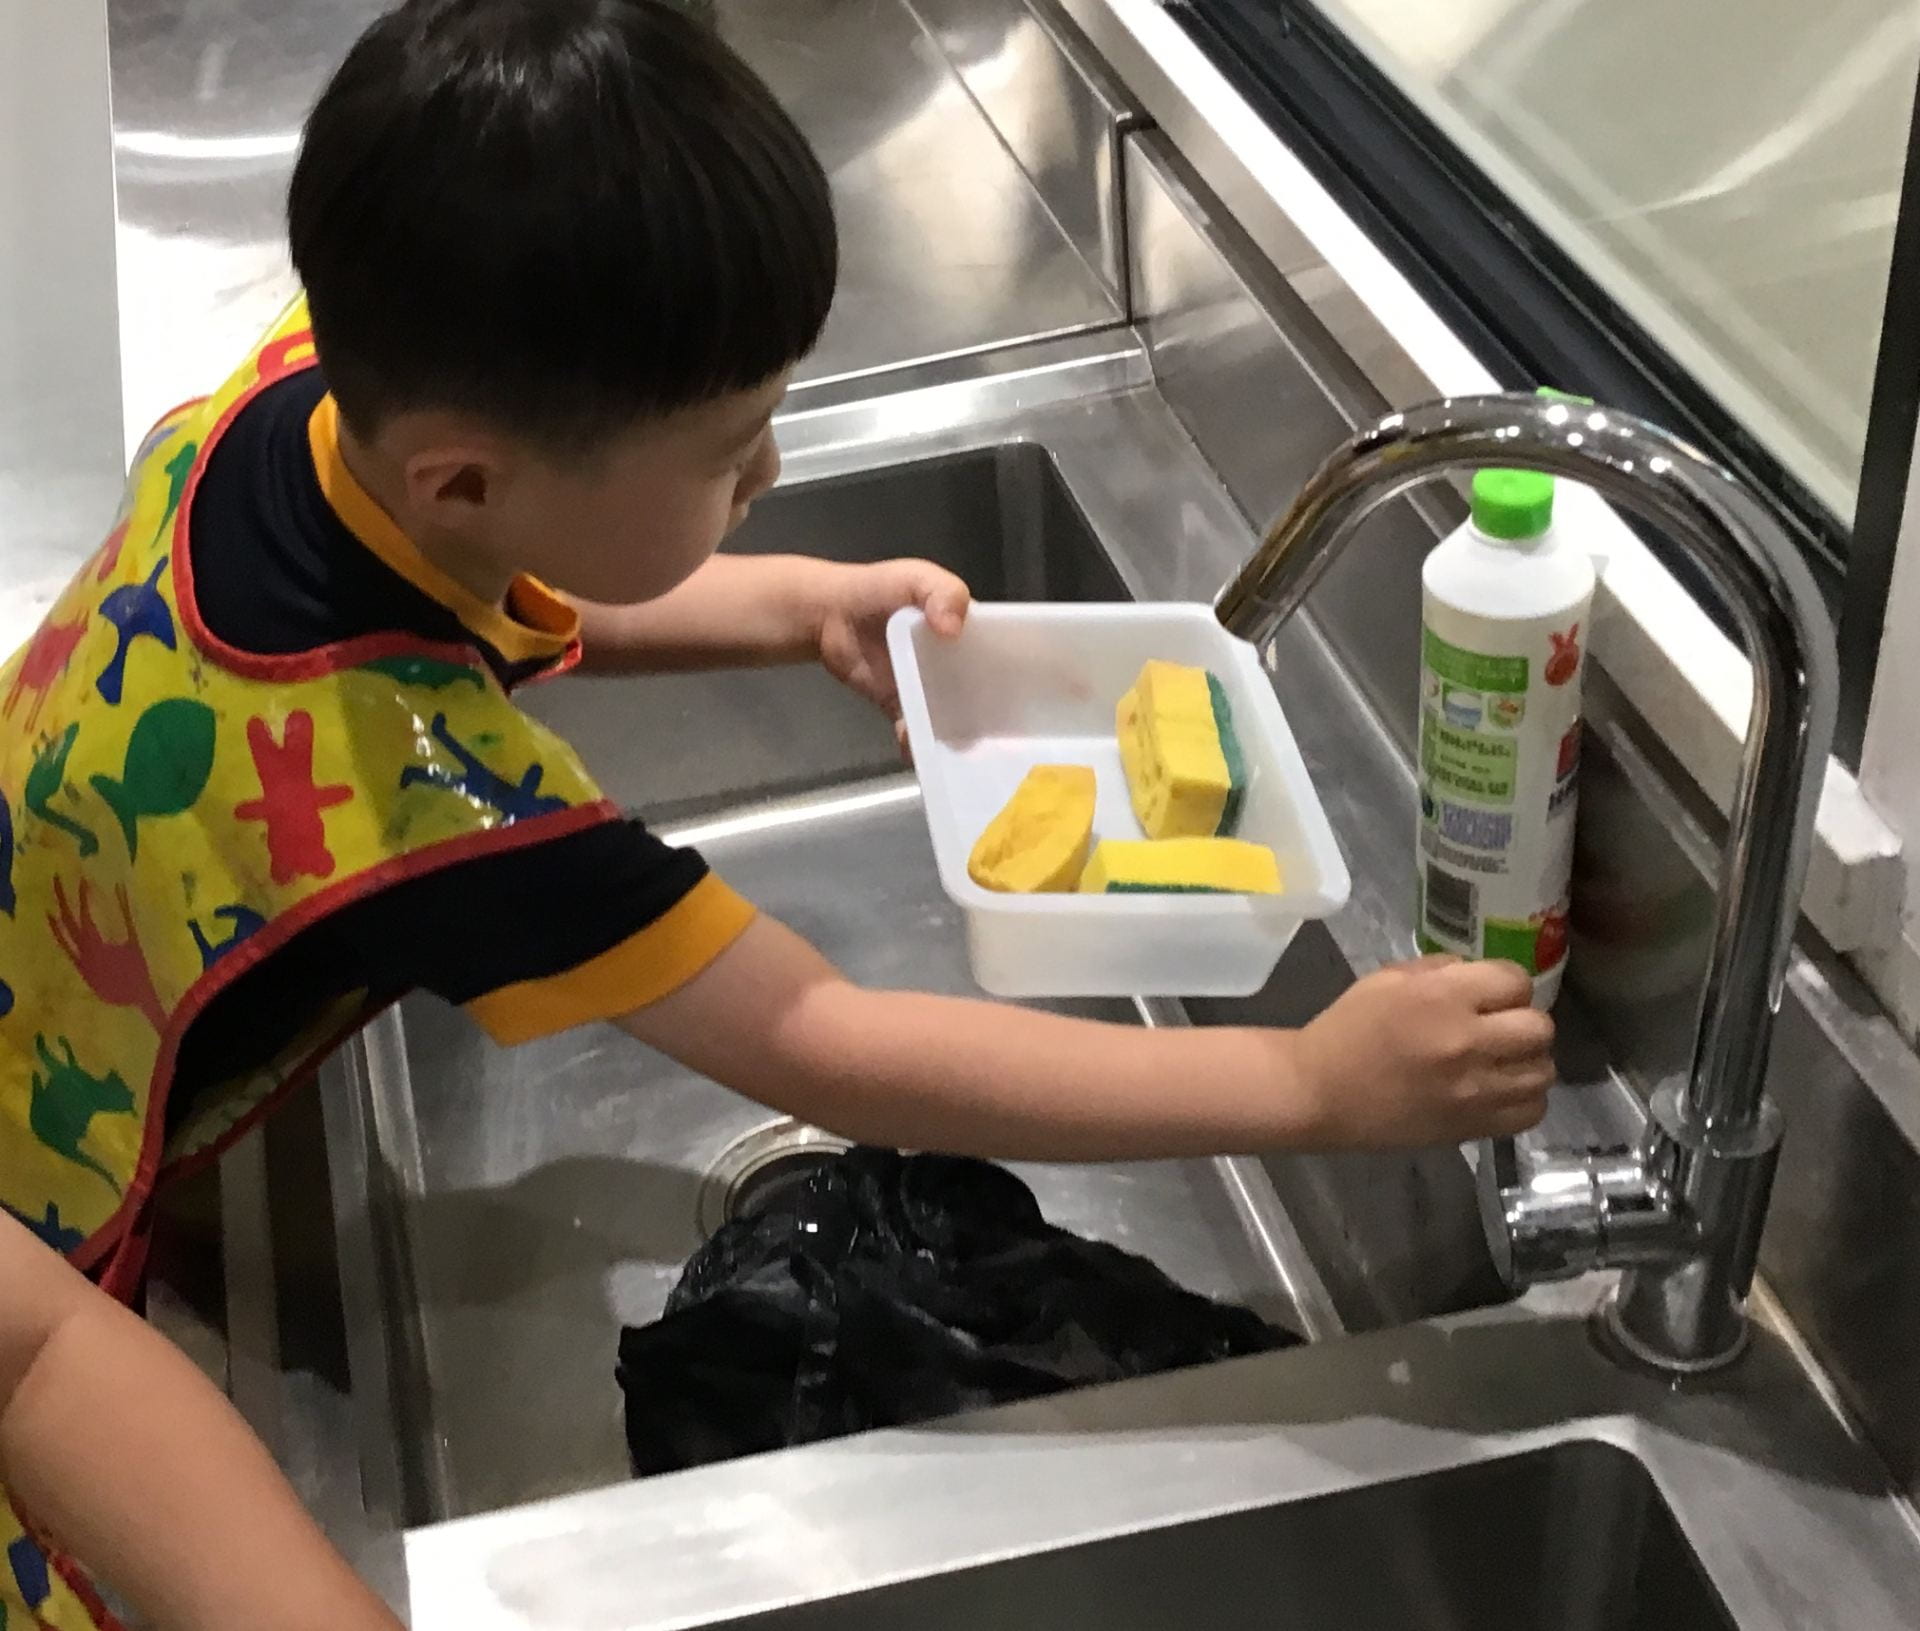
They began by soaking the paper scraps in water for a few days.
Then, they turned the paper mixture into paper pulp, following different steps to ensure that the mixture of water and paper pulp was correct.
Then, they dipped the frame into the water with the paper pulp until they had a thin layer of the mixture on the netting.
Finally, the frames were left to dry in the sun and the new sheets of paper were created by the team.
Isabella and Adalyn presented their learning to the class, sharing the various steps they took to create several pieces of new paper.
The inquiry process provided Isabella and Adalyn with opportunities to explore different tools and methods. The sequence of planning, data gathering, interpreting, and communicating enabled them to develop skills in information literacy.
The team now wonder what other natural materials they could use to make paper.
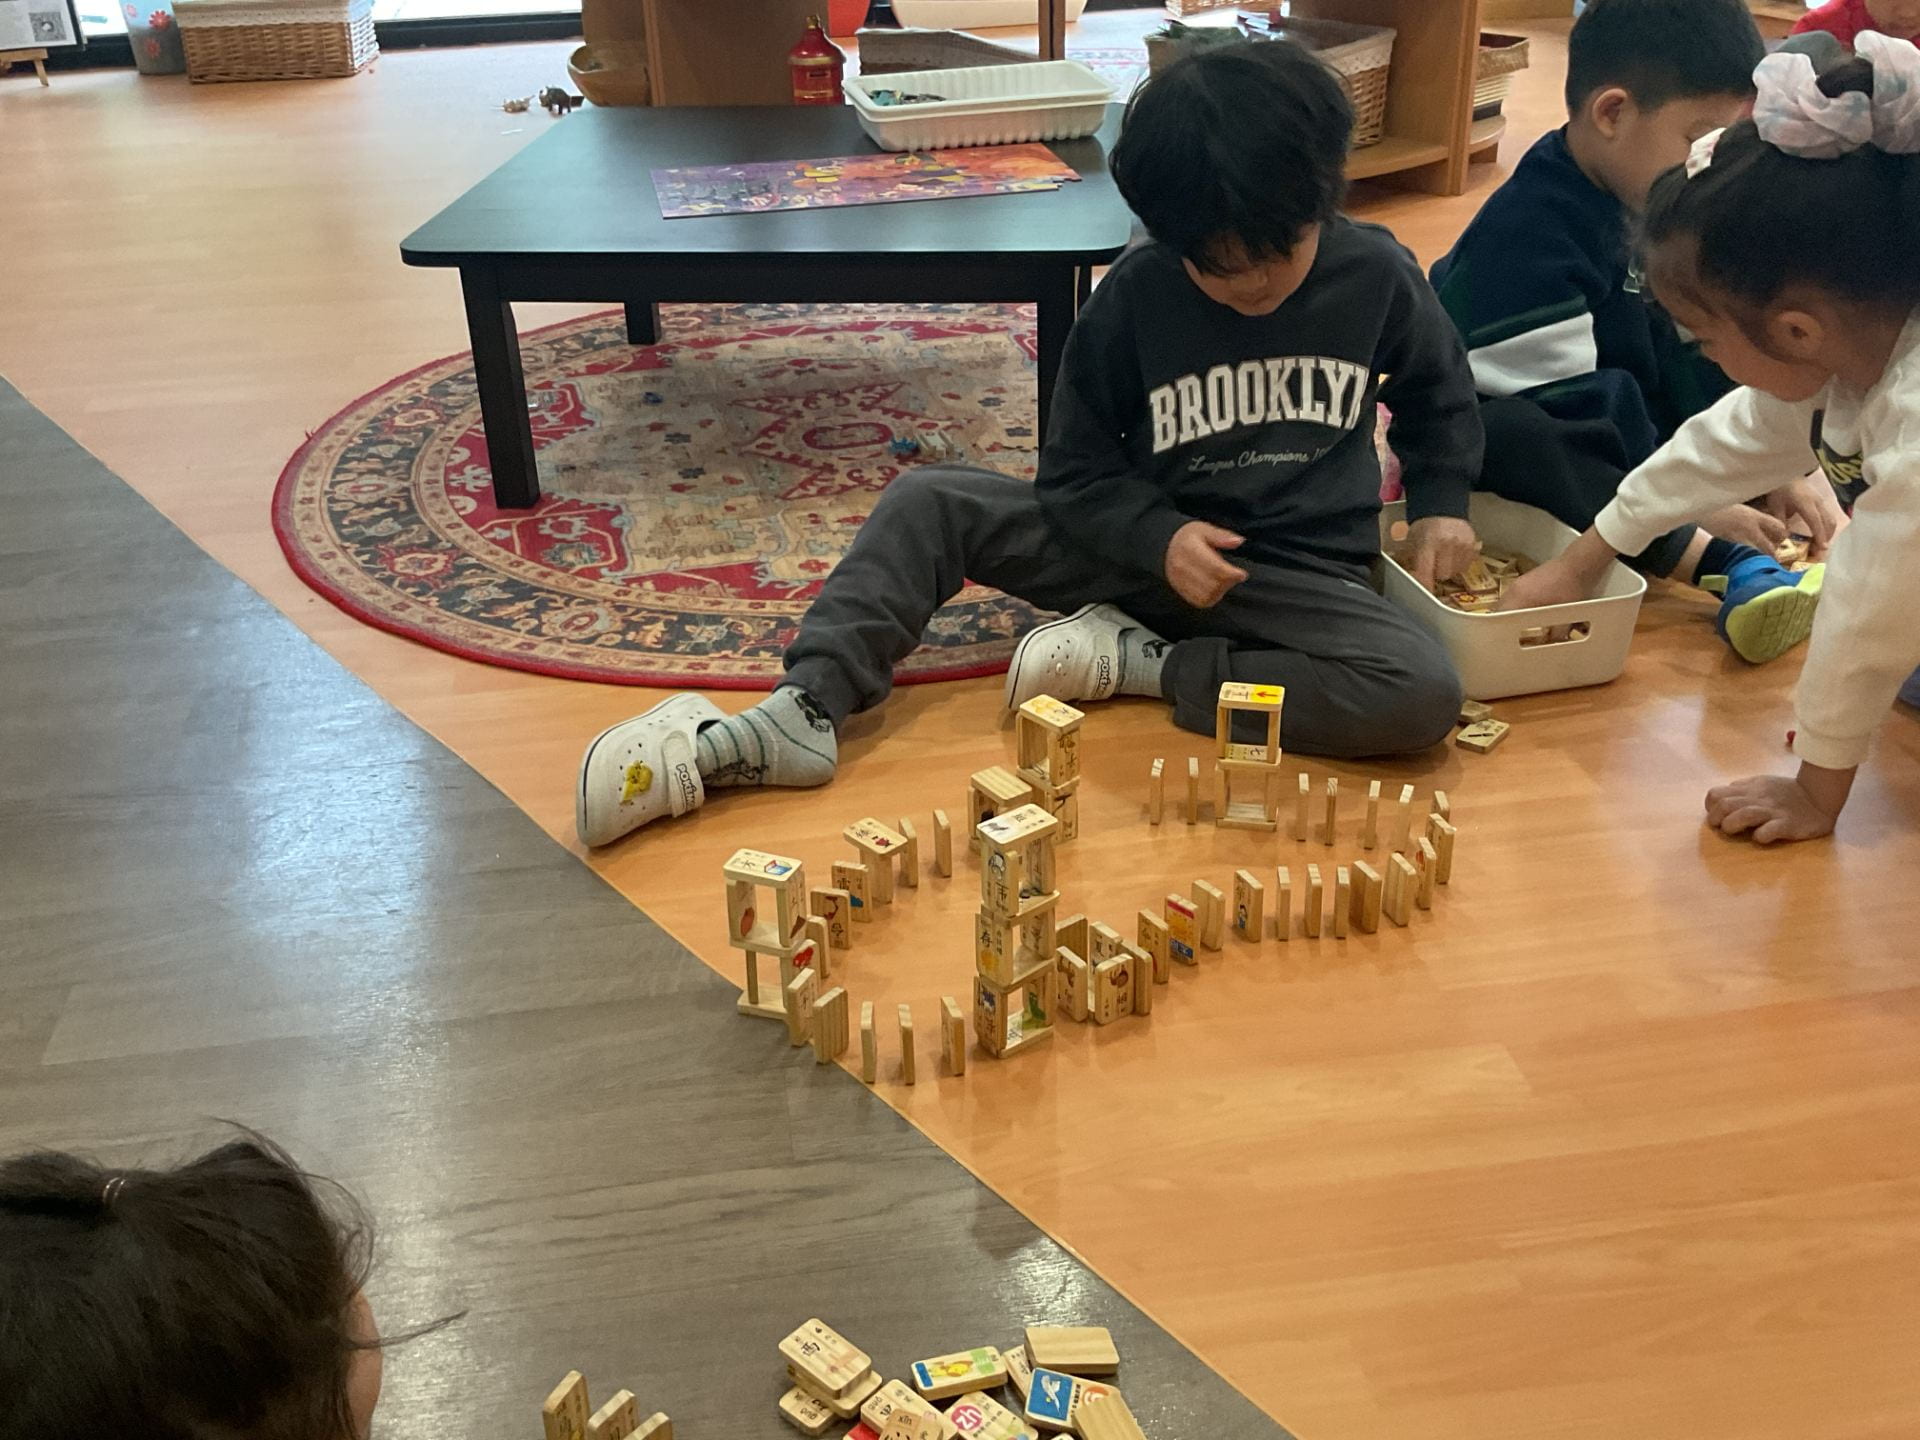
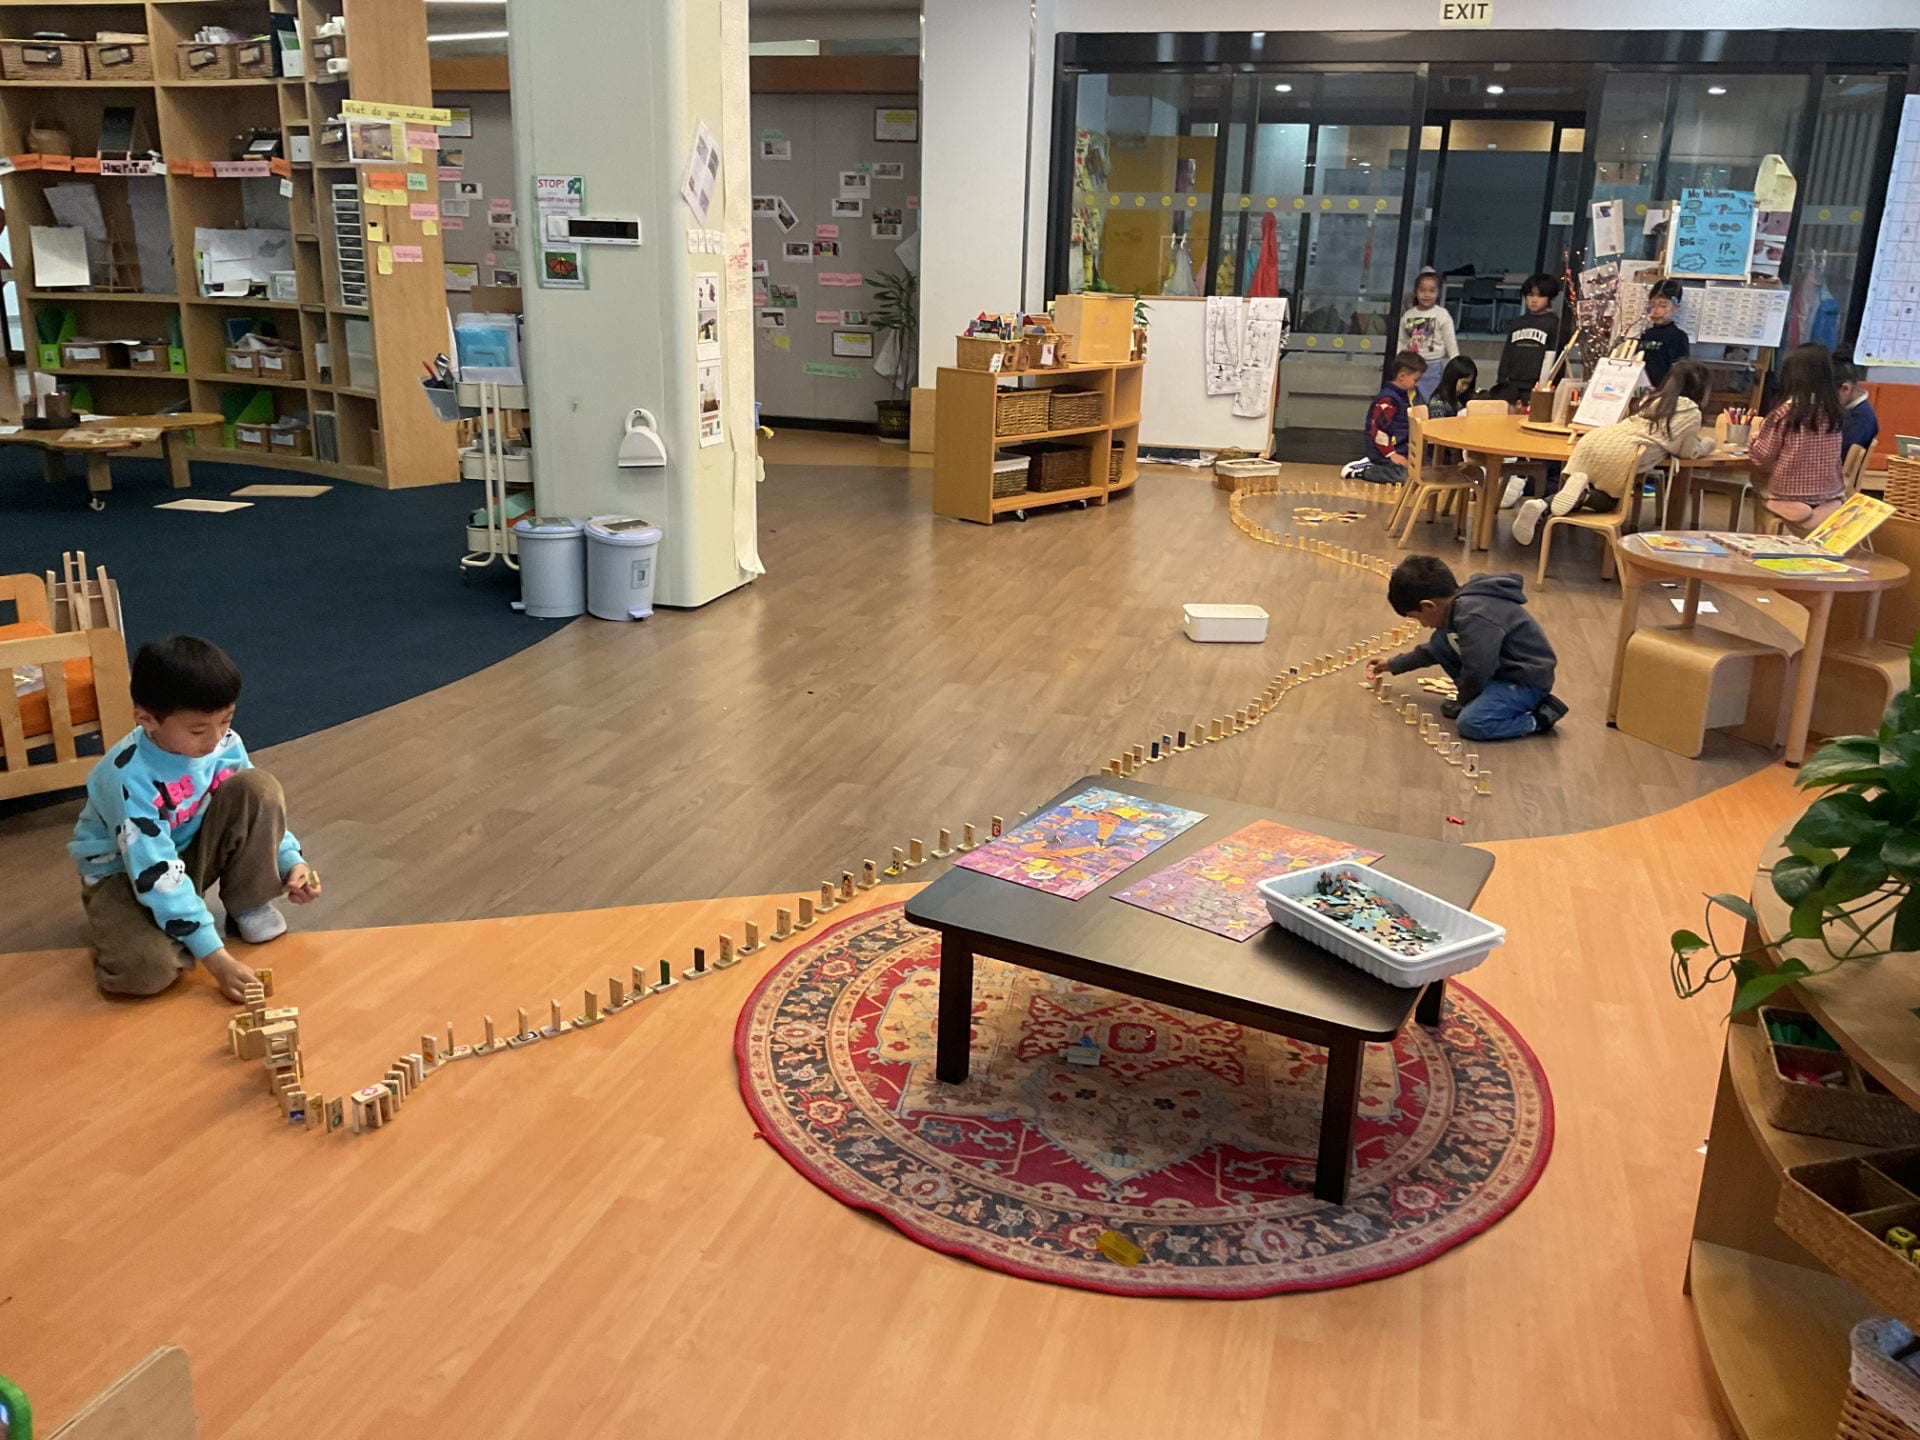
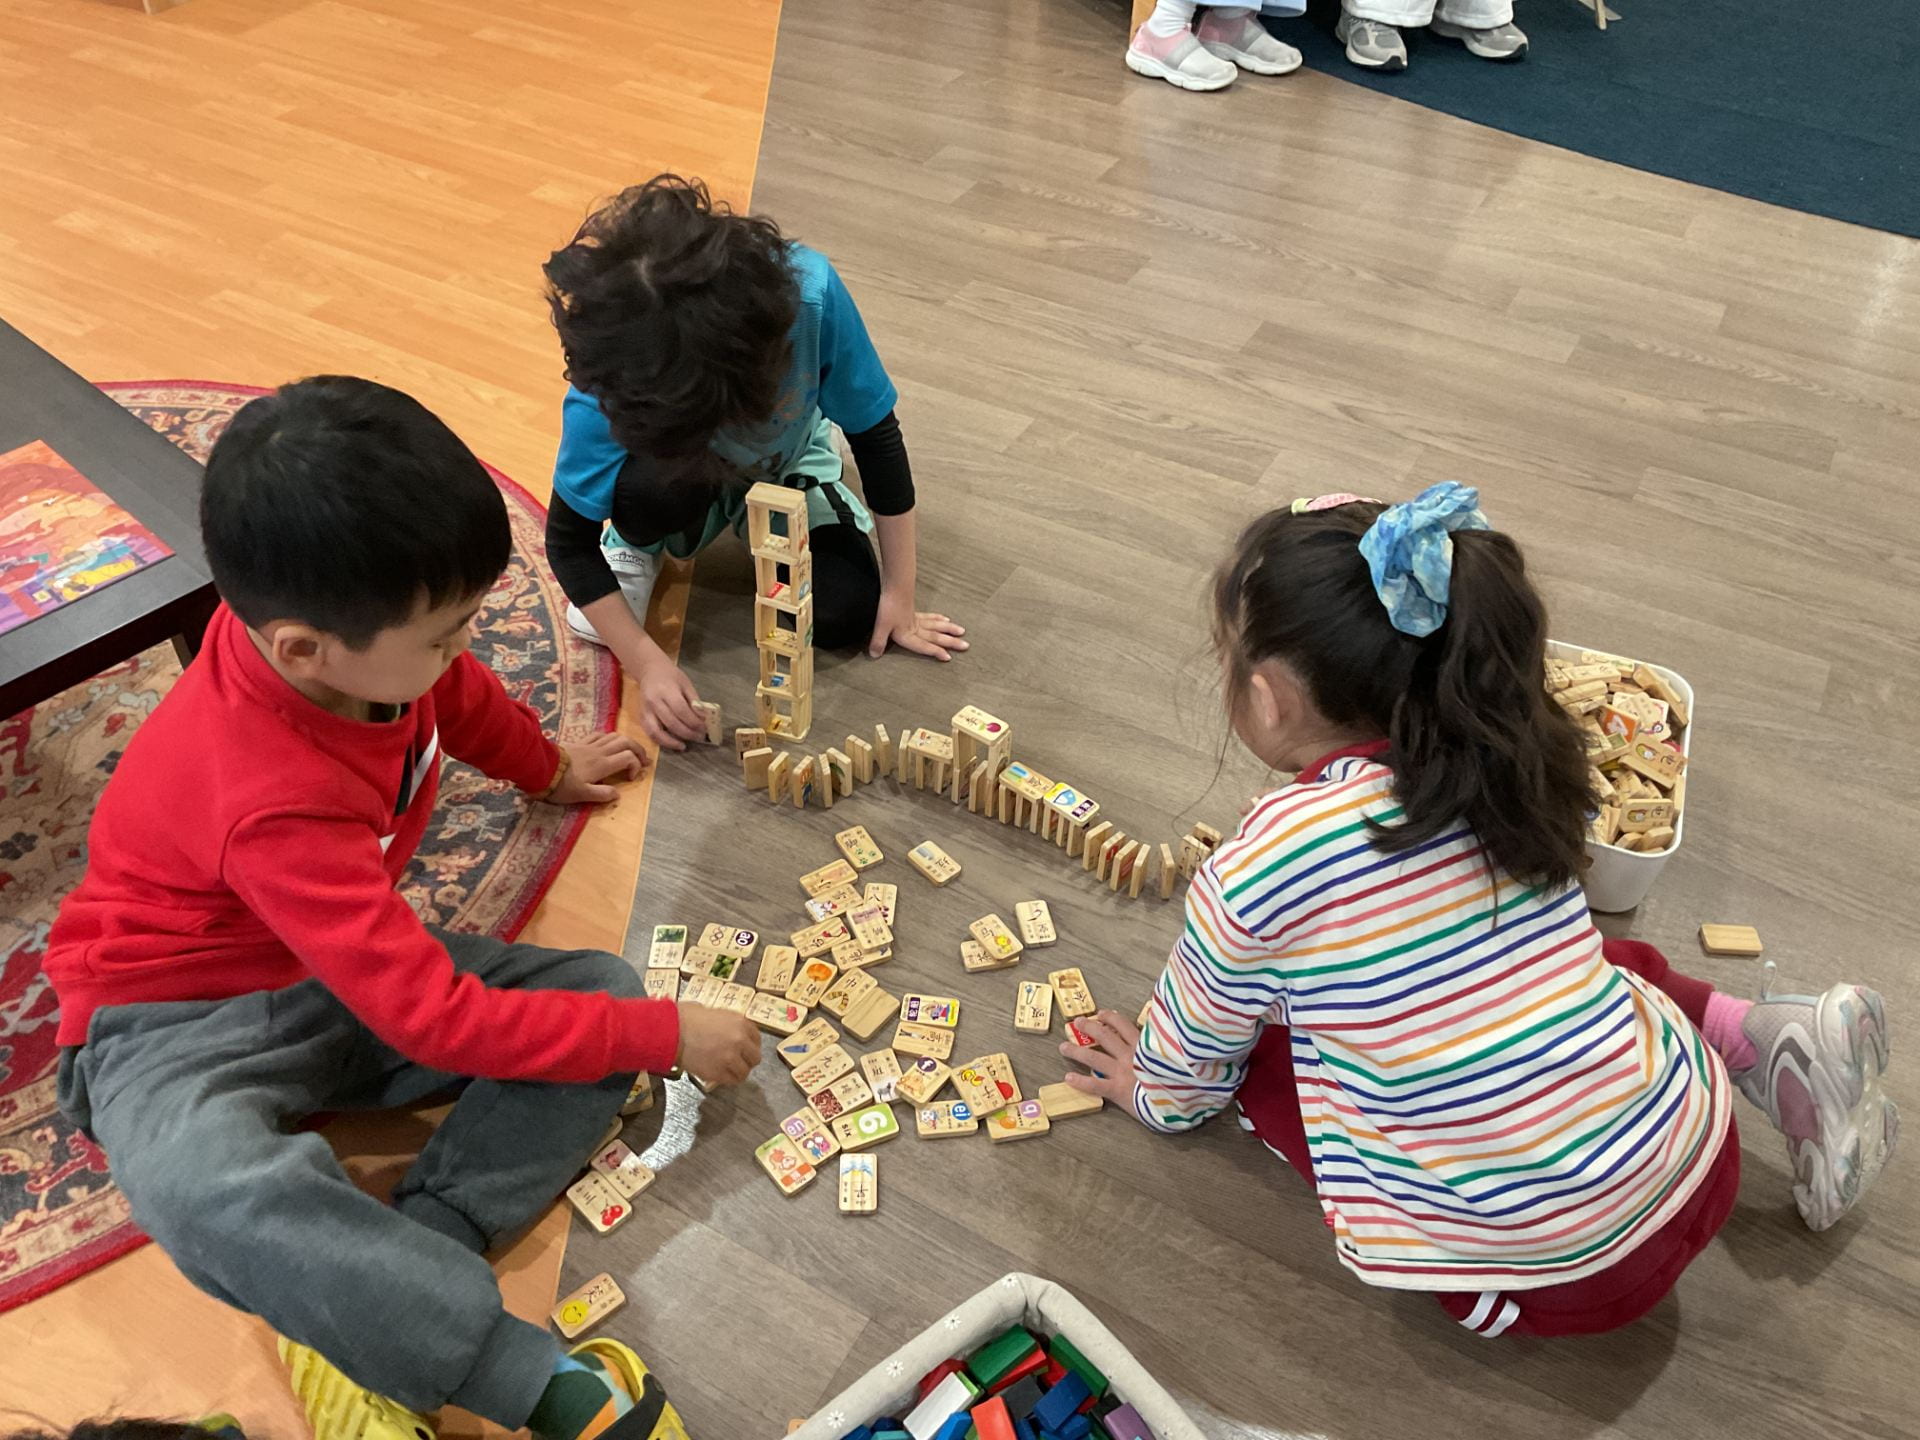
A group of children were interested in using Domino’s to create a game. They began to prop the dominoes up next to each other, to create a structure that would produce the domino effect. Each time they placed a few Dominoes, they fell over.
How can we make the challenge more interesting?
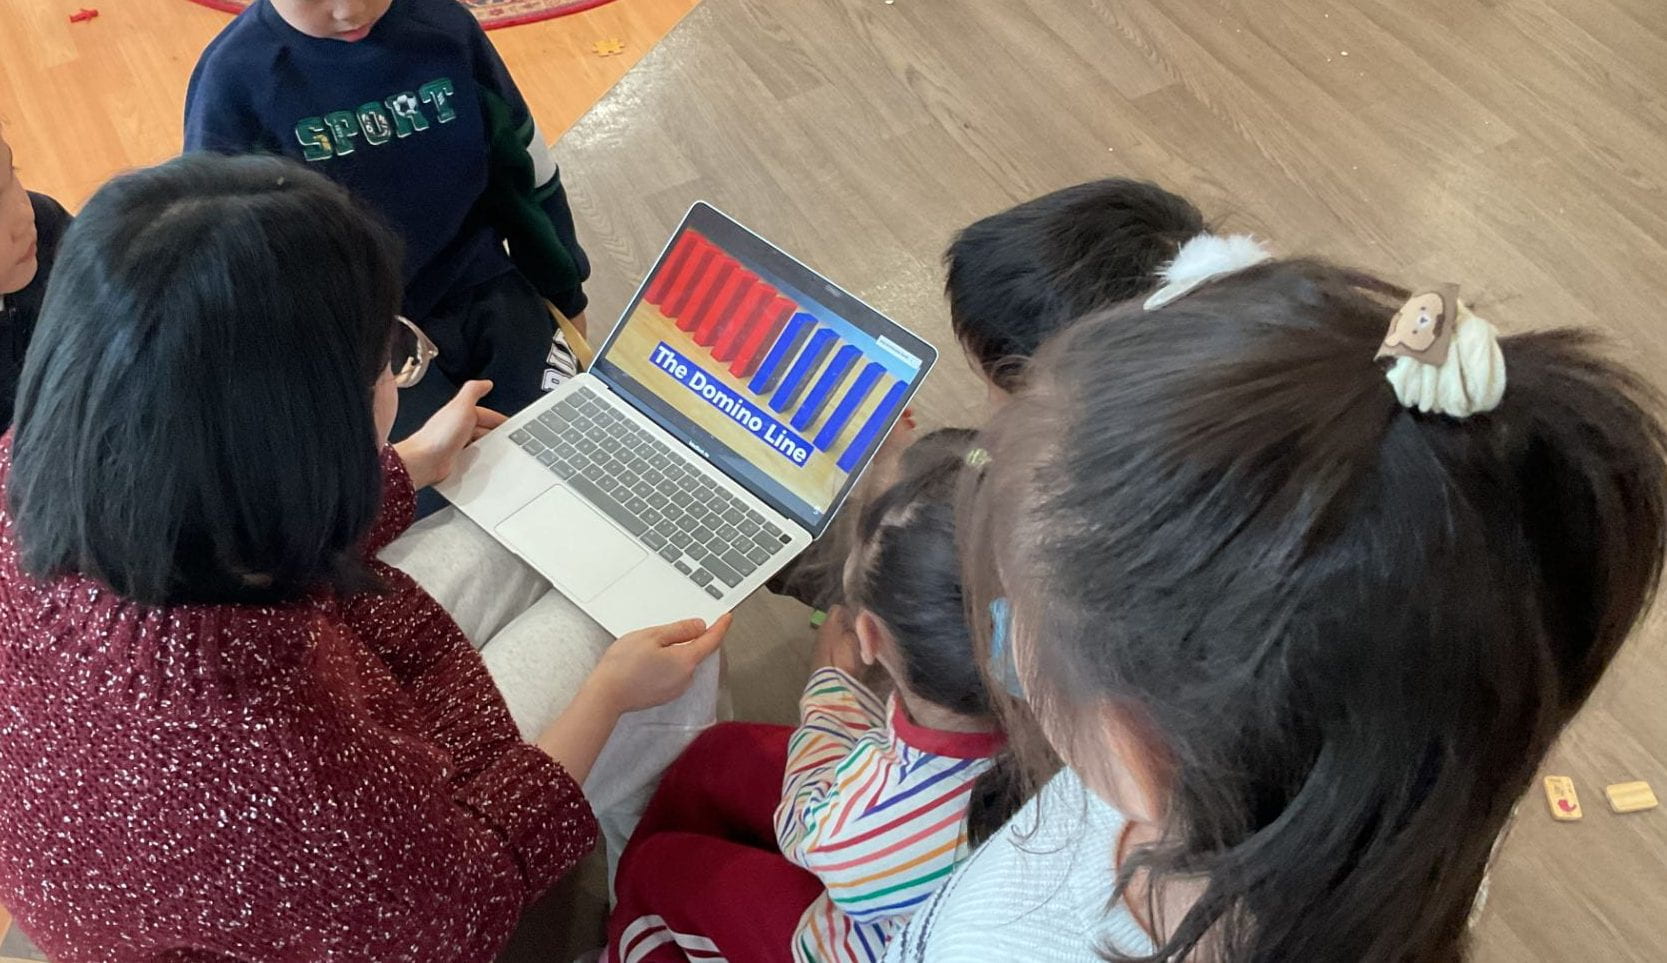
Noticing the children’s interest in creating the domino challenge, we decided to share a video that shared many different ways to create the challenge using a range of materials and toys to make it more exciting.
Isabella recalled watching a similar video in the past. She was excited by all the ideas that were shared.
Ciel “Why do we need to watch the video?”
Euno “Because this important because Grade 5 made this game.”
Isabella “Because you can build it yourself in different ways.”
Sea “We can make it together it is fun.”
Junsu “We make more blocks and make fantastic fun.”
Dahyun “Because then we can make play for some things.”
Isabella “Because you can build more cooler stuff.”
Euno “We watch the video and we can make dominoes fun and we can play and be happy.”
Ciel “We can make and watch, then we will be good at dominoes.”
What are some important things to consider when we play with the dominoes?
Ciel “We need to tidy up when we are finished.”
Evan “Make a story with dominoes.”
Junsu “Dominoes is broken then they go straight and push and then fall.”
Dahyun “Be kind to each to each other and kind hands and kind voice.”
Isabella “We need to say kind words. Nice words.”
Suzy “We can’t do too loud or else people’s ears will hurt.”
Euno “We need to be safe with dominoes because we don’t have space and people kick the dominoes because we can’t see. SO careful to play dominoes (accidentally kick it).
Sea “We be kind to dominoes because dominoes fallen down the floor and people will slip and their back is hurt.”
Dahyun “We need to be kind or people be sad.”
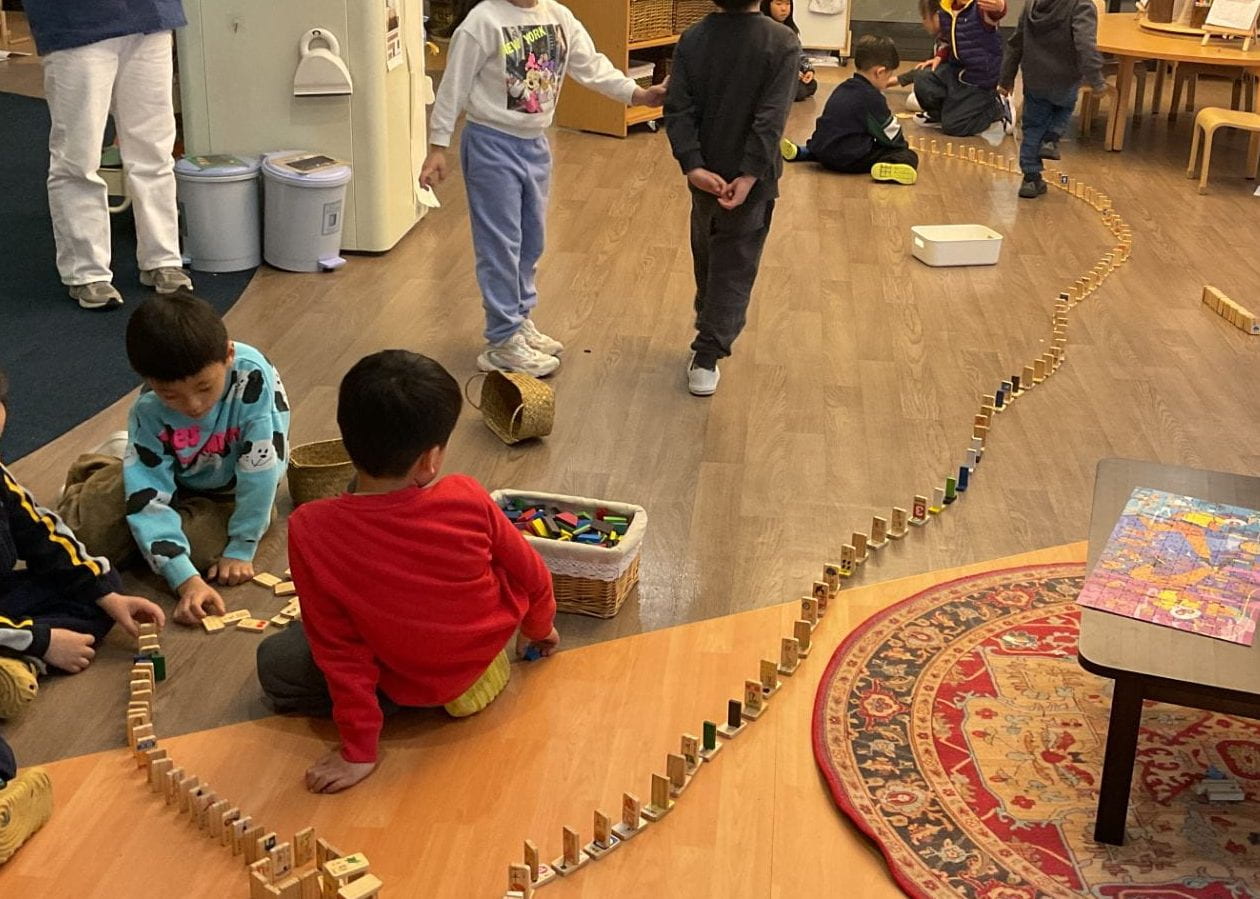
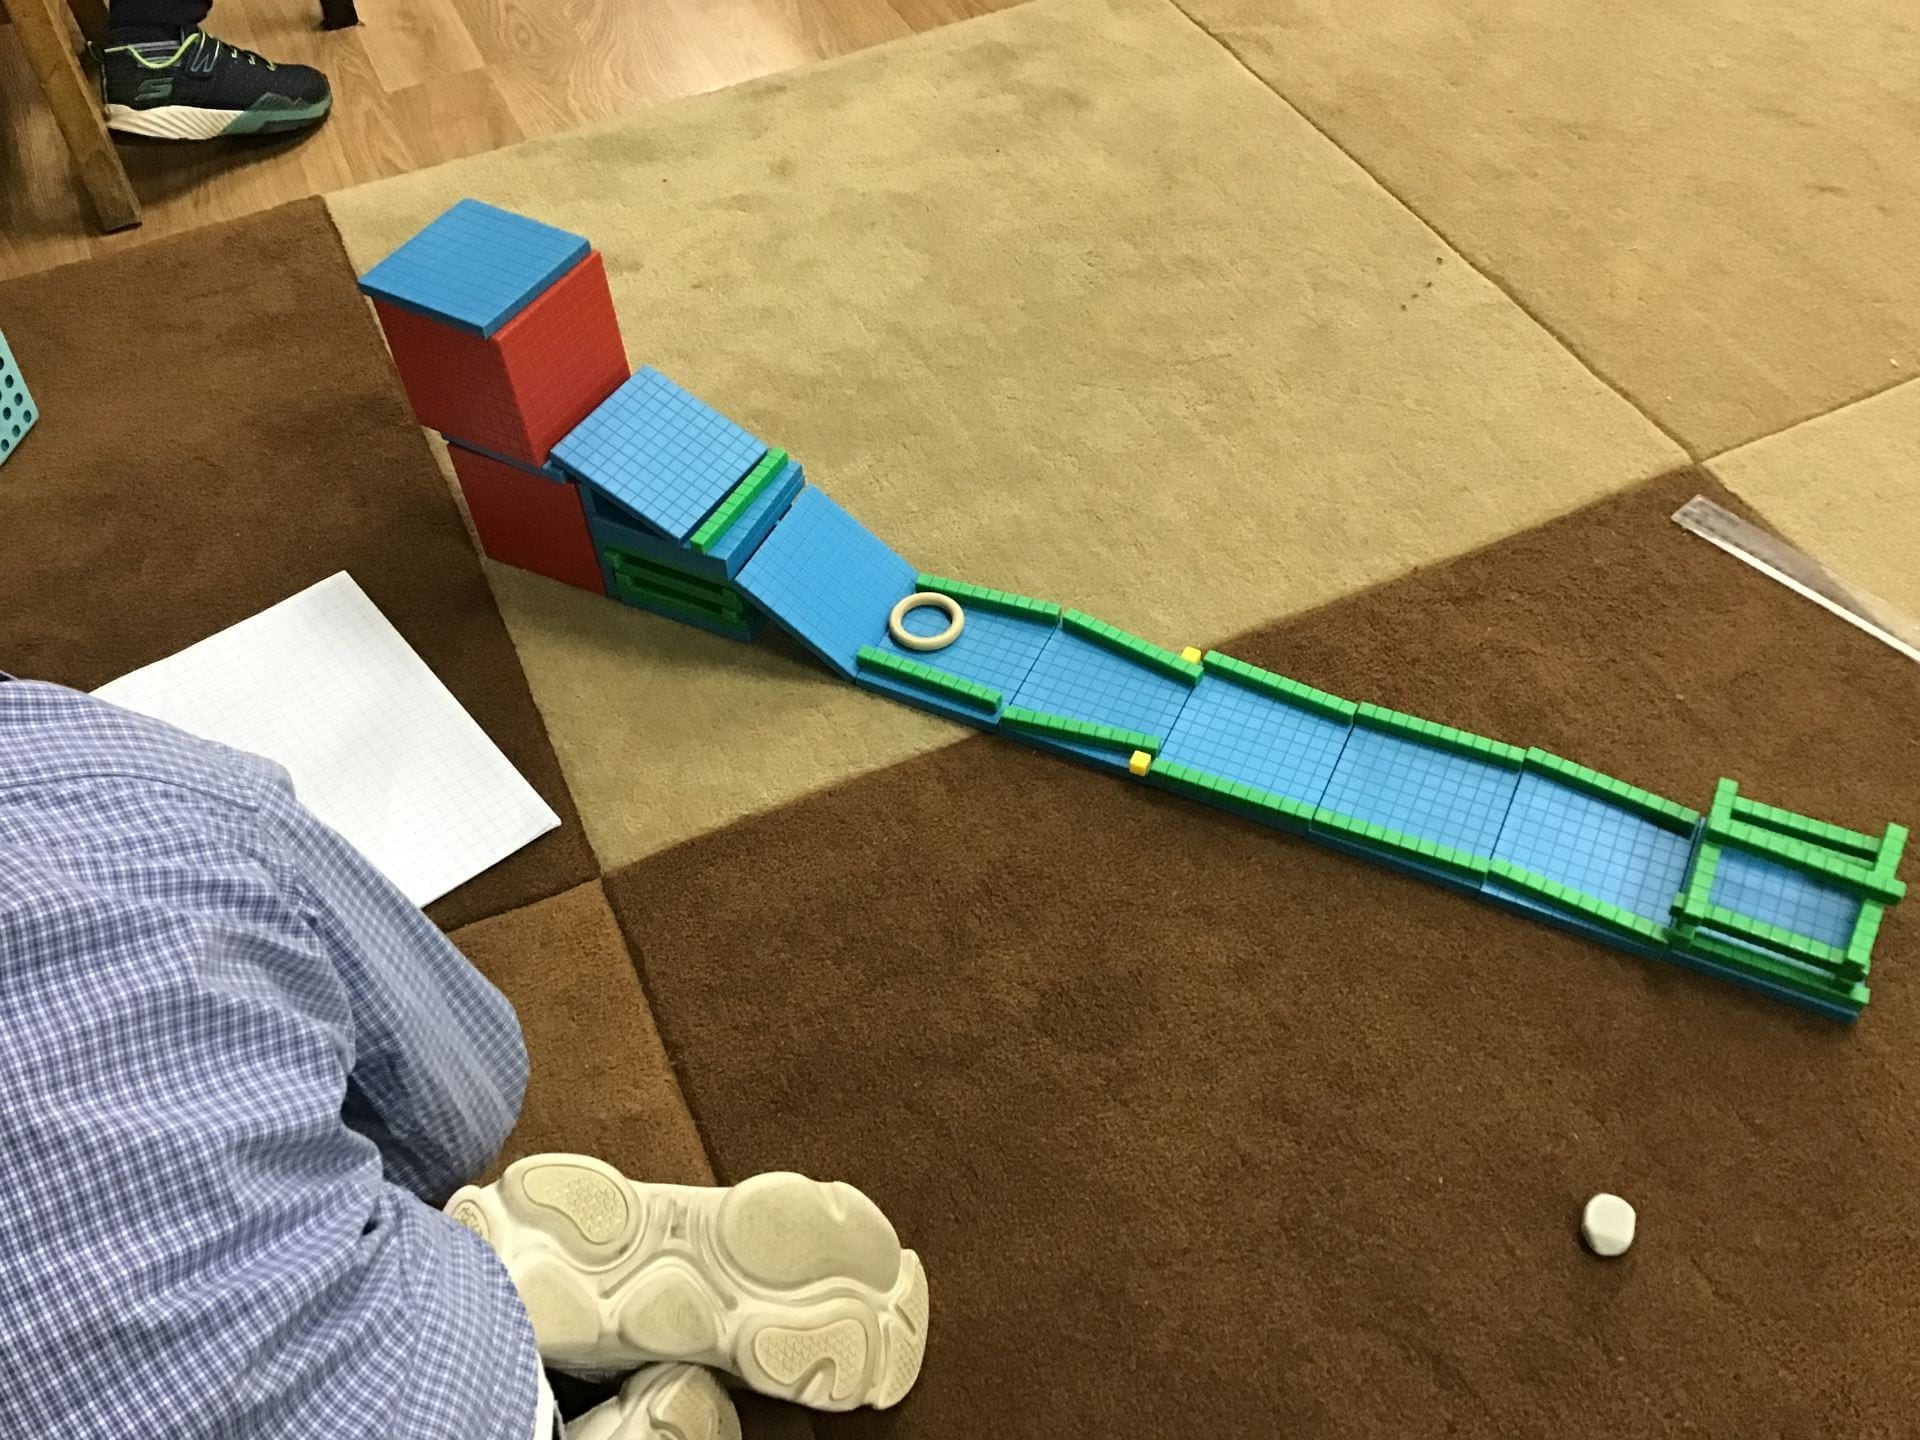
The team went back to work on the chain. They persisted till they created a long chain. More children wanted to join in as it looked like fun! The domino chain spanned the width of the classroom. The team was ready to test the chain reaction. Gently, they pushed the final domino forward hoping for the others to come crashing down. However, the chain reaction only resulted in a few dominoes falling over each time, which resulted in the team knocking some over until they reached the end.Isabella watched what was happening, she said, “They need to be closer or it won’t work!” Ciel agreed and shared his observation too.
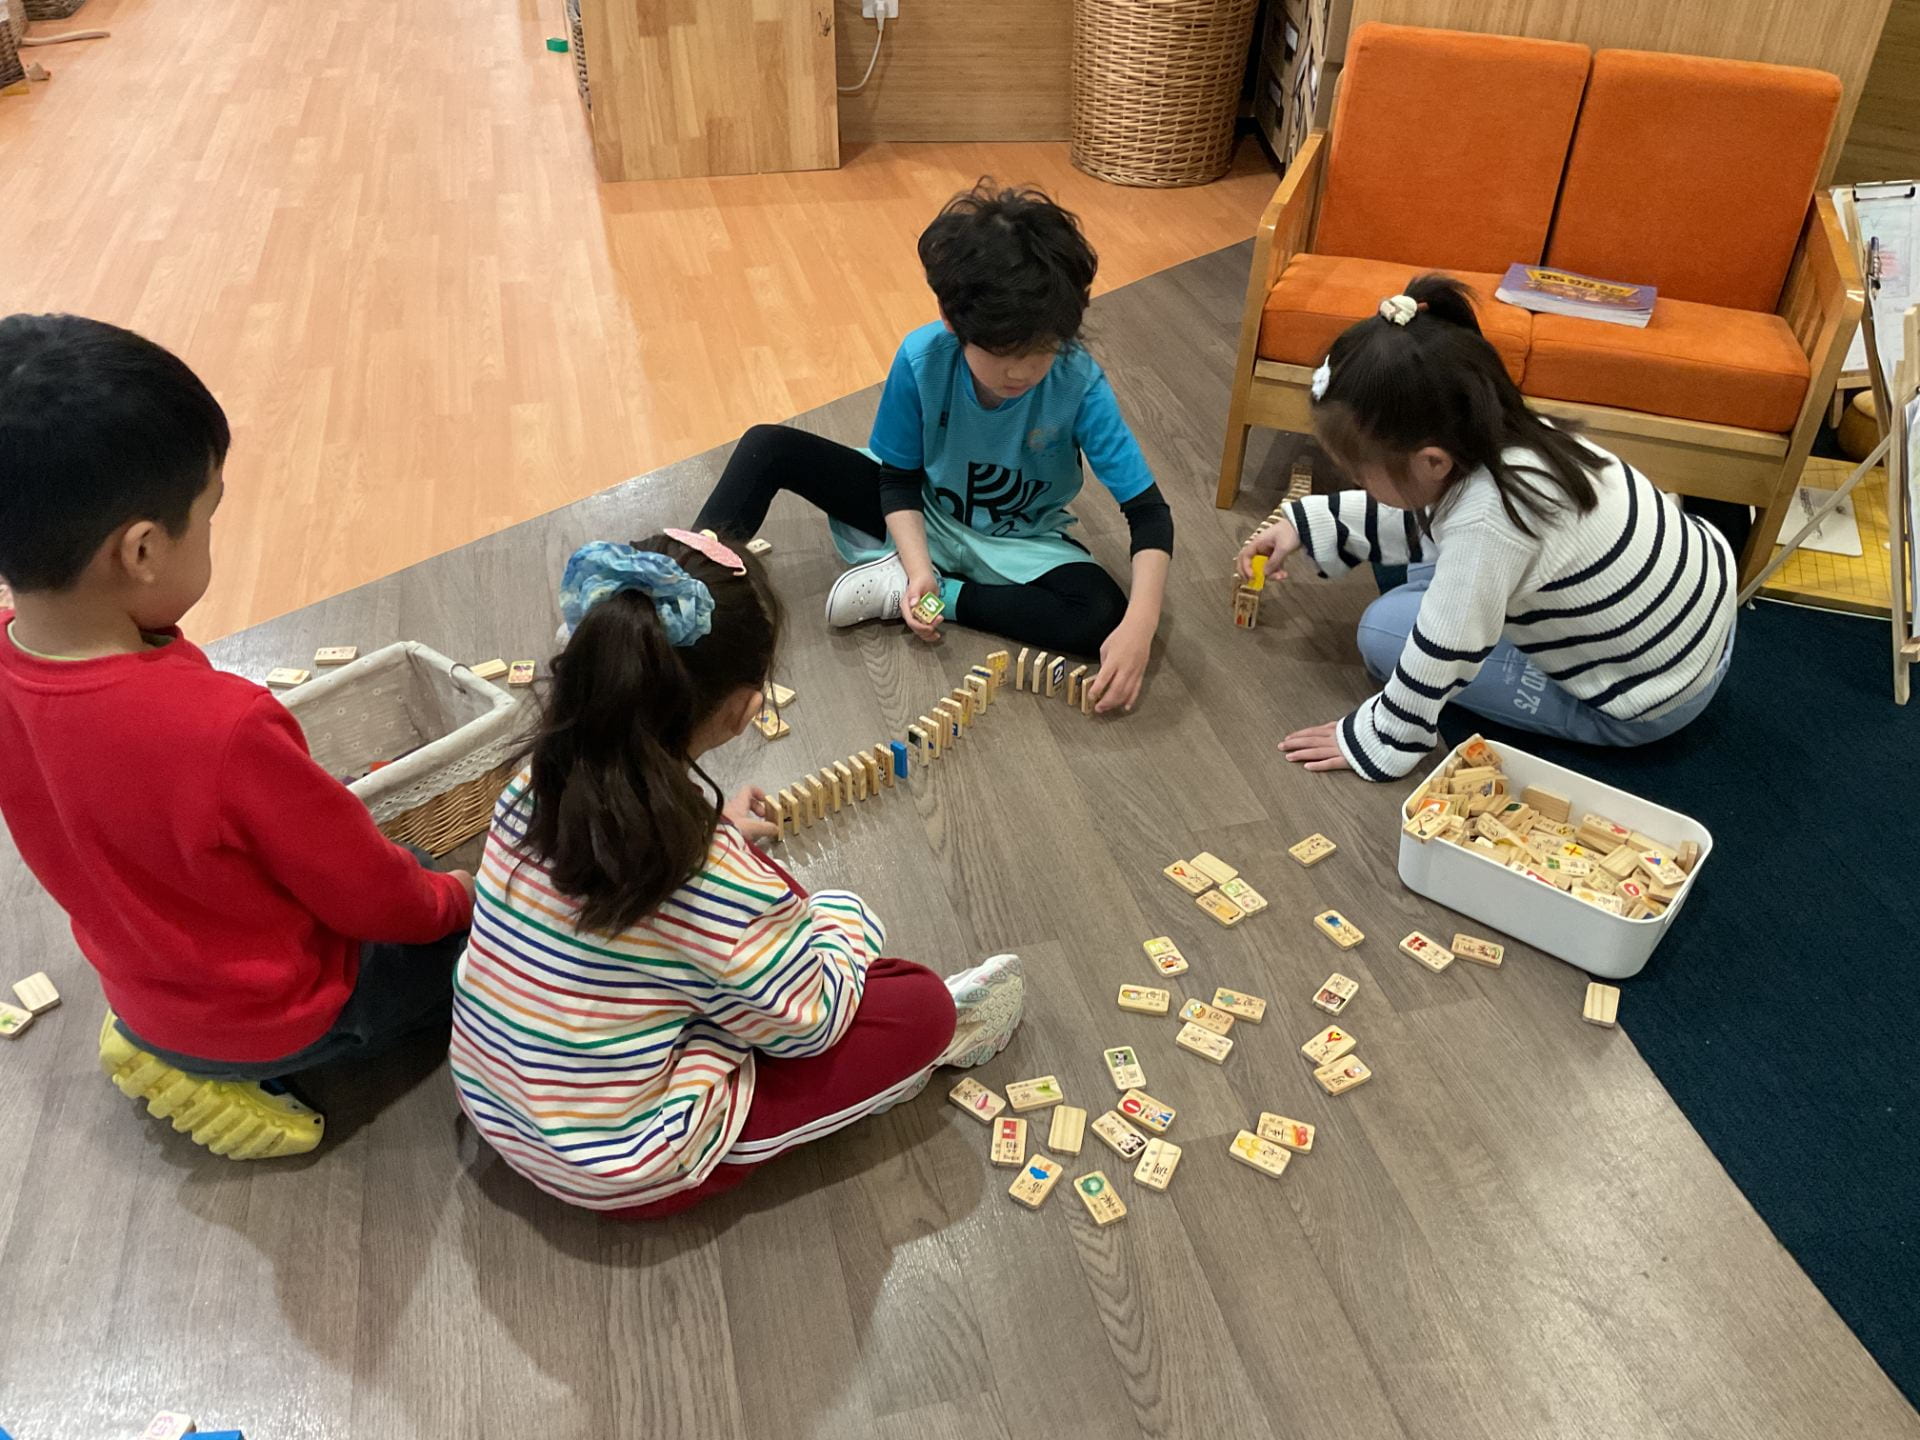
The next day Ciel went back to working with the dominoes. Others gathered around him and wanted to join in. They discussed who would use the different materials.
Ciel worked with Isabella. He made a few vertical structures, but they came down. Evan joined Isabella and Ciel.
Ciel “We can make a big circle inside the sofa!”
What information will help us create a successful chain reaction?
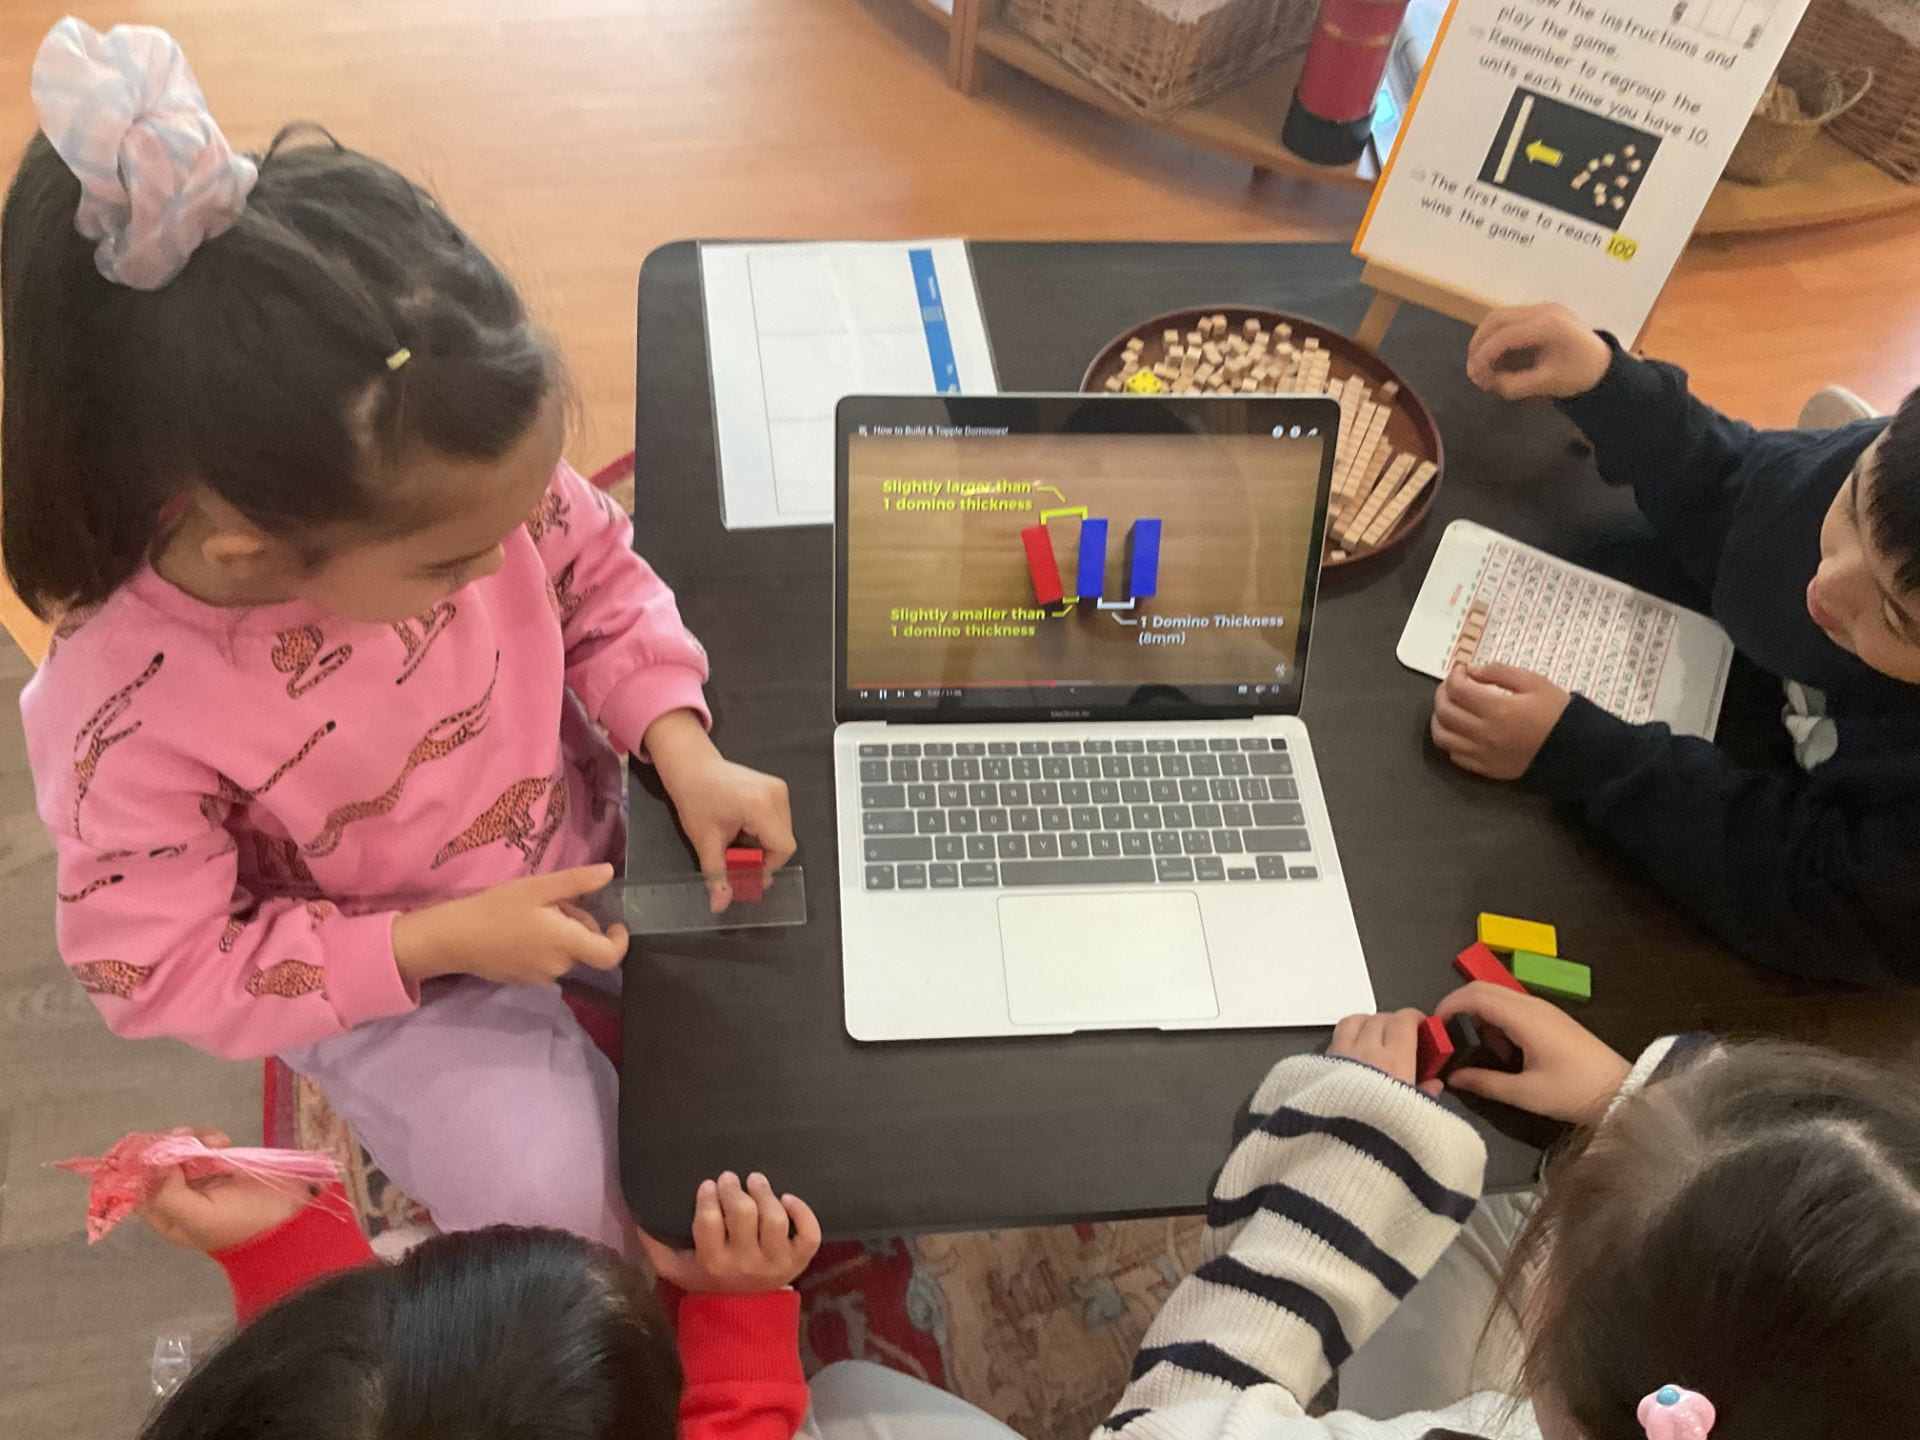
Over the next few days, the researchers continued to show their interest in creating the chain reaction. They wondered how they could create an effective reaction. Ms. Sophia suggested that they seek out more information to learn about the domino reaction. The team watched a video to see what they could learn.
Isabella “We are watching the video of making the domino video.”
Evan “Because we want to look at the dominoes because we don’t know what to build.”
Ciel “I see the dominoes standing straighly.”
Adalyn “We can look at the iPad we can learn how to build dominoes.”
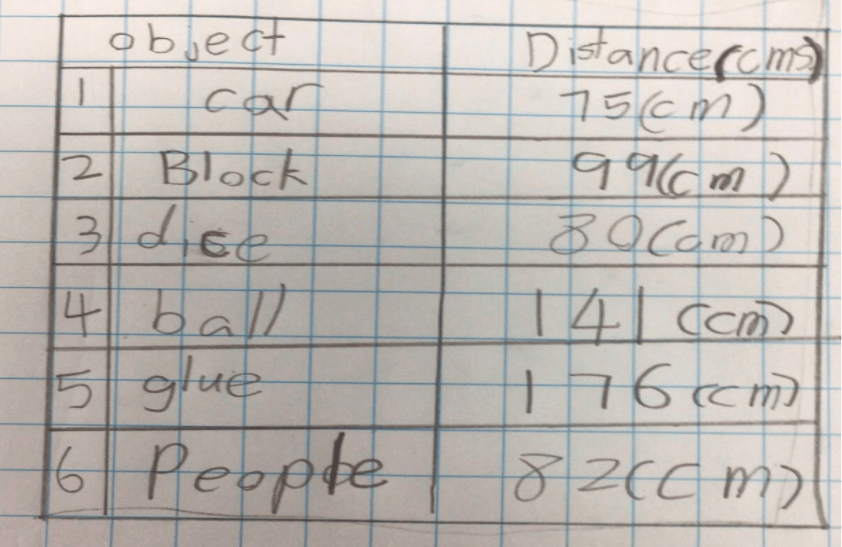
Isabella “When you put the dominoes you need to grab the bottom, not the top. If you grab the bottom it won’t fall down, if you grab the top it will fall down.”
Evan “When we are building the dominoes we need to put 2cms away from each other because if you do it too far away then only one will fall.”
Isabella “It’s 0.8cms, the gap so it can fall down. 2cms is too far. It won’t fall down.”
The team used rulers to measure the distance that was suggested in the video. Then, they tested some of their ideas to see if they would work. They carefully curved the edges of the ‘test’ chain, being mindful of the distance they needed to maintain between 2 Dominoes.
Isabella “We are trying to see if it can fall down. It fell down together.”
Ciel “We are going to build it to PreK-K1.”
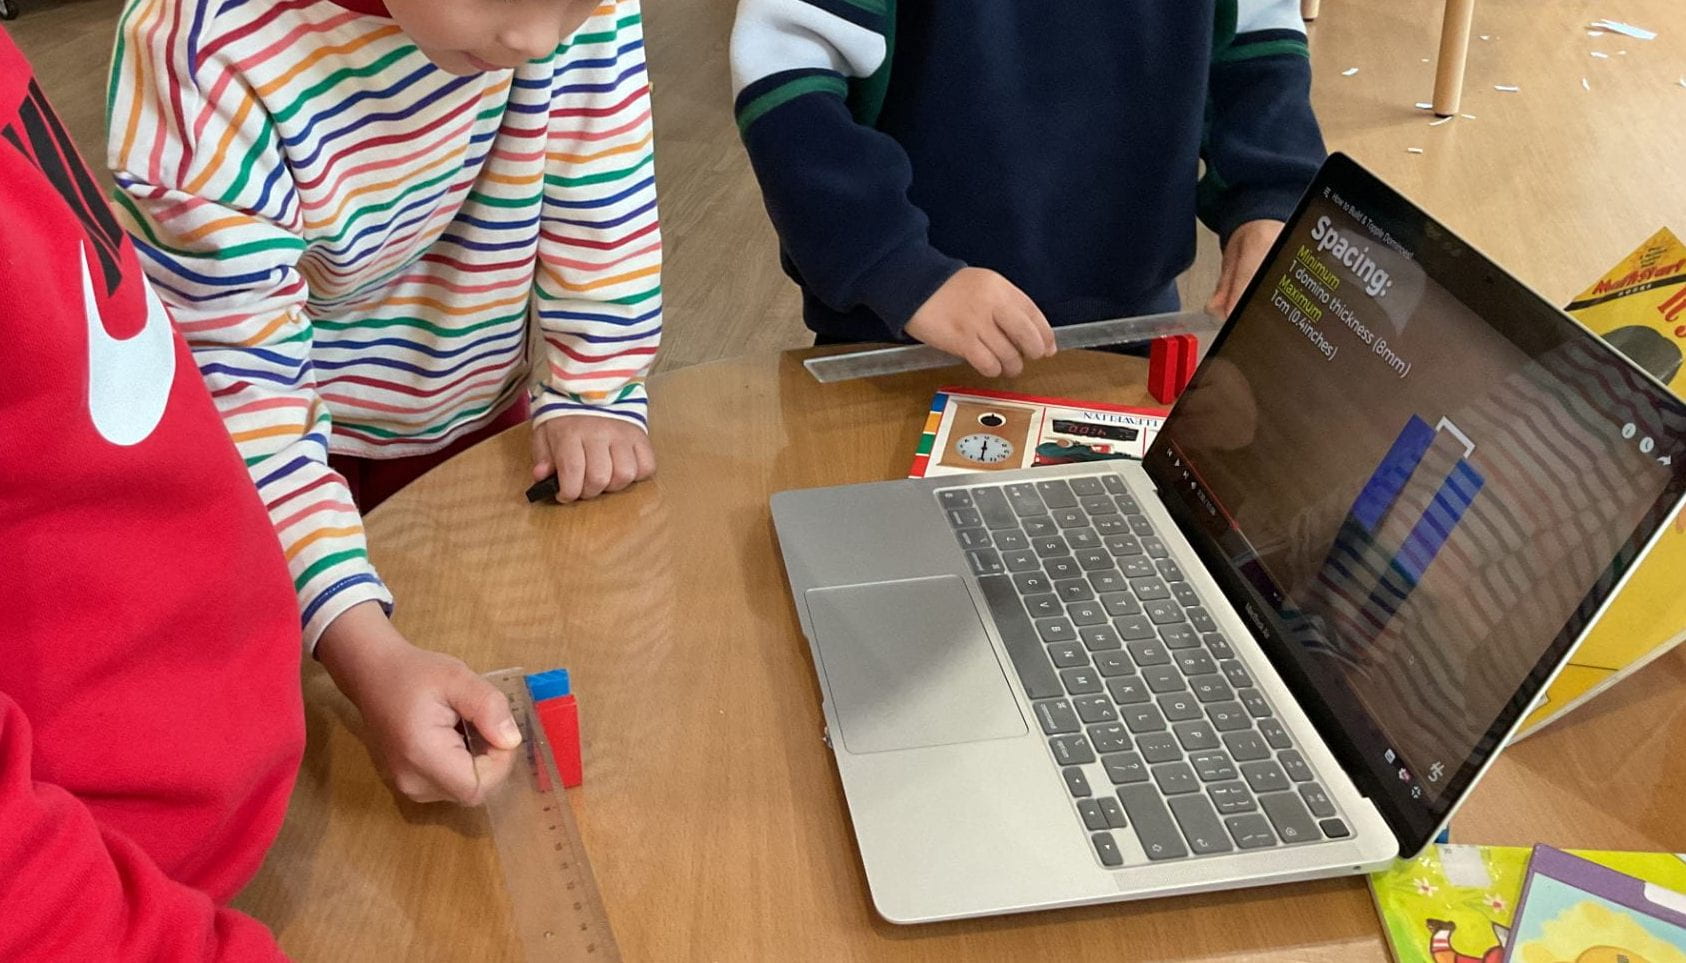
As Ciel missed out on watching the video the first time, he asked to watch it with the others.
Ciel “The dominoes need to have a 1cm space between them because if we don’t do that it will not fall. I learned how to make interesting dominoes. I can make it interesting by making some cool dominoes.”
Considering that the team have now learned more about creating the domino effect we wonder…
…what new information the team will need to be more successful.
…what strategies the children will use to change the outcome of the domino challenge.
…how they will collaborate, sharing their ideas and suggestions to work as a team.
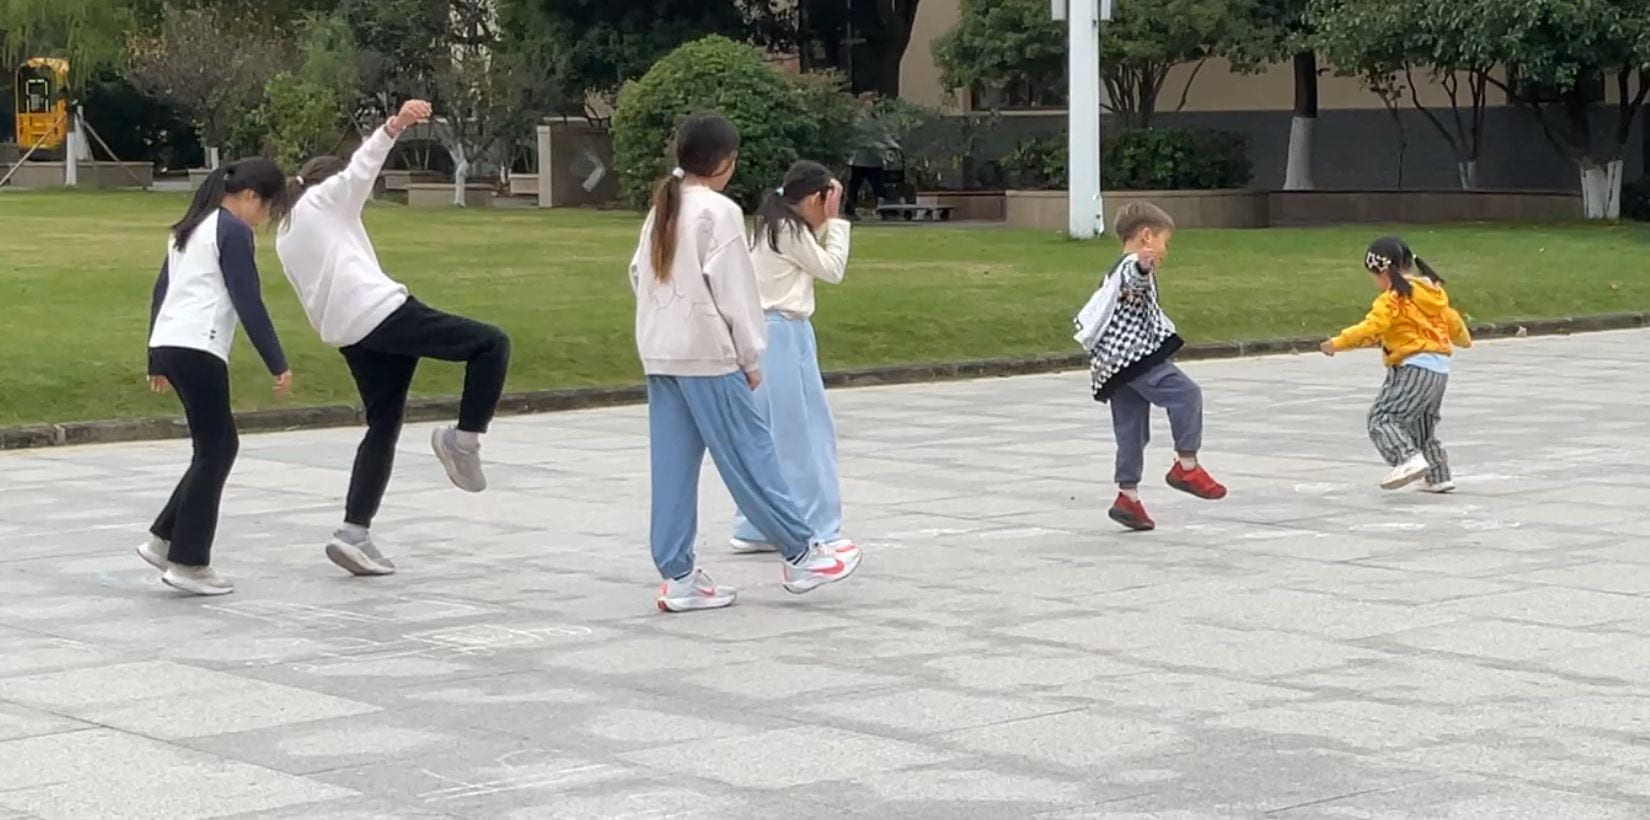
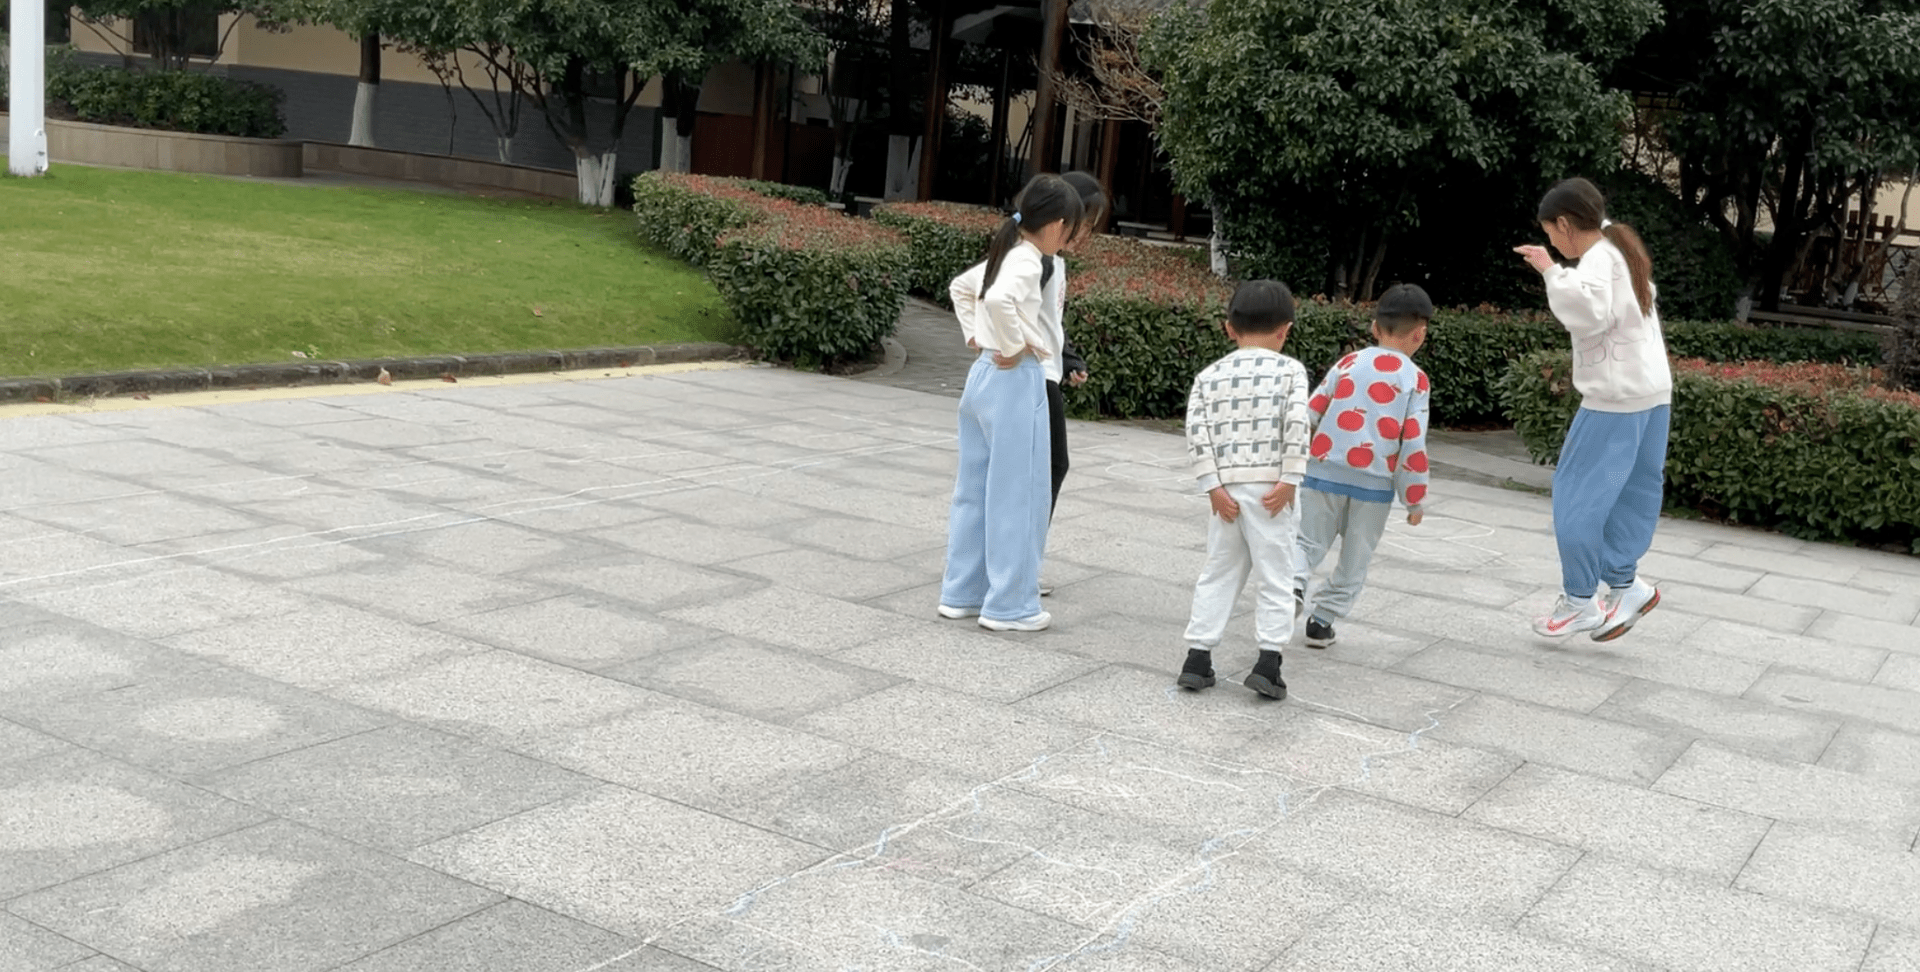
The Grade 5 students were excited to hear about our three-minute challenges and decided to plan challenges for their K2 buddies.
We joined Grade 5 outside the courtyard to play some of the games they had planned for us. The children in K2 rotated around the different stations, attempting to win points and some stickers as they completed the challenges.
The children reflected on the day’s events, sharing their highlights.
Suzy “We played a lot of games.”
Archie “We played tag. I like the tag game the most. Octopus tag with grade 5 buddies in 3 minutes challenge.”
Junsoo “We played ball game, and I like it the most.”
Riccardo “I like the ball game, because it’s challenging but I did a great job and I didn’t be tagged by the ball.”
Isabella “For the hot potato game, when the person counted down to 1, and someone was holding the ball, then he will be out of the game.”
Euno “I like the octopus game. Octopus game me run to the end and buddy catch people. They didn’t catch us. Then, I don’t know who wins.”
Ethan “I like the hot potato game because it is so fun.”
Adalyn “I like the octopus tag and I also like the one that has patterns on the ground and you need to follow the patterns to pop the bubbles. And the beanbag game is also interesting.”
Isabella “I like the pattern game the most because you can race your buddies and it’s easy for me.”
Suzy “I also like the pattern game because I like the bubbles. The bubbles were on the ground. You stand on it and it pops.”
Ethan “I like the tiptoes walking part and it was so much fun.”
Evan “The hot potato game looks fun because I like the ball game.”
Suzy “I did the pattern game in 3 minutes.”
Isabella “I also did the pattern game, the hot potato and the red light green light and I also played octopus tag and throwing the sand bag in 3 minutes. It was easy for me. It was a long time.”
Suzy “It was a short time, I did it in 3 minutes.”
Sea “I like the octopus game because they don’t tag me. I ran fast.”
Dahyun “I like the tag game because it was fun. I won 3 times. We got a sticker.”
We wonder how this experience will help them plan for the challenges they want to set for their Grade 5 buddies.
The children have been discussing the concept of ‘time’ while engaging in play and exploration. Often, they refer to time as being ‘long’ or ‘short’.
Suzy “It only took me two minutes to draw the love heart, that is a short time.”
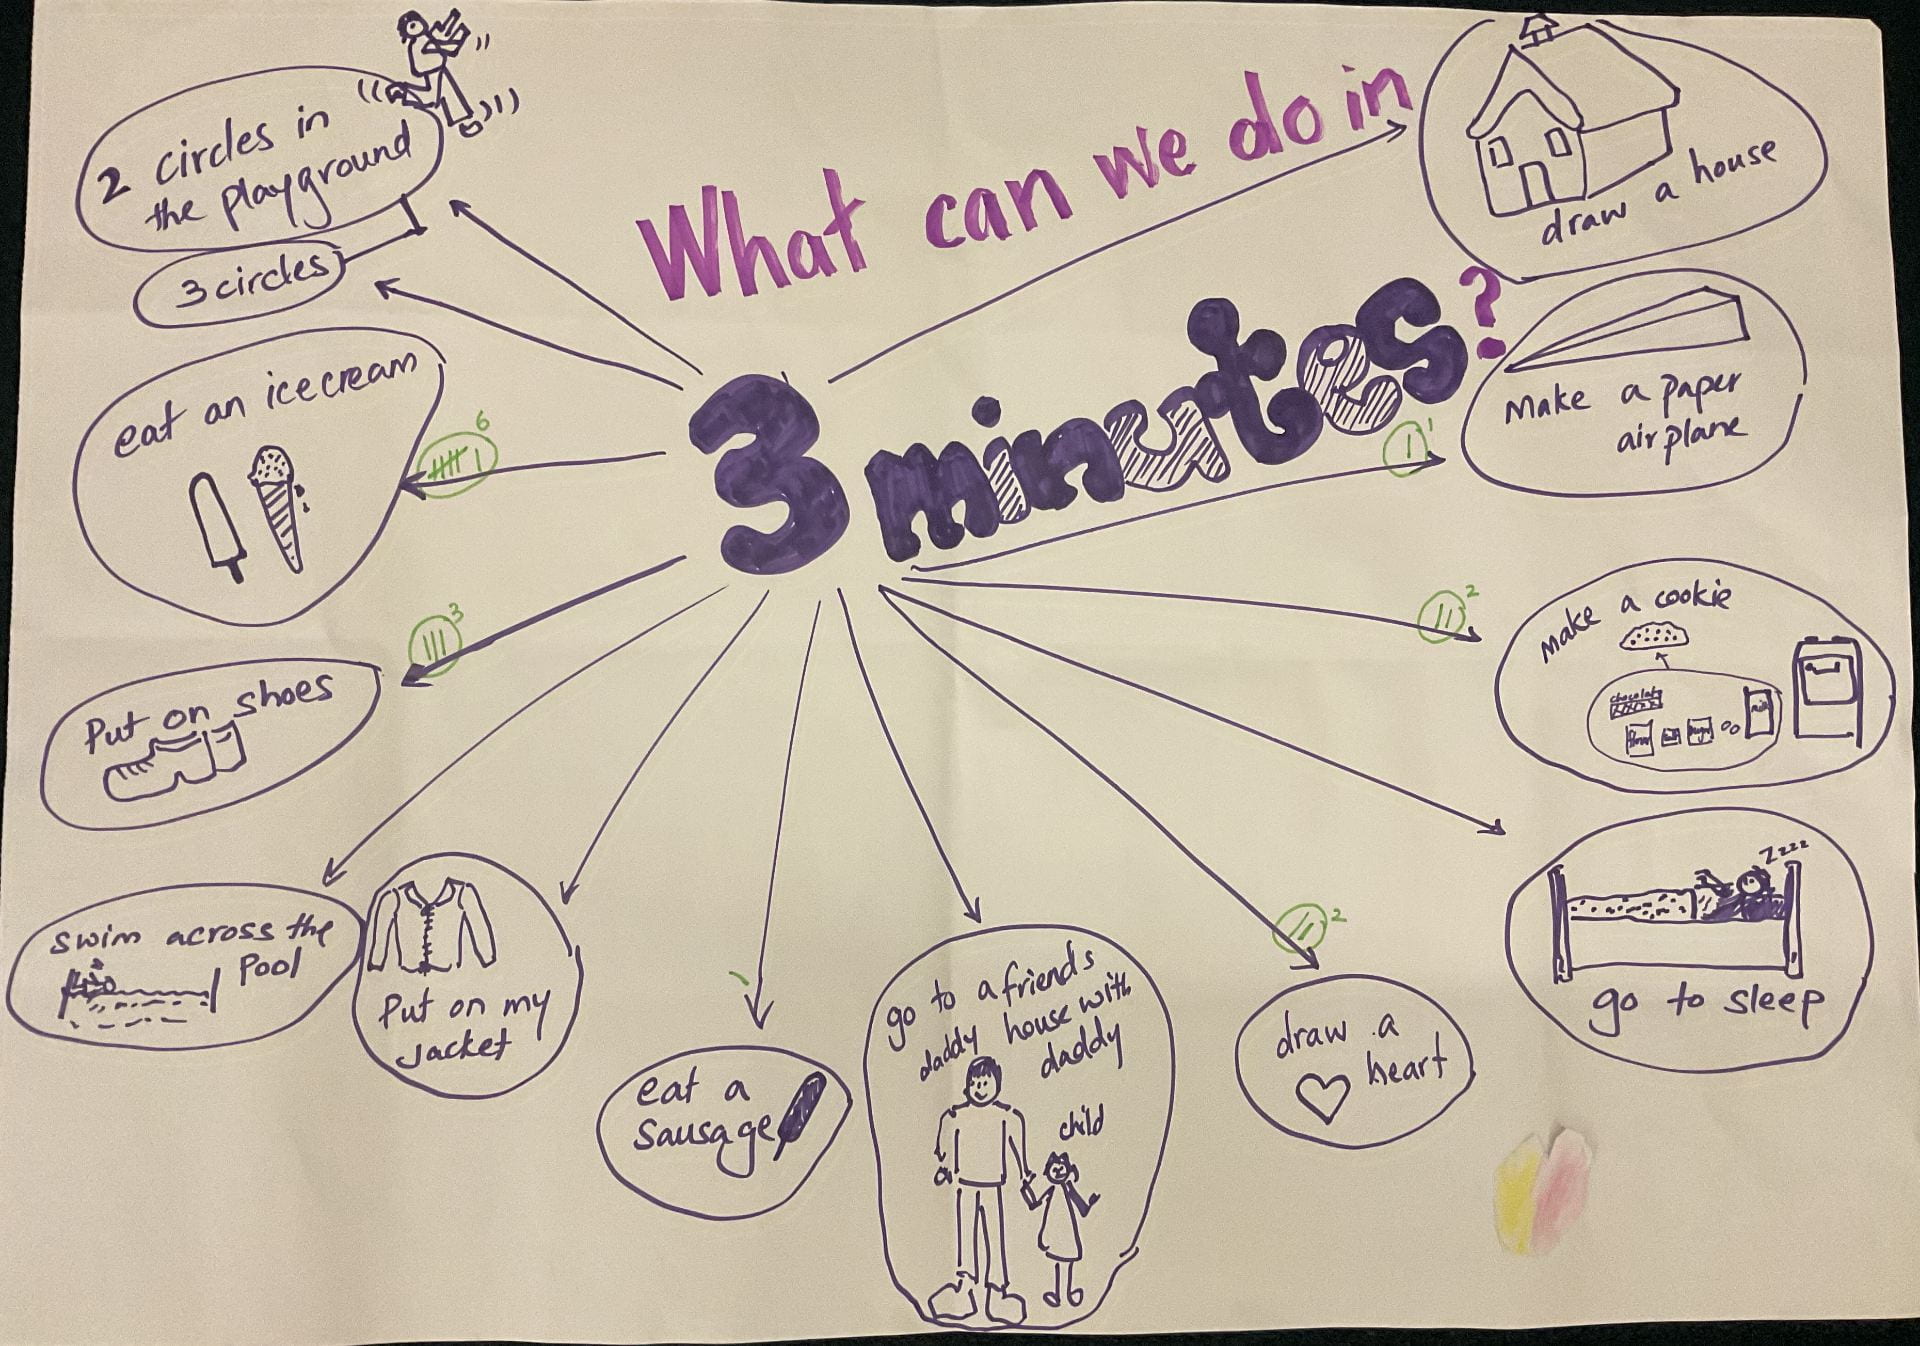
The children were interested in creating challenges to explore the concept of ‘time’. They were excited about the three-minute challenges they had brainstormed and voted on. We gathered to discuss the different ideas collected, noting them all down on chart paper to help us create a plan for our next steps. As the children discussed these ideas, we used drawings and words to document their thinking. We had 13 challenges altogether!
How would we decide which one to explore first?
We decided to vote on the different challenges to find the most popular. Making ice creams received the highest votes (6). The children had many different ideas about the ice cream challenge. They suggested purchasing ice creams from the café, and buying ice creams at the supermarket or McDonald’s. Having heard all the ideas, the teachers decided to encourage the children to consider the practical challenges connected with some of these ideas.
Where would we get the money for the ice creams?
What about the children who have different allergies?
What options for flavours are there at McDonald’s
The teachers decided to stretch the children further, to encourage them to consider alternate opportunities for learning.
Does anyone know how to make ice creams?
After some thought the children tapped into their prior knowledge and experiences from previous years. Isabella and Evan recalled making ice pops at school. They explained the process of making watermelon ice pops, preparing the fruit and using moulds and popsicle sticks to make the ice creams.
The children were excited about making their own popsicles. They discussed several ideas, including the flavours they could choose. Considering the many opportunities this project may have for the children to apply their understanding of concepts through their experiences and play, the teachers agreed to support the children in preparing for the challenge if they could come up with a plan for their next steps. They would need to solve some practical obstacles to make their ice creams and carry out the challenge. They would need to decide and plan how to purchase the items, the process they needed to follow to make the ice creams and how they were going to organise the challenge.
We wonder how the children would:
plan and follow through to make the ice creams (process)
document their thinking and ideas so others can understand and follow their process (representation)
consider and plan for the safe use of materials, resources and tools (safety, responsibility)
consider how to include their friends and the community in their challenges (inclusion)
collaborates with students, parents and other teachers on learning (collaboration)
The children were invited to take part in a paper airplane challenge. We decided to ask the children what they already knew about paper airplanes. They began to explain how a paper airplane is made.
As the children shared the different steps, we wrote these down as instructions. However, when we read the instructions to fold the paper, the children began to see that the instructions weren’t clear.
Evan volunteered to show us how to make two different types of planes. We invited him to share the instructions through visuals and words. As he presented the steps, we made the paper airplanes.
WHY?
Isabella “On Friday we can fly the paper airplanes so we had to fold paper airplanes and then we tried to throw it.”
WHAT?
Adalyn “We made paper airplanes. We folded the paper. It was a bit hard.”
Riccardo “I am folding the paper airplanes. Someone helped me fold because I don’t know how to do the paper airplanes.”
How?
Isabella “We folded the paper in half and then we folded into a triangle.”
Suzy “Fold 2 triangles over the top. Fold it again.”
Ethan “2 triangles 2 times.”
Evan “And then you fold the paper again into 2 more triangles. The triangles are inside another triangle on the top.
Isabella “Flip it over. And then, fold it in half.”
NEXT
Evan “We did a paper airplane race outside with everybody.”
Isabella “We were throwing the paper airplanes into the hula-hoop.”
Evan “We throw the paper airplanes to knock the Ping-Pong down.
Suzy “Taiping knocked it down one time.”
While inquiring about paper airplanes, the children used their thinking skills to tap into their prior knowledge.They observed carefully, making connections as they followed the steps to create the paper airplane. They listened attentively when information was shared. They used their communication skills to clearly express their ideas and next steps so that others could understand and follow the directions to complete the task. We noticed how the speaker or presenter slowed down, giving others time to process ideas and information. The children developed their self-management skills by paying attention, listening and then following instructions. When they noticed that their friends needed help, they paused to support and guide each other, which created a trusting and safe learning experience.
When testing the paper airplanes, the children explored aerodynamics and concepts of design, lift and drag, gravityand forcesthrough play and inquiry.
The tower in the block play area cannot be missed!!
It has been standing tall for a few weeks, with only its steeple toppling over on a few occasions when children pass by or try to adjust the blocks that support its design. We noticed the children adjusting the columns, replacing and testing out different shapes to see which ones offer better support. Through trial and error, the engineers developed and tested theories about balance, shapes and design.
They were now more intentionalwhen choosing the shapes for different sections of the tower. For instance, they realised that using broader, flatter shapes horizontally provided more foundational support and that they could make the steeple taller by using cylinders with a greater diameter at the bottom. Throughout the process of experimentation, the engineers discussed and negotiated ideas, looking for ways to work collectively to reach their goal, of building the tallest tower.
Through inquiry, we explored different ways to measure the height of the building. At first, the children used non-standard units to measurethe tower.
Then, a team uncovered the use of standard units and decided to measure the tower using a ‘flexible, long ruler’, a measuring tape.
The children shared estimationsof the height of the tower.
Then, we used the measuring tape to measure the tower accurately. The children were excited to learn that the tower was 190 centimetres tall!
During outdoor playtime, a group of children met Mr. Lee and explained that they had built a tower that was taller than him. Mr. Lee decided to check if this was true. As he stood next to the tower he asked, “How tall am I?”
The children were invited to use paper and black line markers to create a memory of their first day in K2.
They documented their ideas using drawings and labels. The children drew pictures of their friends and playtime. Blocks, Lego play and outdoor learning experiences were some of their favourite experiences of the day.
We look forward to observing how they document their learning throughout the year in K2.
A group of children have been working together to create a house, which they named ‘The Octopus House‘. They used their imagination and experiences to inform their art-making.
While building the house, we observed the group sharing and listening to ideas presented, then using a range of materials to improve the different elements in their creation.
Working on one creation can be challenging, problems require solutions and disagreements need to be worked out.
We saw the team work through these different challenges, persevering and then celebrating their final design. Finally, they presented their creation to the class. The architects were invited to keep a record of their design using their visual arts skills.
We noticed how they thought about and used shapes, colours and mark-making to record their creation on paper. These creative experiences allow the children to collaborate, persevere, listen, learn and have fun together.
The teachers noticed that a group of children had been interested in making their games during inquiry playtime. They often used recycled paper and cards to design and create their games.
Recently, the Grade 4 students visited K2, to ask the children about the arcade games. This was connected to their Unit of Inquiry ‘How We Organise Ourselves’.
First, the Grade 4 students conducted a survey, to learn more about the younger children’s interests in games. Then, they returned to create a list and gather feedback to learn “What might make the game fun?”.
Jeongyoon “Rules and tag.”
Motong “If we don’t have rules and we don’t know how to play.”
Oxford “”
We noticed that the children continued to refer to the ‘rules’ in a game. We wondered if the children were making connections with the games they play in their P.E. class, as conversations at the end of the lesson highlight important behaviours that make games fun and engaging. The teachers decided to dig deeper, to learn more about the children’s thinking. The teachers decided to ‘use the discussion to generate new ideas and investigations’.
Why do we need rules in the game?
Jeongyoon “If the game has no rules, it’s not a game, because it’s not fun.”
Motong “Because we don’t know how to play if we don’t have rules.”
Oxford “Rules let us know what we can do and what we can’t do.”
The children highlighted the ‘function’ of rules in the ‘organisation’ of a game. Then, the children drew the games they liked on large chart paper. We noticed that many of the games had mazes. Was this something that interested the team?
We discussed the kinds of games the team would like to make for the other children in the EY. We wondered…
How might we gather information to learn about the games that the EY children like to play?
What does a game need to have to make it exciting and fun?
The team gathered to discuss their next steps. Could we use a survey or draw some graphs to show our findings?
Oxford chose to create a survey that included three games. He planned to ask the children in the EY to choose their favourite game, to help him decide which game he was going to finally make. The three games to choose from were ‘Whack-a-Mole’, ‘Maze’ or ‘Treasure Hunt’.
Motong chose to create a survey with three choices of games for children in the Early Years. His games were ‘Car Race’, ‘Solider Game’, ‘Code Guessing.
Jeongyoon chose to use the maze game and decided to write some questions that would help him find out how he could make his game fun for the children in the EY.
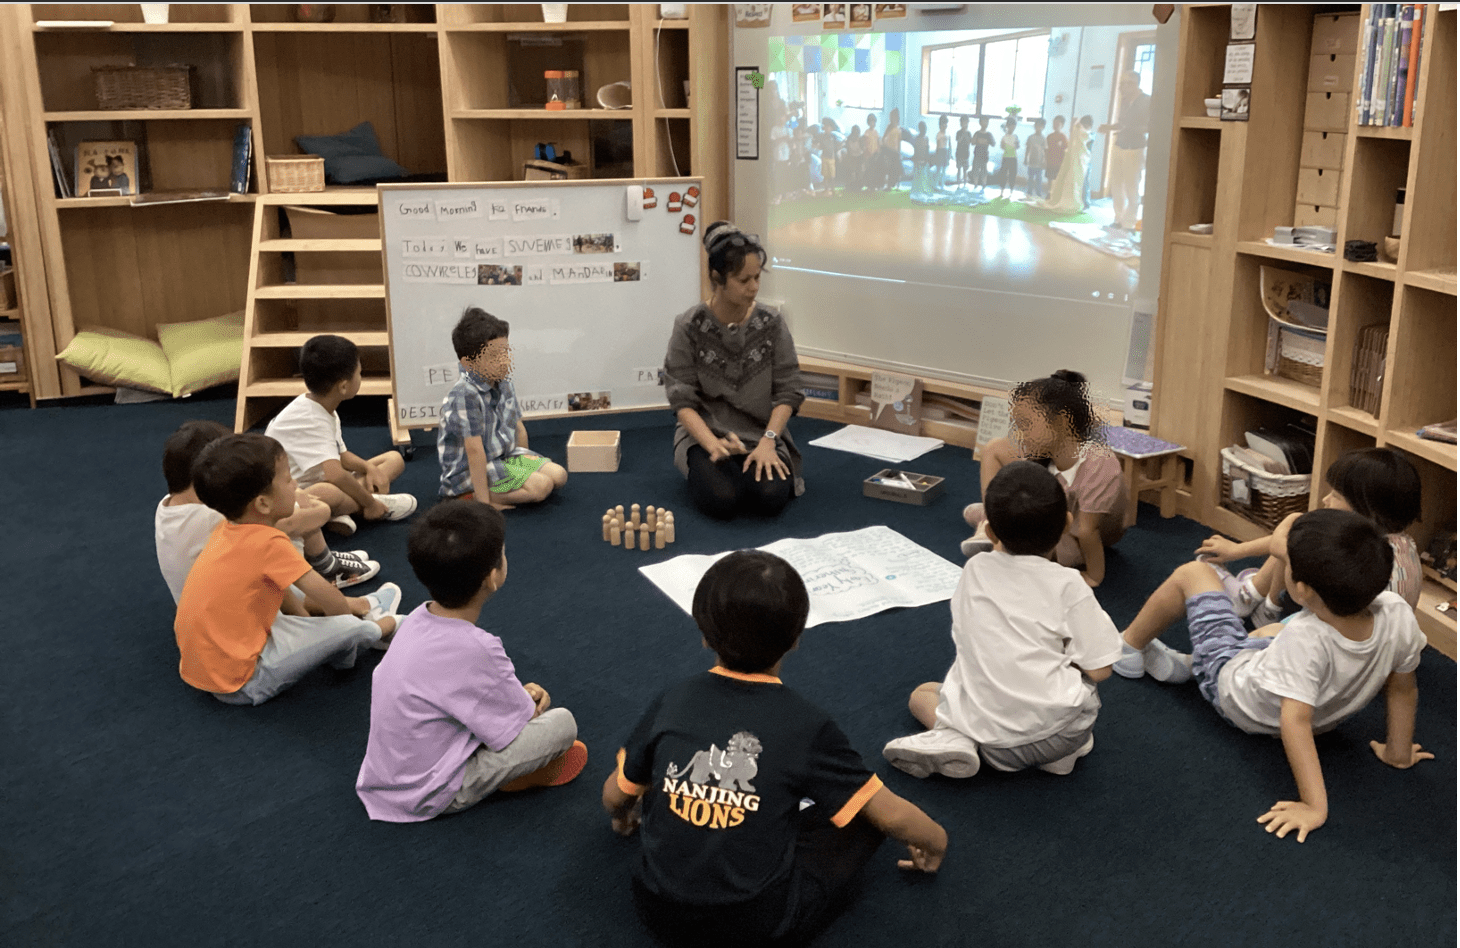
It was time for us to gather at the Piazza, a gathering spot in the Early Years Centre where we come together to sing dance, listen and connect with others. This morning we began with the song and ended with a dramatic story. The teachers took videos and photographs of the Early Years gathering, to help the children reflect on the morning’s activities.
Next, the children were invited to draw what they saw, heard and felt while they were together as a community. We listened to the children’s ideas and wonderings. Some guiding questions encouraged the children to think about the purpose and ways we come together. We paid attention to common themes and ideas that the children presented through their drawings and discussions. When the children watched the video, they told the story of connection, fun and laughter.
We noticed that the children were beginning to talk about agreements and behaviours that would make the EY gathering a positive experience for everyone.
Some suggestions were:
Choose a good sitting spot for listening (respectful listening).
Sit in a circle, at the edge of the last circle (including everyone).
Talk and sing together (enjoyment, connection).
Listen to instructions so that everyone knows what to do (listening for information).
Use a speaking voice when we speak and a singing voice when singing.
We wonder…
In what ways do we come together with others?
How did we feel in different situations where people get together?
What makes something a good experience?
This led to a conversation about the different situations that bring us together.
The children explained that we come together to…
sing
dance
read
play games
talk
We documented our ideas on chart paper to help us think about the ‘purpose‘ and ‘ways‘ we come together. We decided to use photographs to document our thinking.
Every Friday afternoon, the adults and children gather on the green doughnut to sing, dance and be with each other. We took some time to reflect on the time we spend together.
What do we do during our EY gathering?
What behaviours help us have fun together?
The children discussed their ideas and then made their thinking and ideas visible on paper.
As a class, we took time to reflect on what the children said. We documented these ideas on chart paper. Next, we discussed suggestions for the EY gathering.
What would YOU like to do more of during this time?
Make things with paper
Plant seeds and plants
Show different things to the EY community
Share how we do things
Draw
Read books
Play with balls
Build things
Going forward, we wonder how we might use some of these suggestions to make our EY Gathering an exciting, fun learning experience.
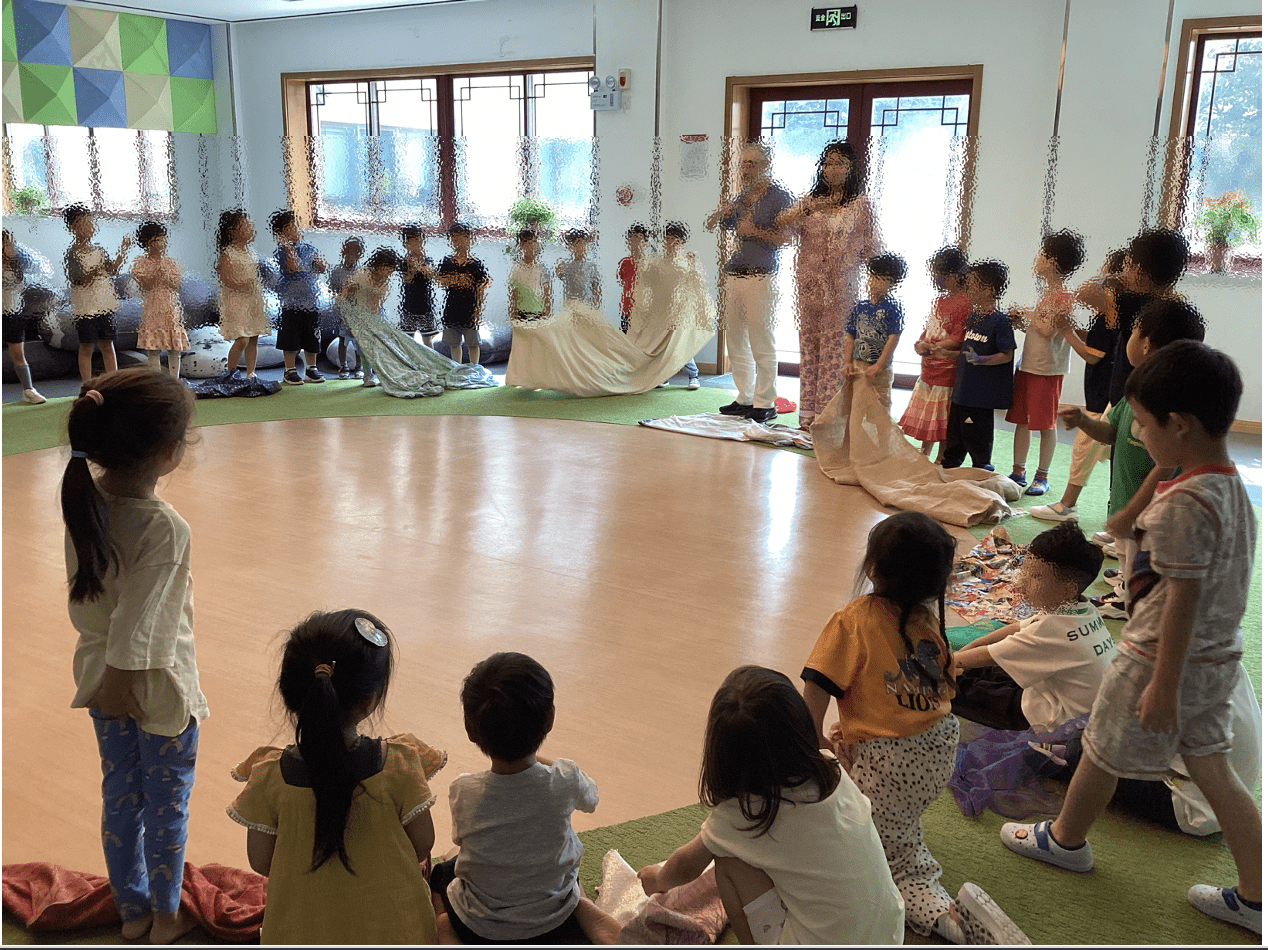
The storytellers drew their ideas for what the stage might look like. Ms. Heidi came in to show us one way to present using sound, props, musical instruments, costumes and a setting.
She invited the K2 storytellers to think about her performance piece and how some of the ideas she presented could be used in the K2 Showcase.
– What ideas could we use?
– What NEW ideas do we have?
We could:
make our own sound effects
make the sounds of the animals
use our own voices to make sound effects
be the animal characters
3 people can make the sounds and one person can show the puppets
divide the jobs
make puppets in our group and have a group sing a song
make our own props
make our own backdrops or settings
make the stage look like the setting
use props and fabric to tell the story
use puppets and plastic animals
Two groups presented their storyboard 2 ideas to Ms. Heidi. She gave them feedback and made some suggestions.
Together, they brainstormed ideas for the:
cast
props
sound effects
backdrop
and decided how they wanted to narrate or ‘tell’ the story.
We are excited to see the different ideas the storytellers have thought about as they use the Performing Arts Creative Cycleof planning, practicing, polishing and performing to help them create and present their K2 Showcase.
The groups convened with clipboards in hand to talk about their ideas and put them down on paper. They sat around chart paper, using pictures and words to share their ideas.
Many of the groups discussed characters and settings. We noticed the children collaborating, looking for ways to include and weave in ideas suggested by others.
We noticed the children being open-minded and inclusive, using a common language and gestures to share their ideas.
The chart papers were overflowing with suggestions. Scary, funny stories began to emerge.
At the end of the session, the children gathered to talk about their next steps. A challenge was to identify the ‘plot’ in the story.
What was going to happen in the story?
How do we know what happens first, then, next and finally?
The Storyboard
The next day, Ms. Heidi joined our planning. We revisited what we did the previous day.
Jessie “We went into groups and drew different things and shared ideas.”
Then, A few groups shared their ideas for stories.
Group “Snowman, people and bugs that bite people. It is on a mountain.”
Ms. Heidi “Think about how many characters you need to have in your story. If we have 5 people in our group, we might want to have 5 characters. The narrator might be there to tell the story.”
Group “It’s in a castle. We have ghosts and germs.”
Group “Our story is in the rainbow and a roller coaster. We have rainbow ghosts. Rainbow ghosts and A robots.”
Mr. Seth “You have lots of characters and lots of settings. We have a beginning, the middle and an end.”
Created by Mr. Seth
Mr. Seth introduced a ‘storyboard’, a way to plan a story.
The children went off into their groups to create their storyboards. The teachers checked-in with the groups to listen, suggest, brainstorm and provide feedback.
The children worked hard to include different ideas while thinking of the flow of the story.
We continue to talk about the sequence of a story, the plot and end.
How can we make our stories more interesting?Our collaborative storytelling continues…
“Children have an innate need to inquire into the world around them, to try to make sense of it and learn about it. Often this important inquiry takes place in children’s play.” Almon and Miller, 2011
Nothing lights up the brain like PLAY. The children were invited to ‘play’ with this wonderful material that works so gracefully in the hands of the creator. These experiences help the children develop a predictable cognitive sequence they can apply when they encounter anything new: to observe, question, explore, reflect and repeat, to develop understandings about materials and their possibilities.
First, the children got their aprons on. They helped each other with the challenging velcro strips and moved over to choose their clay.
Then, the children prepared their spaces for research. They chose table top potters wheels, a number of clay tools, wet sponges and rolling pins. The child sized potions of damp clay were wrapped in wet cloths and kept in a plastic tub to maintain the texture.
Time is of great value. The children were given plenty of time to explore the clay. They used their fingers and tools to dig, pat, poke, roll, crumble and mould the clay.
Children need to have time to be confident with the materials so that they have time to formulate hypotheses and then test their hypotheses.
After an extended period of play, the children were invited to use the tools and materials at their fingertips to create clay portraits. They had previously used card and black-line markers to create self-portraits. They looked carefully at their sketches and were excited to use a different medium to create their own clay models.
When it was time to clean up, the children worked together to wash the tools and clear away the resources and materials they had used. Maker-centered learning experiences give children agency and empower them to take responsibility over their own learning.
We will continue to explore the possibilities of this wonderful, creative and versatile material.
Through these experiences, the children had opportunities to:
engage with, and enjoy a variety of visual arts experiences
select tools, materials and processes for specific purposes
use their imagination and experiences to inform their art making
The children hurriedly entered the Atelier eager to explore tools and materials, excited to create and learn more about this design studio. The Atelier is a place that exemplifies the creative processes not just with art.
The creative processes are part of every language. The culture of the Atelier invites and encourages the different languages of expression. These 100 languages of expression demonstrate a high degree of learning with equal importance and value placed on play, the product and the process of learning for children and adults. Learning is always interdisciplinary, crossing boundaries between many different subjects. It is a place for active, independent and collaborative learning.
Children develop a range of skills and knowledge through their research with materials, tools and the environment. They test their theories and develop understandings about concepts such as artistic form, change, connection, creativity, appreciation, form, process, light, image, colour and technique.
The children transform into storytellers and explorers through the language of watercolour🎨.
We sat down to share our thoughts on ‘whenand why’ people come together.
Morning Greeting, Morning MeetingEach morning, we come together to greet each other. We sit in a circle so that everyone can see the speaker. Our time together helps us connect with each other. When we greet our friends, we look at each other, use a calm voice and respectful language. Our names are special because it helps us identify each other. A person’s name can also have special meaning or story attached to it.
Kenan “Sit on the blue carpet because I need to make a circle and talk to friends.”
Patrick “We talk about ideas.”
Tracey “We are going to a circle to say ‘hello’. We said ‘hello’ with a butterfly. We wave hands.”[with action]
Noah “It’s Morning Meeting.”
Patrick “Every morning we say ‘hi’. We feel happy. When someone says ‘hello’ to you, you say and it will take you to a good place and you will be excited.” [points to his heart]
Olivia “Because say ‘hello’, and ‘good morning’, morning we go to school.”
Tae Woo “Ms. Eileen is greeting. Like a butterfly.”
Through this experience, we learn to value our diversity and appreciate our uniqueness. This is a wonderful opportunity for us to learn about our community and to find ways in which we might be connected.
The Fire Drill
This week, we had an announced fire drill. Before the drill, we talked about the different safety measures we take when the alarm goes off.
During the practice, we took a picture of K2A while they were sitting together silently.
The image was presented to the children. The children quickly explained “we know it means the fire is here. Not a real fire!”
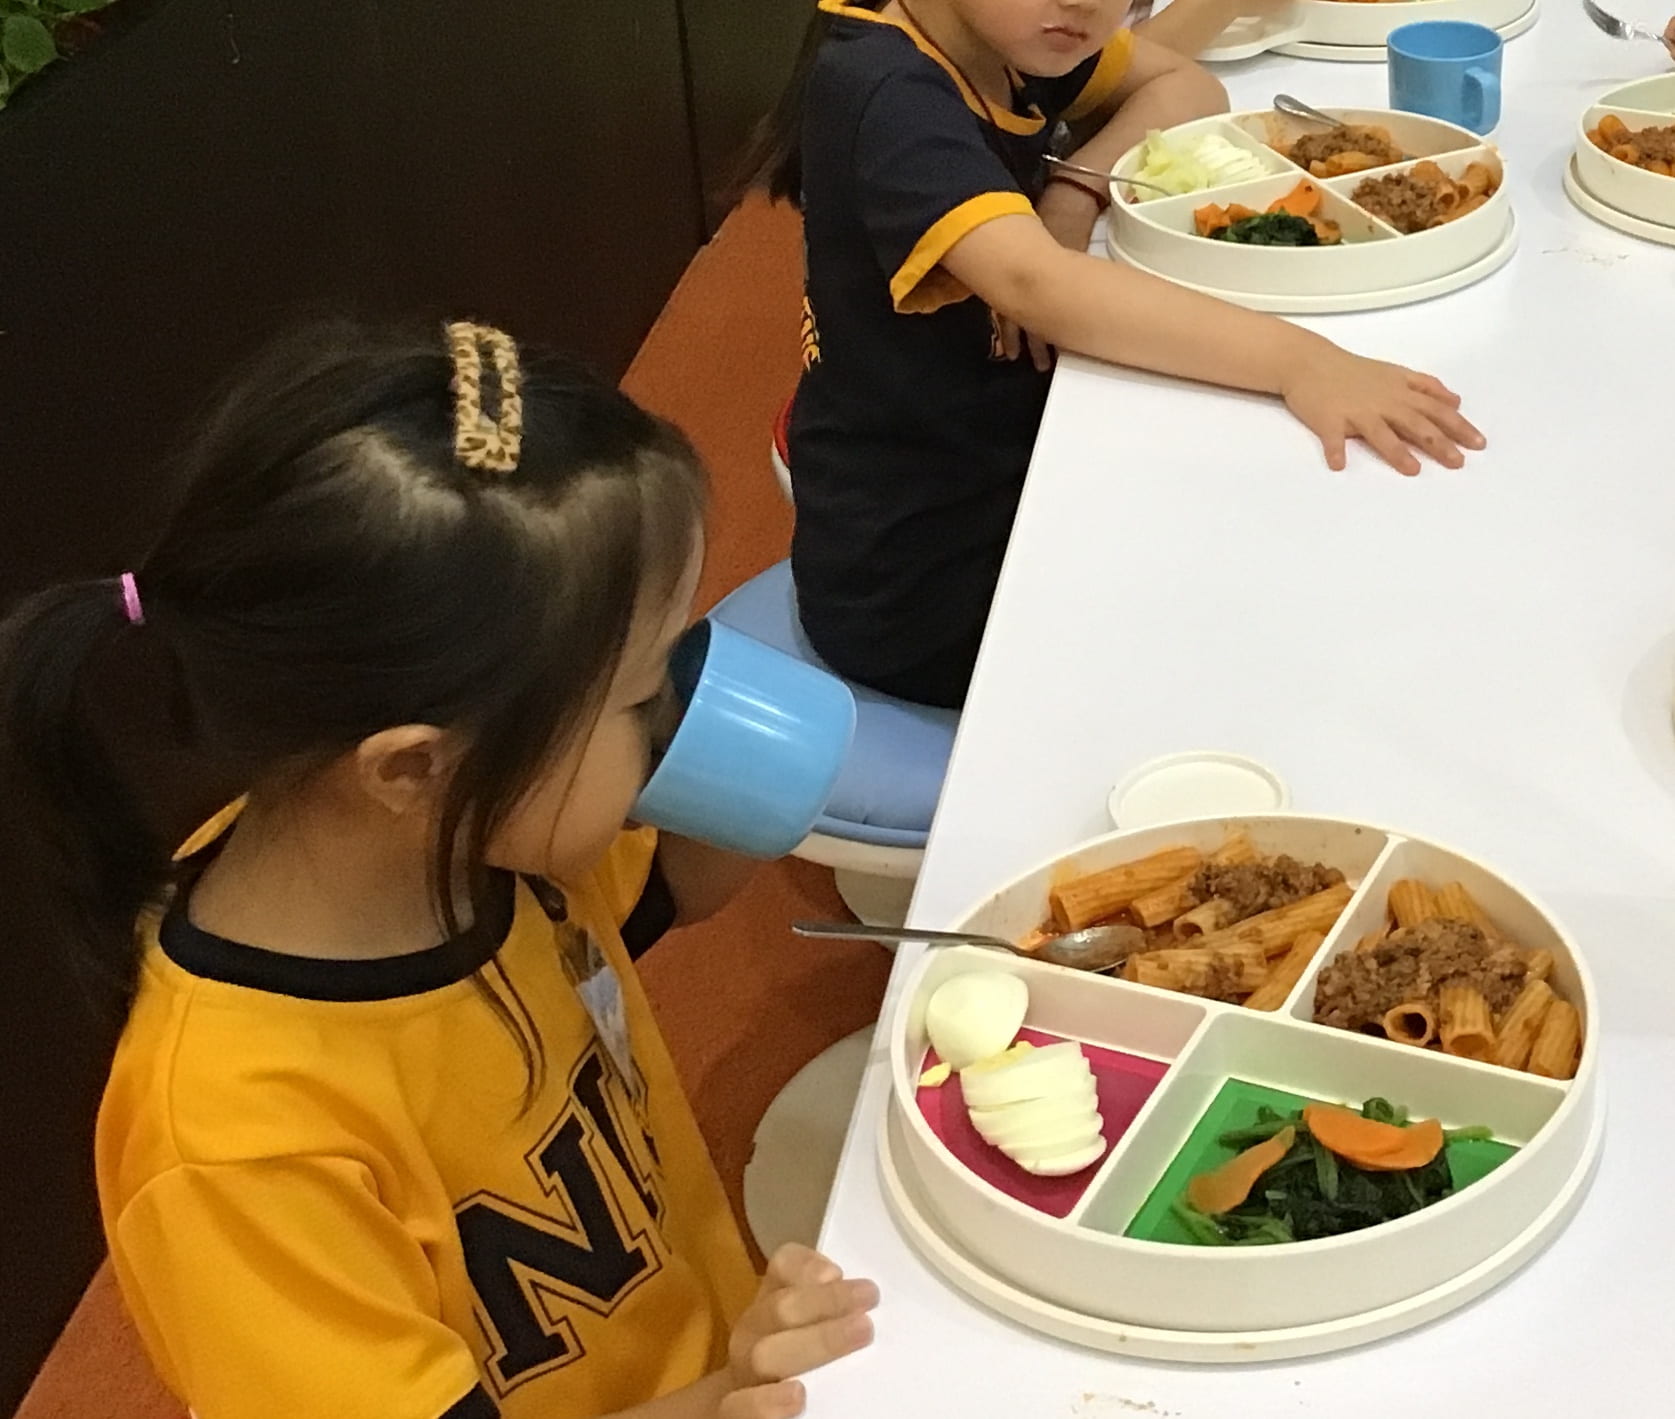
Snack Time
Doho “Everybody is hungry.”
Sean “Eating snack.”
Kenan “Everybody is eating on the blue carpet.”
Patrick “We are on the blue carpet. We wash hands and then we take snack box and then we eat the snack. But now we eat in the book space.”
Olivia “Because eating fruits.”
Patrick “The trash is on the blue carpet so we need to tidy up and clean.”
Noah “We clean up. We fold the blankets. We put it where it belongs. Then we have Morning Meeting.”
Lunch
Chloe “Eating lunch. Wash our hands, its dirty. Wash hands in the toilet. Stand, line up. Lunch in the red box. Take it out. Eat the lunch. Drink the milk.”
Eunice “Finish and put it away. And line up. I put away.”
Kenan “First line up. Then go to lunch. Then, we can finish and then go back to class. Everybody cleans up because eating the food is everybody.”
Cleaning Up
Tracey “We are together playing.”
Mason “Clean up because too messy.”
Tae Woo “Cleaning.”
Olivia “We cleaned up because we played with block toys.”
Mason “If you don’t clean up the things will lost.”
Patrick “When you don’t tidy up other play it’s a mess and cannot use it to play. The people who play with the toys they go away. And now another people cannot tidy up it. We are happy then we can play again.”
Allen “Very tidy.” [in Mandarin]
Andy “Everyone is tidying up. After cleaning up it will be very tidy. And people will find the things they need easily.” [in Mandarin]
Sean “Tidy up blocks and animals. Animals in basket.”
Noah “If the toys are lost then we can’t find it. Then we lost them. We will feel sad because we lost one. We clean up so they don’t lost.”
We noticed that we come together:
to be with people
to talk to people
because it makes us feel good
to greet each other and share information
to be safe
to eat
to work and celebrate special occasions
to read and learn
to clean up after play
We wonder how we might create opportunities that bring us together.
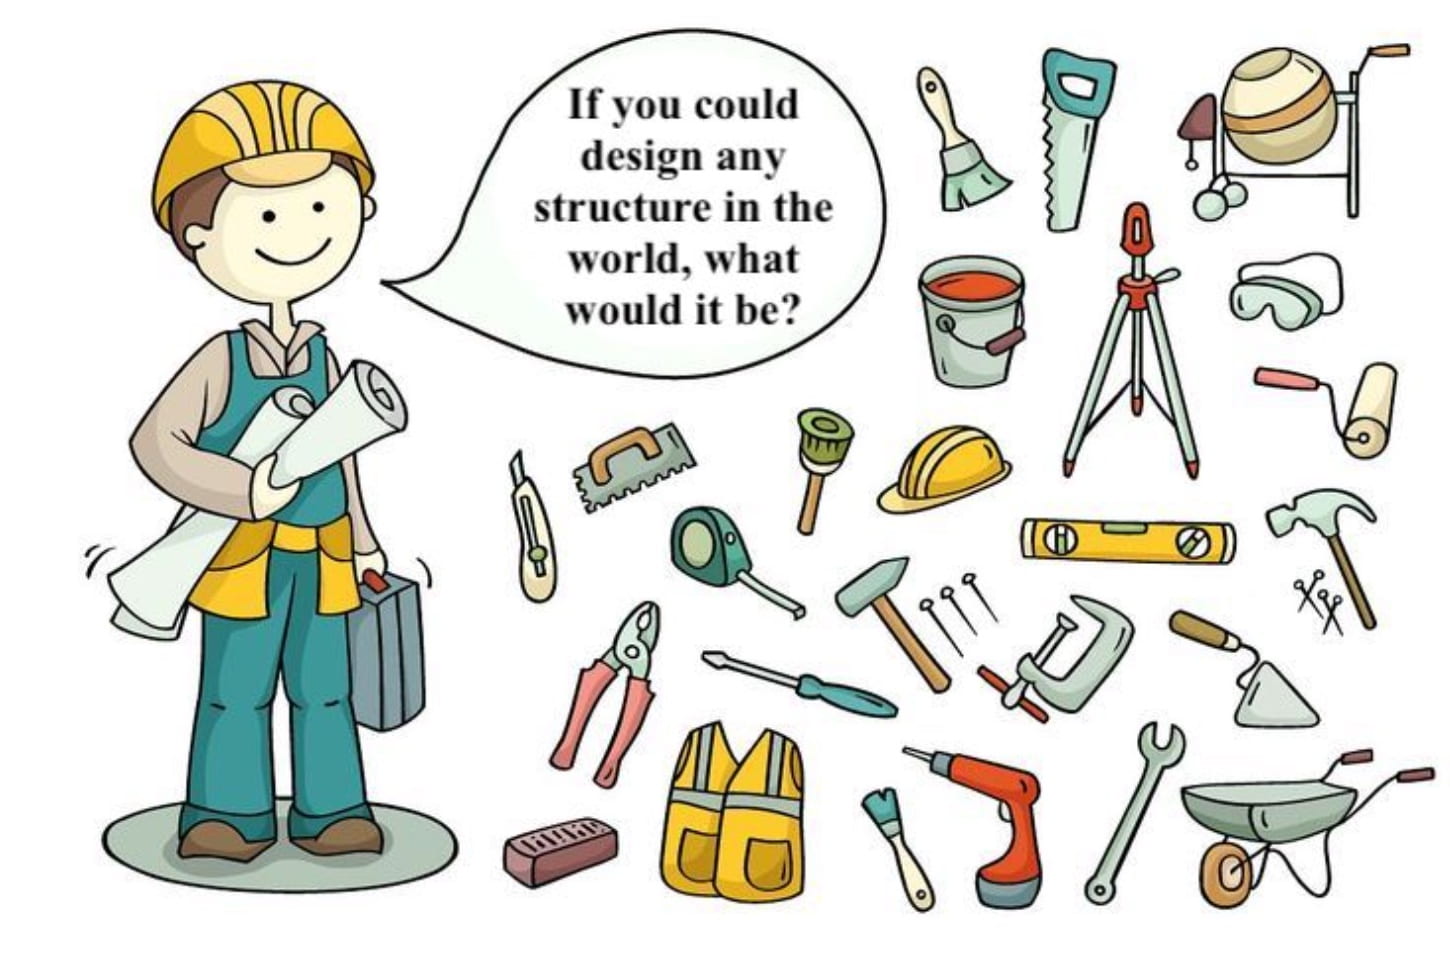
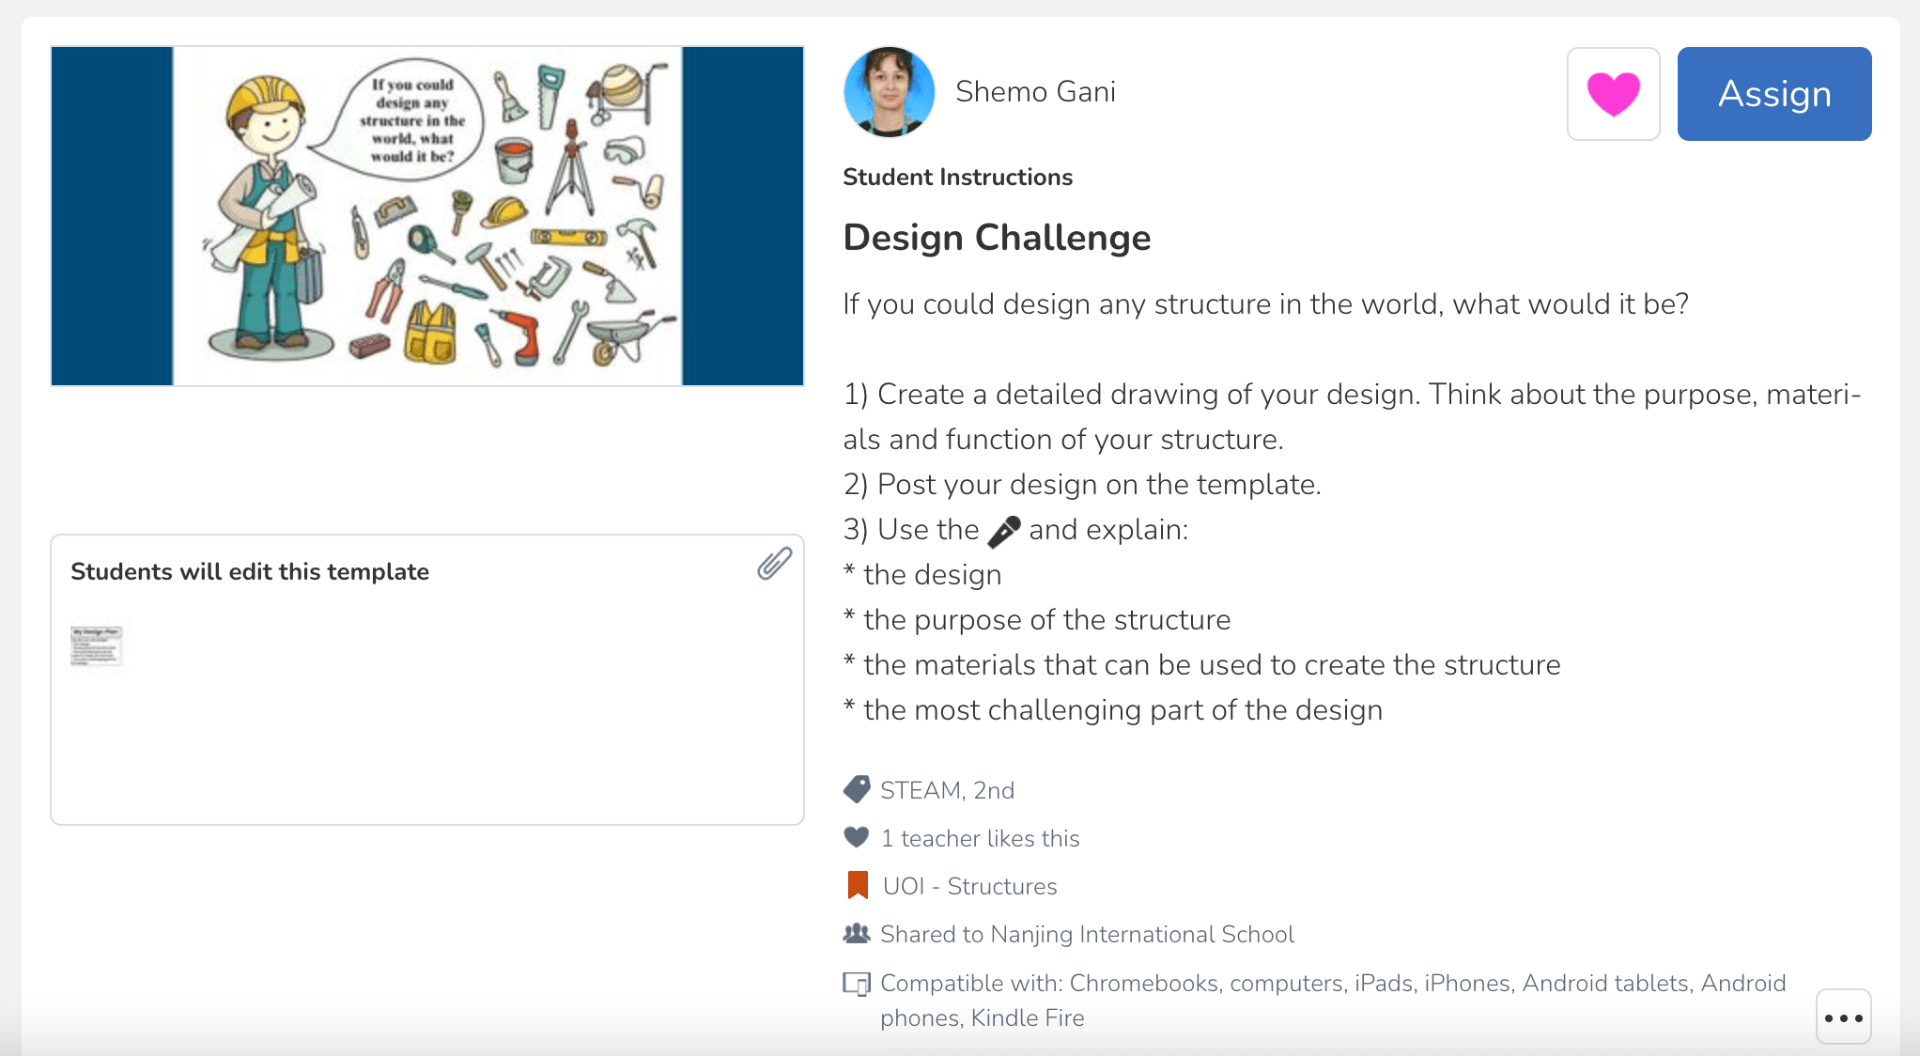
If you could design any structure in the world, what would it be?
The students began to create their design plans, labelling and providing important information about the ‘purpose’ of their structure.
Challenges and Obstacles:
The students shared their first plans with a learning buddy. They interviewed each other, asking challenging and thought-provoking questions about the design, materials and its purpose.
Then, they were encouraged to think about the ‘challenges’ or obstacles they foresee in their own design. They identified this using a red sticker. The students presented their challenges to the class.
Their next step would be to create a prototype of their design. They would need to apply the knowledge they have about materials, and use the skills they have gained through the different design challenges they have experienced during the unit, to complete the task.
Conceptual Understandings:
– we solve problems during the creative process by thinking critically and imaginatively
Your task is to PLAN and then use any type of Lego or any other building material to CREATE a home for the SNOOP family. They have made a list of requirements. Think of how you might design and create a strong, safe and beautiful home for them.
The home:
should be 2 floors high (don’t forget the staircase!)
each floor should have 2 rooms
will need a chimney as they want a fireplace
must have lots of windows to let the cool breeze in
should have a beautiful garden with two big trees
should include an outdoor kennel for the their pet dog ‘Woof’
must have a two-door garage to park their two cars
an outdoor pool
1) Make a PLAN on paper.
2) Use building materials to CREATE the structure. Make sure you think of ALL the requirements to make a safe, strong and beautiful home.
What do we need to know about building structures?
We watched ‘Look at That Building!: A First Book of Structures‘ by Scot Ritchie.
This wonderful picture book introduces young learners to basic construction concepts through the eyes of five friends keen on building a doghouse for their pet pooch, Max. Many important concepts, and vocabulary are explored through this simple picture book.
We began by discussing and sharing what we already knowabout patterns. The students noted their ideas on large chart paper.
Ethan “You can repeat something or add more.”
Seoyeon and Ella “pattens can be shapes. Patterns have to repeat all the time.”
“Patterns can be numbers.”
Agata “Patterns can be long or short.”
Seoyeon “Patterns can be colours.”
Questions:
Agata “Can patterns be built with people?”
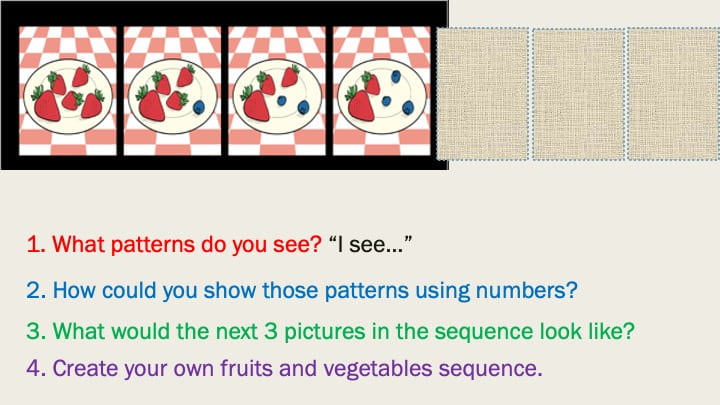
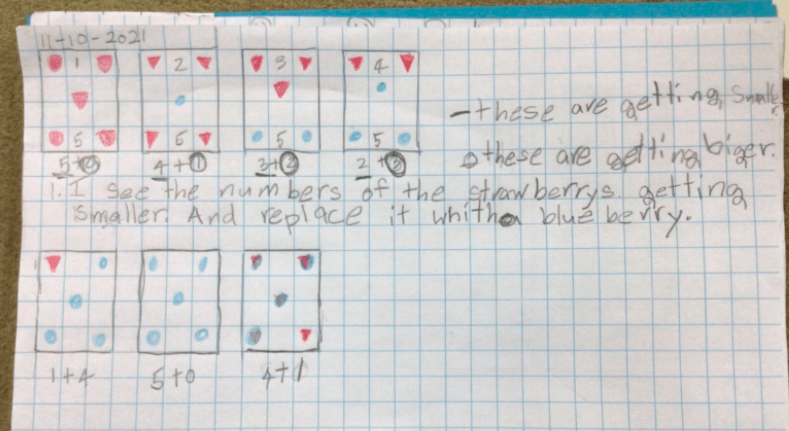
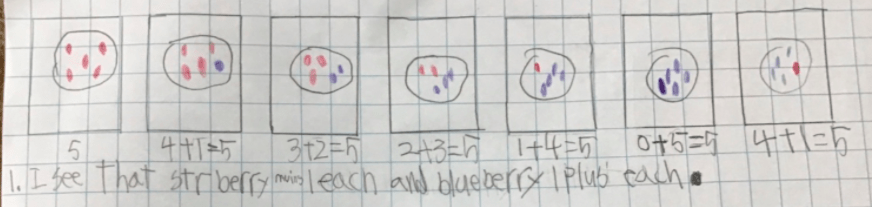
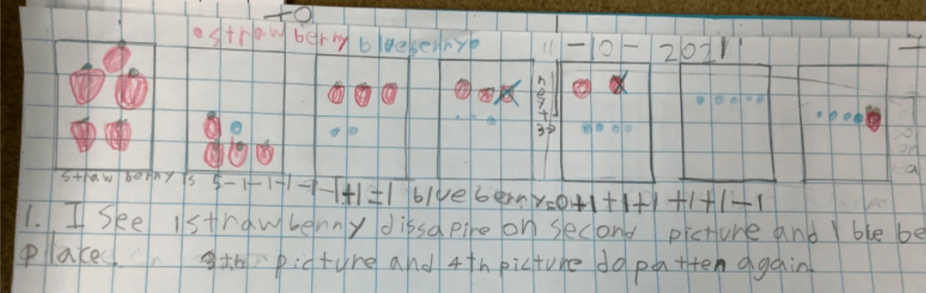
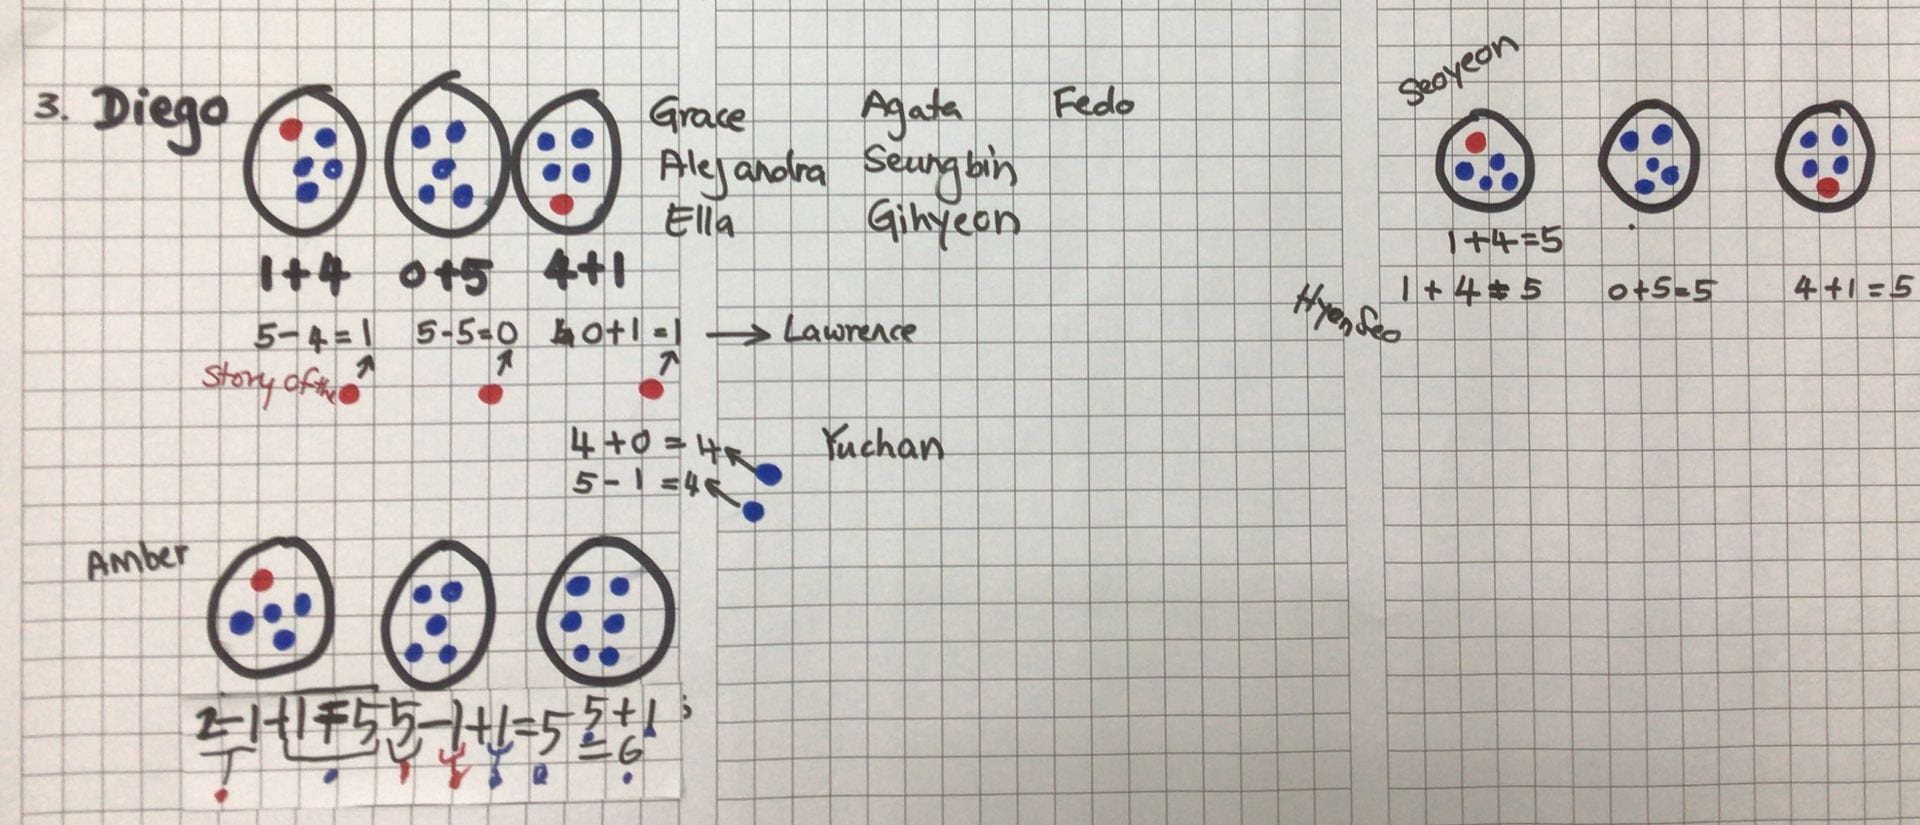
Next, the students were presented with a series of images. They documented the image and their ideas using pictures, numbers and words.
I can see…
“…strawberries and blueberries.” – Grace
“…one strawberry changed to a blueberry.” – Ethan
“…strawberry -1 each and blueberry +1 each.” – Seungbin
“…the number of the strawberry is getting smaller and replacing it with a blueberry.” – Ella
“…I see the picture going down is the blueberry is more more.” – Lawrence
How can you show these patterns using numbers?
What would the next 3 pictures in the sequence look like?
Then, they decided on how they would continue the pattern. They justified their ideas to the group.
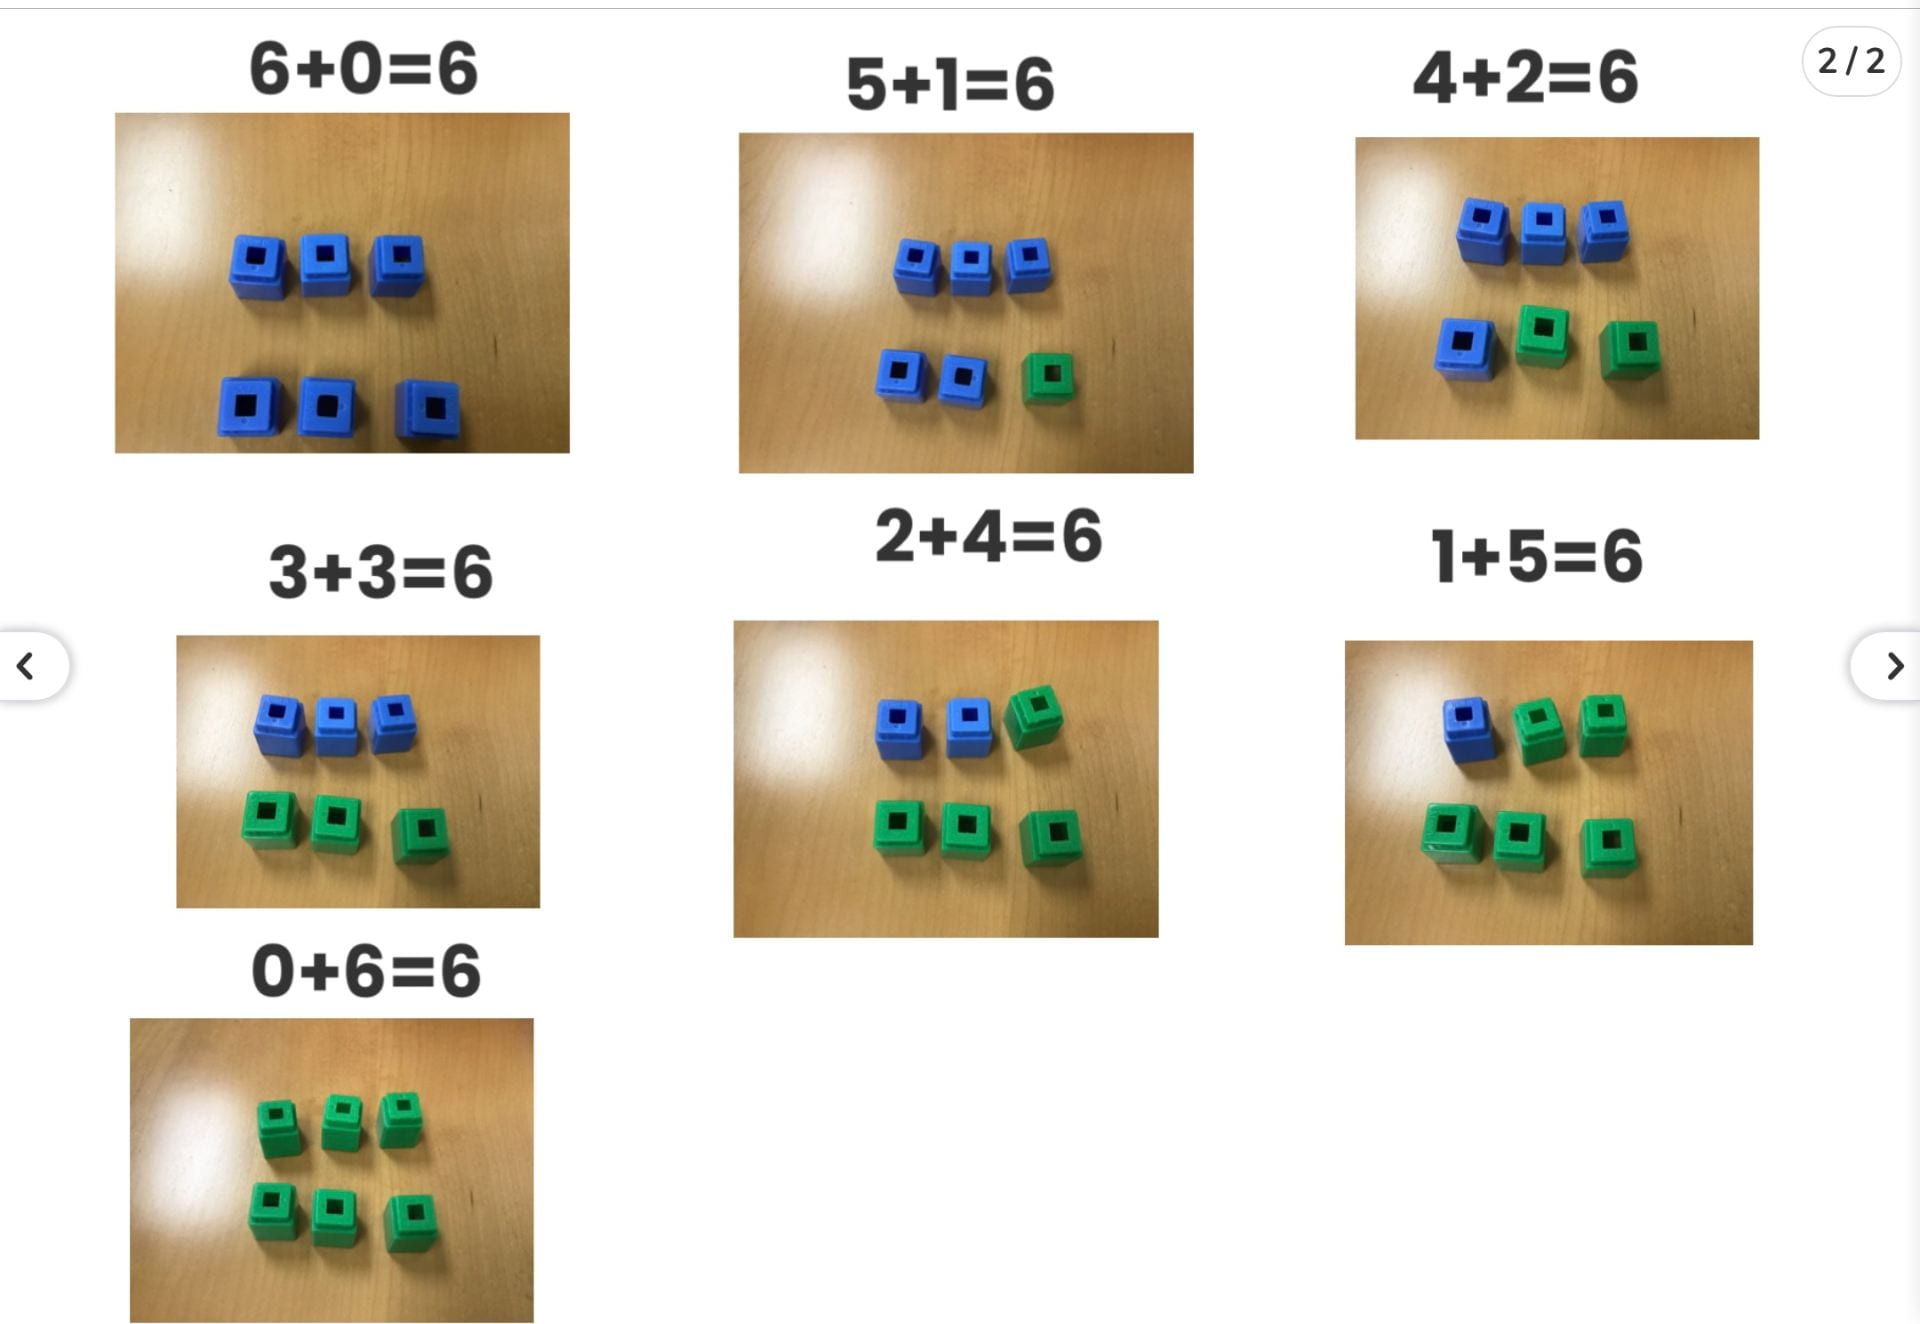
Finally, the students created their own pattern using manipulatives, symbols and numbers, demonstrating how patterns can be represented in a variety of ways.
How can we use pictures, numbers or models to solve math problems?
We worked through the task together and recorded our thinking in our Math Journals.
We thought about the different tools we would need to solve our problem. The students discussed their thinking and worked through their task using math vocabulary related to number, measurement and data-handling.
Next, they worked on creating and testing their own ramp. They needed to work in teams, solving problems and negotiating ideas.
The students thought about the materials they would need, the height and placement of the ramps as well as the objects they would test.
Then, they recorded their data on a table and discussed and shared a question they could ask about the data they collected.
Through this experience the students had opportunities to:
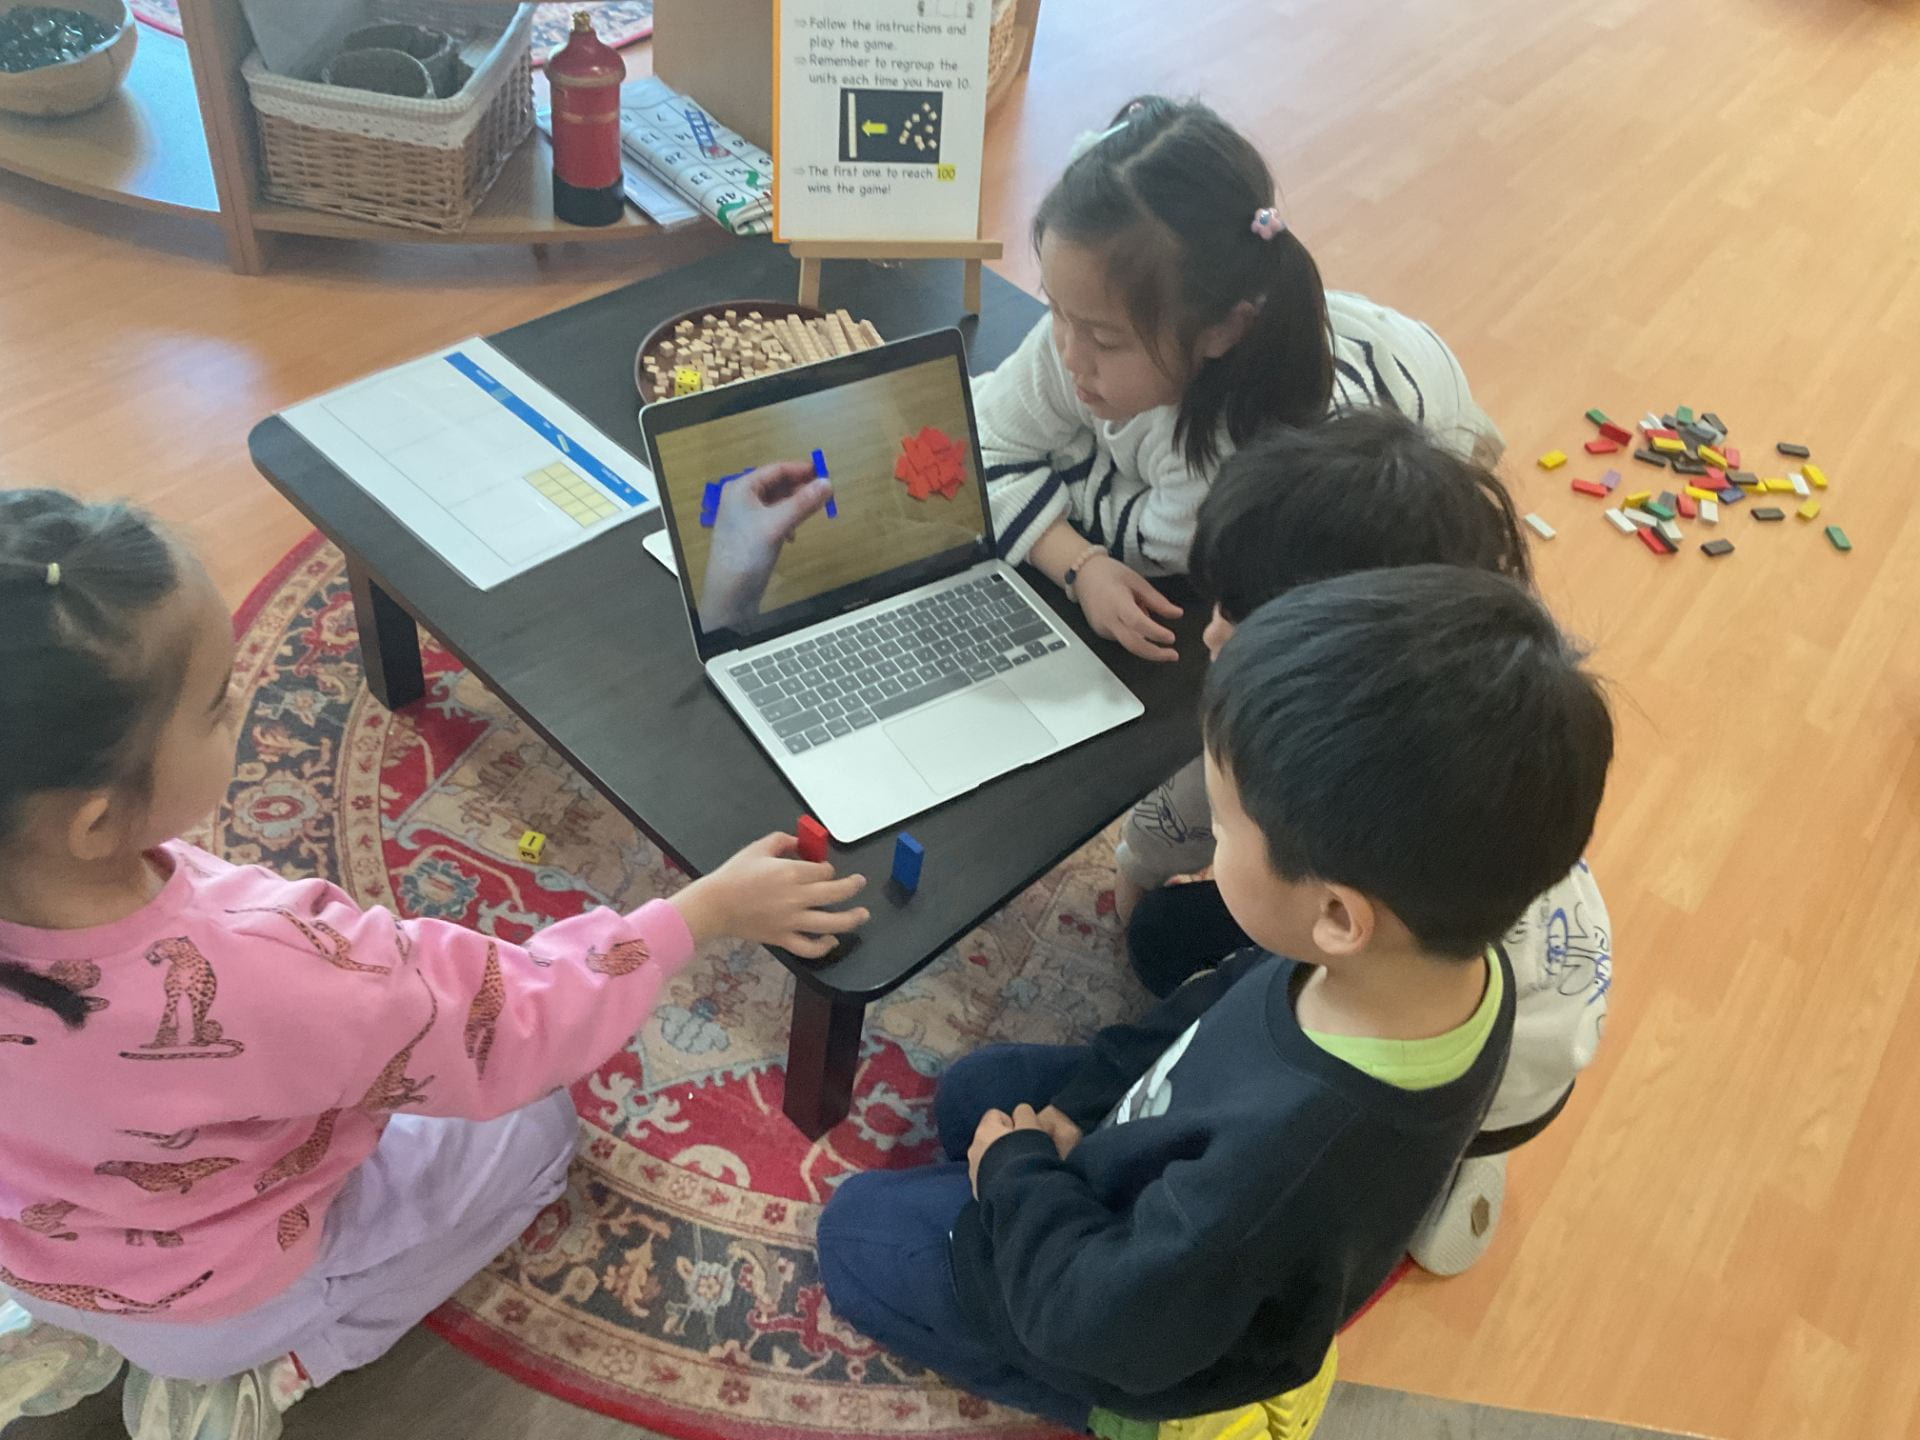
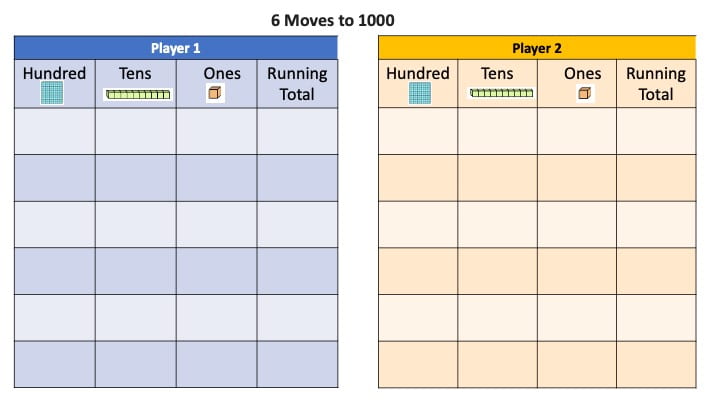
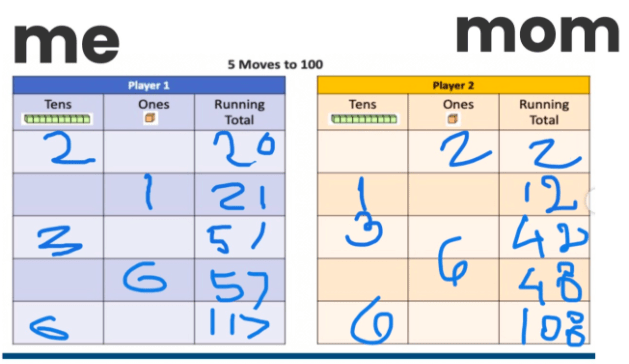
The students continued to strengthen their understanding of place value and addition through the game ‘5 Moves to 100’.
They were encouraged to discuss their thinking and strategies used while playing the game.
Students could make the game more challenging if they wished.
As always, we are reminded that playing collaborative games helps students build a positive classroom culture that celebrates relationships through connection.
Our Math focus this week was on building our number sense through games, discussion and problem-solving. Students were encouraged to interact with each other during the online sessions to help build a sense of community.
Math Vocabulary
We began by talking about ODD and EVEN numbers. We used manipulatives, pictures, and numbers to share our ideas.
Students:
“odd and even numbers can be divided by two and each person gets the same
if I had three sweets and I shared it with a friend then it won’t be equal
15 is an odd number because one person has 7 and the other has 8
ODD numbers are like 1,3,5,7,9 and EVEN numbers are 2,4,6,8,10”
Next, we played ‘Reach the Beach’!
The focus of the game was to identify odd and even numbers. The students were able to make the game as challenging as they wanted to by adding more dice, or multiplying the digits instead of adding them.
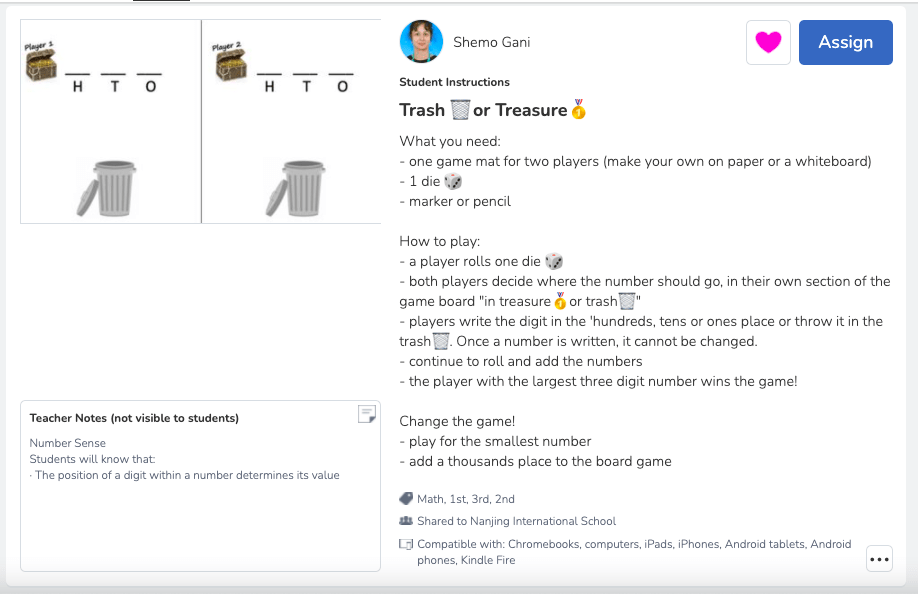
The next game we played was ‘Trash and Treasure’. This game develops an understanding of how the position of a digit within a number determines its value.
The students were then invited to create and play their own games. This provoked their thinking and developed their self-management skills. Students were able to stretch their thinking by making the games more challenging. Taking responsibility for completing tasks and being open-minded while playing team games was also fostered through these activities.
Odd and Even
Trash and Treasure
Conceptual Understandings:
Number Sense:
the base 10 value system – the position of a digit within a number determines its value
Over the last few weeks, the students have been creating their prototypes based on their design plans and related research. They have continued to add more details and descriptions to their initial plans, thinking deeply about the different materials that are available and how they might use them to create the ‘MOST CHALLENGING‘ part of their design. The task would need to meet the following criteria.
Design Plans and Prototypes
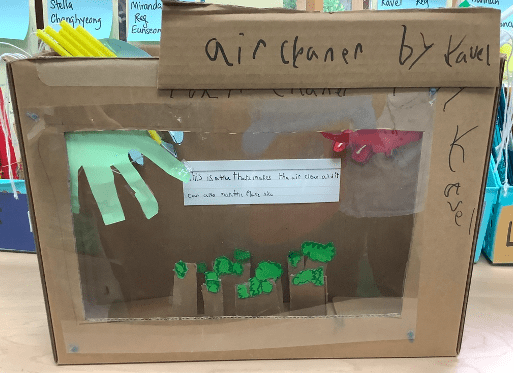
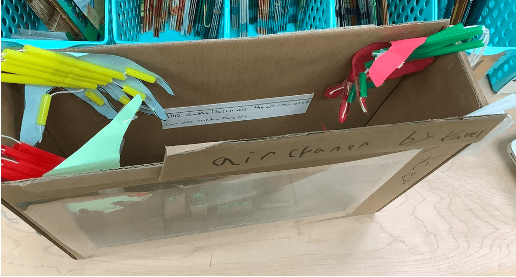
The Air Cleaner
The Air Cleaner (Challenge: Robot Hands)
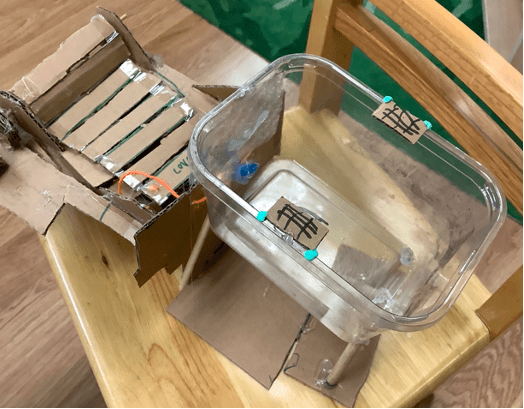
The House with Swimming Pool
The Swimming Pool (Challenge: Automatic Pool Cover)
The House on the Mountain (Challenge: The Hot Water Tank)
The Switch House (Challenge: Automatic Entrance)
The Glass Pyramid (Challenge: Stone Stairway)
The Whirlpool
The Whirlpool (Challenge: Water Wheel)
The Hotel
(Challenge: The Hotel Slide)
The Science Laboratory
The Science Laboratory (Challenge: The Elevator)
The House with a Pool
The House with a Pool (Challenge: The Balcony)
The House with a Pool (Challenge: The waterfall)
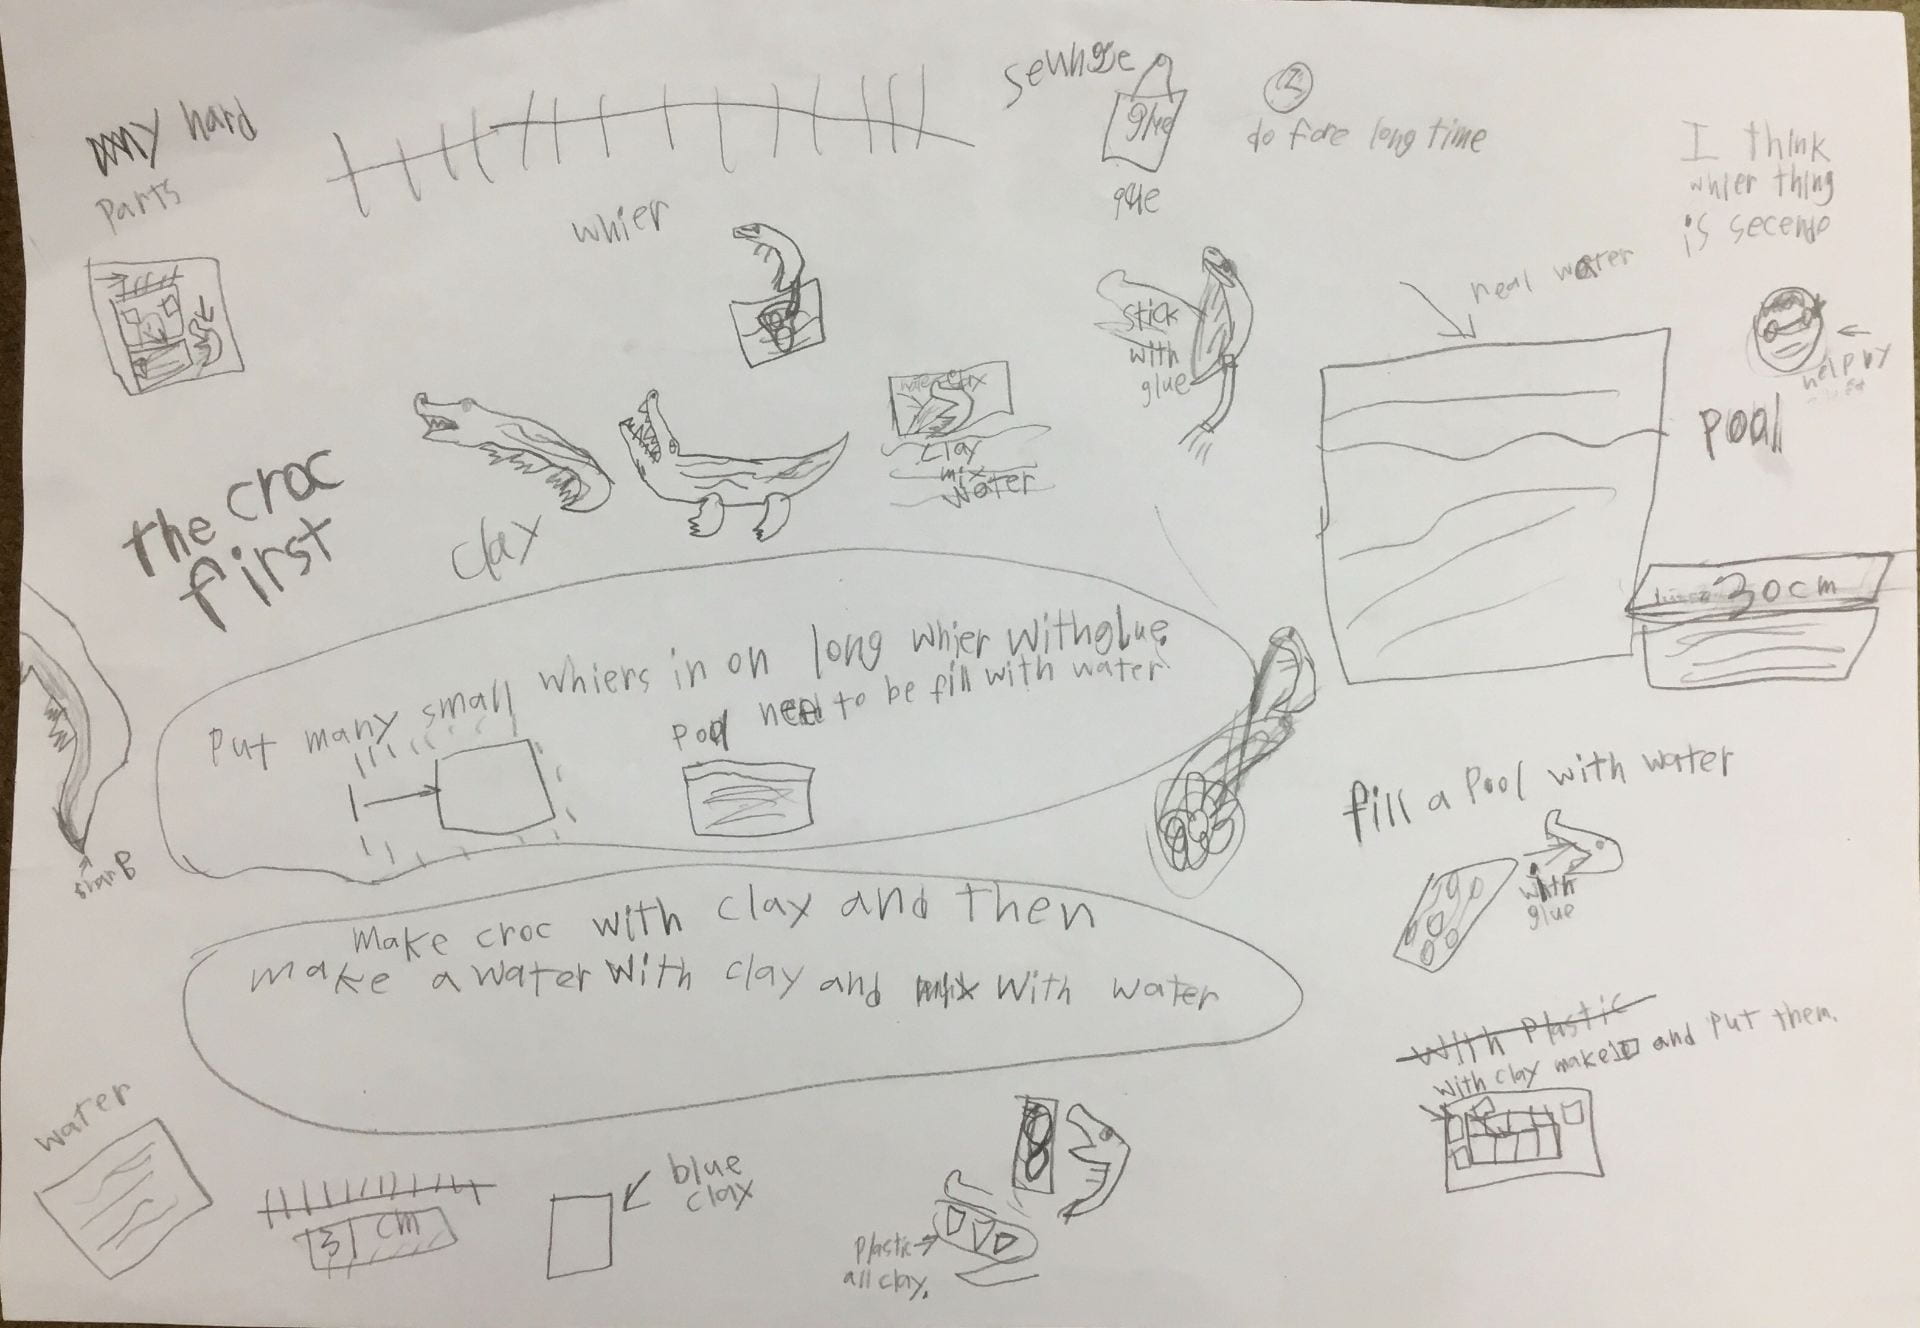
Challenge: The Crocodile Water Fountain
The Crocodile Water Fountain Plan
The House
Hogwarts Castle (Challenge: The Automatic Doors)
The Hotel on the Water (Challenge: The Slide with 2 loops)
The Prototypes
The students have been moving between the design rooms and the classroom, testing and choosing from a range of materials to fit a purpose. The students persevered, working at their own pace, talking to others about the challenges and how they were learning through trial and error.
Personal Reflections
The students have been documenting their learning journey, reflecting on challenges and how they have found solutions through the design process.
We consider reflection an import part of the learning process. Therefore, students were encouraged to document their own learning journey while reflecting on the following:
what has been done (process)
the materials (What materials did you use? Why?)
the challenges (difficult parts/jobs)
the solutions (What did you do? What made it work?)
the skills (research, thinking, self-management, social and communication skills)
what has been learned (What have you learned from/through the steps/tasks?)
feelings and emotions
The students are working on putting together a Design Journal to share their individual learning story. These will be presented at their final presentation to the community.
Conceptual Understandings: Students understand that:
a push or a pull affects how an object moves or changes shape (Physics).
different materials can be combined for a particular purpose (Chemistry).
science involves observing, asking questions about, and describing changes in, objects and events.
we solve problems during the creative process by thinking critically and imaginatively.
designs grow out of natural curiosity.
skills can be developed through play.
technologies are tools that extend human capabilities
Students were able to:
demonstrate control of tools, materials and processes.
identify, plan and make specific choices of materials, tools and processes.
to identify the stages of their own and others’ creative processes.
make predictions, experiment, and anticipate possible outcomes.
The students have been conducting their research, discussing their findings and making plans that will help them create prototypes of their structure designs.
They continue to reflect on and document their own process of learning.
The students have been reading books, watching videos about structures, forces, energy and materials to help them make decisions on their own plans.
The students put their initial ideas on paper. They made plans, using words, diagrams and information that they would require in order to create their prototype. Their aim is to create a prototype; an early sample, model, or a product built to test a concept or process.
Throughout this process the students will have opportunities to:
be actively engaged in various stages of learning, including: thinking about, planning, modifying and creating
be actively involved in discussion and questioning, and be more self-directed in their creating
apply their understanding of concepts through the construction of their projects
make connections to the real world by taking past experiences into their investigations/projects
face challenges, and will be given the freedom to independently overcome these or fail through trial and error or experimentation
We have been using manipulatives to explore measurement. We have been measuring the Perimeter and Area of different shapes.
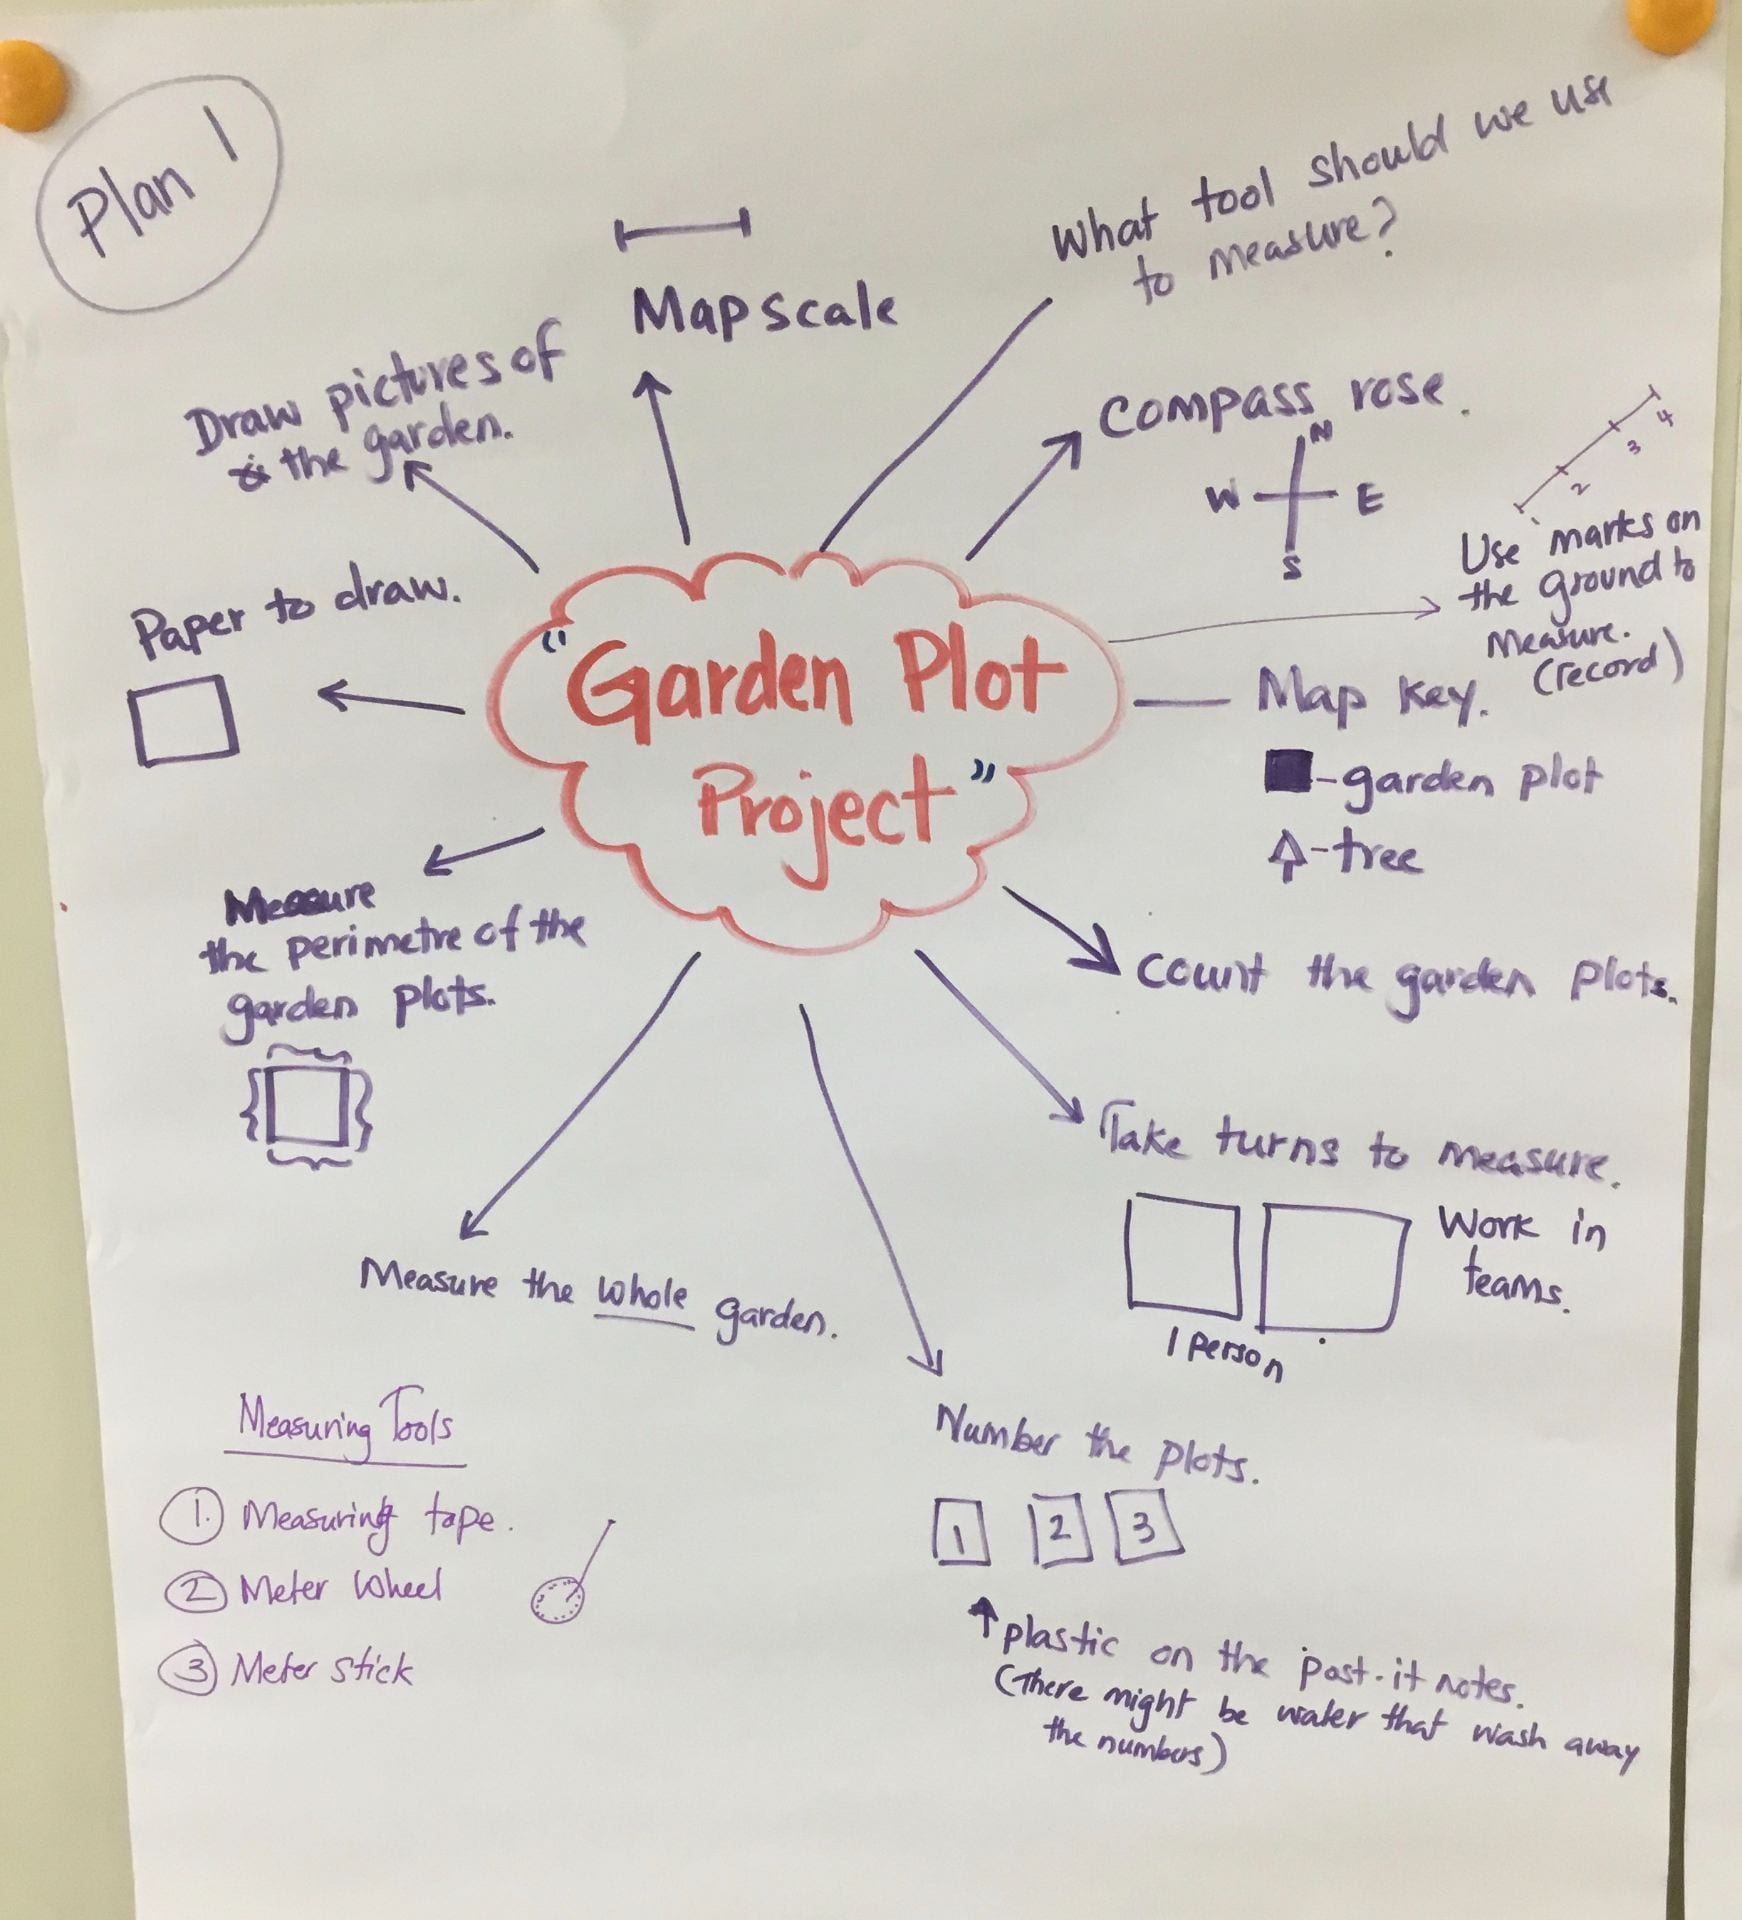
Mr. Danny, the Activities Director needed some help. He asked the students if they could create a map of the ‘Community Garden Plots‘.
We began by brainstorming what we already know about maps. We documented our thinking and ideas on chart paper.
Next, we thought about the map of the ‘Community Garden’.
What should it include?
What would we NEED to create the map?
The students wrote down their ideas. They shared their ideas with each other.
A plan was beginning to unfold.
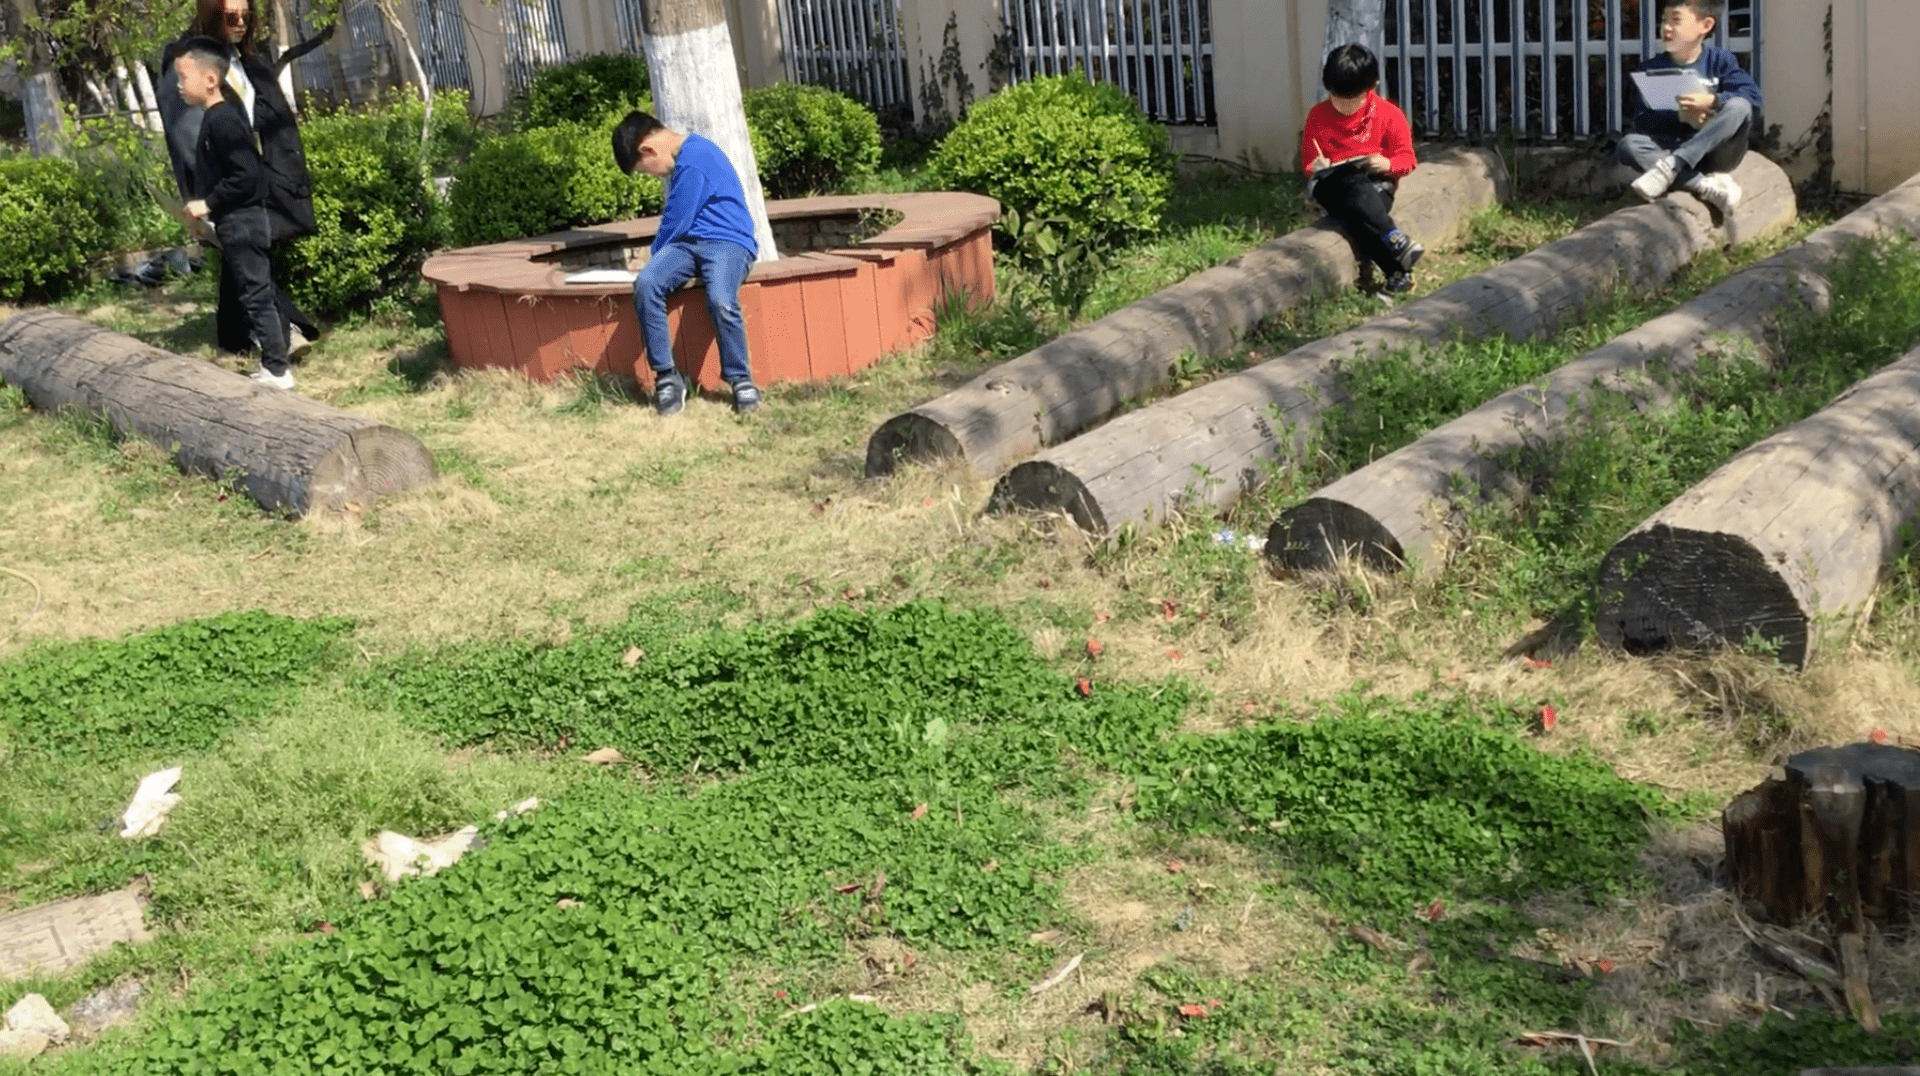
Then, we went to the garden to take a closer look at the garden plots.
What else do we need to think about?
What steps do we need to take to complete the task?
The students continued to document their ideas on paper. They discussed their ideas with each other.
What skills would we need to complete the task? The students shared their thinking.
(Developing the Approaches to Learning)
Kavel “You have to manage yourself. I think we should use thinking skills because we need to think how we need to measure the right proper way. We need to put the tool on the ‘0’ or it will be the wrong measurement.”
Carlotta “You use thinking skills, to think about how you are going to measure things. You also need to use your social skills because you are already measuring one thing then you got to tell other people that they should not measure again.”
Chanwoong “We use communication skills because we all have different ideas so we have to communicate ourselves. We also need research skills because we have to ask questions about it and we have to gather and research the information on the garden.”
Reg: “You have to use your communication skills when you have already done a task you have tell others you have already done it. We also have to use Math skills because when we make the plot when we make the area around the garden plots, the perimeter, so we know the area of the plots. It will help us when we make the map. Like 1 meter of it can be like 30 or 20 cms.”
Hannah “You will need to use your mathematical skills, to write down the things like ideas and then count because we need to count how many plots.”
Sky “We need to count, because we need to know how many of the trees, pots and plots we need to draw on the paper. We need thinking skills because if we don’t think and we just say its like 2 cms (estimate) then we will get the wrong answer. If you measure it correctly then you will get the right answer. We need to be mathematicians because we need to add all the meters and cms. together. If you don’t you will have the wrong answer. ”
Stella “We need Math skills, because you need to make a map you still need to think of math.
Changhyeong “We need thinking skills because we need many ways to measure the ground.”
24 March 2021
Over the last few weeks, the students have been collaborating in their groups to plan how they will create the map of the ‘Community Garden’ at NIS.
We created a table to list the materials we will need to complete the task. Students populated the table based on the needs of their individual group.
Next, we sourced the materials from the resource room.
Then, we went out with our tools and resources to begin measuring. The students had to decide how they will manage their task and document their learning. Through this experience, the students have many opportunities to use the skills and knowledge, for an authentic purpose.
We have been exploring geometric shapes and using associated vocabulary to help us represent and describe objects in real-world situations. We have been wondering how shapes can be transformed in different ways.
The students were invited to go on a shape scavenger hunt. During the task they have been identifying, naming, drawing and documenting the shapes in our environment.
TASK: Shape Scavenger Hunt
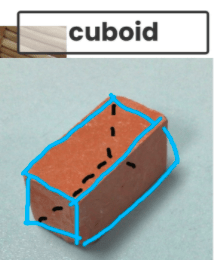
They created a table to record the number of edges, vertices and faces of 3D shapes.
Students determined a line of symmetry and rotational symmetryof a 2D shape by folding and rotating paper shapes.
Line of symmetry – A line that divides a 2D into halves that match when folded.
Rotational Symmetry – When a shape can fit on itself exactly when turned.
The students showed a desire to create their own 3D shapes. The students were presented with the next task which invited them to manipulate, shape and explore a variety of materials to create their own 3D shapes.
During the task the students were encouraged to investigate:
if changing the position of a shape alters its properties
how specific vocabulary can be used to describe an object’s position in space
TASK: Creating 3D Shapes
Next, we wondered how we might find the right angles in shapes and objects. How might we create angles with our bodies? A demonstration was recorded pictorially. The students made their own ‘right angle finder’ by tracing, cutting and folding a circle.
TASK: A Right Angle Scavenger Hunt!
We continued to add to our vocabulary wall as the students used additional Mathematical vocabulary.
Two groups of students read interesting fictional stories that included animal characters. We decided to share these stories with the rest of the class.
The students had to decide who would be involved and what role they would play. Some decided that they would be part of the props team, helping to create the setting and the props for the story. The students had to cooperate, find ways to work together and listen to each other’s ideas.
The Setting
The Characters and Props
We reminded ourselves of what a good audience might look like. We had to plan, prepare the props, run through a practice and then perform for others in just 50 minutes!
Here is a challenge that encourages balance, focus and coordination. Gather a collection of stones and stack them as high as you can. How high is your stack of stones?
Approaches to Learning (ATL’s)
develop fine-motor skills and eye-hand coordination
Focus:Observation, Creativity, Thinking Skills, Communication Skills
We have been observing nature and wondering about the treesaround us.
I went on a walk and found a leaf skeleton. I am wondering about trees🌳🌲🌴 and their leaves🌿🍂🍀. How are leaves different or the same? How do leaves and trees ‘change’ over time?
Yesterday I went on a treasure hunt. I looked for what treasures I could find outside. I had help from Ms Karen, Ms Shemo, Ms Tasha and Ms Victoria. Everyone found something and I thought carefully about what I wanted to create. I looked at the sticks I found and started to arrange them. Next I decided to tear Ms Tasha’s orange peels into smaller pieces. They reminded me of leaves in the fall. Ms Shemo had found beautiful leaves that had worn away until they were just skeletons. I loved how they looked against the black paper and reminded me of winter. Ms Karen found tiny pinecones so I added them to make my tree more full. Ms Victoria had found beautiful blossom petals which reminded me of spring so I put them on the bottom. While I was making my community tree I thought about the life cycle of trees and the seasons we all go through. I found items that represented each season except summer. Summer is on its way and I wonder what I will add. What would you add to represent summer?
This invitation encourages children to:
express themselves creatively
enjoy a variety of visual arts experiences
select tools, materials and processes for specific purposes
use imagination and experiences to inform their art making
Focus: Thinking Skills, Research Skills, Self-management Skills
How heavy is the 🍎 apple?
How can we find out?
Can we use other materials and objects to weight the apple?
Let’s read the story ‘BALANCING ACT’ by Ellen Stoll Walsh to explore weight and balance.
In this story, two mice 🐁🐁 make a teeter-totter. They play on their teeter-totter, balancing each other out until their friends come along to join their play. They think of different ways to include their friends, which leads to solving problems with weight and balance.
How might we make our own balancing scale?
Here is one way to create your own balancing scale. You might have other ideas to create your own scale! Follow the instructions in the video to make a balancing scale.
Materials Needed:
2 cups/small containers
1 clothes hanger
A sharp object (to make the holes)
4 pieces of twine about 60cms in length
Steps:
You may need an adults help to use a sharp object, or a hole punch to make holes in 2 small containers as shown in the instructional video.
Cut 4 pieces of twine about 60cms in length. The twine needs to be thick and strong enough to make the balance scale more durable.
Tie the ends of the twine through the holes in the containers to the ends of the clothes hanger as shown in the instructional video.
What weighs the same?
How heavy or light are different objects or substances?
How might we weigh different materials and substances such as liquids and solids?
Light and Heavy What things are light? What things are heavy? Let’s explore the concept of weight through this non-fiction picture book. In Light and Heavy, a girl investigates what she can and cannot lift.
Through this invitation, the children can investigate how objects have attributes which can be measured using non-standard units, which can then be used to sort and compare.
The Ten Frame is a two-by-five rectangular frame into which counters are placed to demonstrate numbers less than or equal to 10. Counters can be arranged in different ways to represent different numbers. A ten frame helps children develop a strong number sense. It teaches them to subitize and is a precursor to addition. They provide the children with a visual of numbers.
*Subitize is the ability to tell the number of objects in a set, quickly, without counting.
Here is a game that you can create and play with one or more players.
This inquiry challenge will encourage the children to:
Focus: Research Skills, Thinking Skills, Communication Skills, Self-management Skills
The food we eat may vary in colour, texture, flavour and nutrition. Where does our food come from and how might our food change over time? Here is a story to help us think about the different food we eat.
Take a picture of your meal, what do you notice about the food you eat? Share your observations.
Have a look in your refrigerator, what do you notice about the foods you eat? Document and share your observations.
On your next family visit to the supermarket, observe the different food you choose to buy. Document what you observe using paper and markers or take a photograph(s) to share what you notice.
Inquiry Invitation #2:
What happens to food over time?
How might we observe and document what we notice?
Choose a variety of food to observe over time. A few choices may be oranges, lemons, bananas, apples, green vegetables, pumpkin, kiwi.
Inquiry Invitation #3:
“As long as materials can be moved, redesigned, put together, and taken apart in a variety of ways, they are classified as loose parts.” – Simon Nicholson, 1971 (Founder of the idea of Loose Parts)
Loose parts are any collection of natural or manmade objects that can be used to extend and further ideas in children’s play. They are open-ended materials that can be moved, combined, taken apart and redesigned.
How might we use food as loose parts?
Create a piece of art using a variety of loose parts. You may want to use dried orange peels, egg shells, pasta, seeds, spices (star anise) as loose parts. Take a picture and share your creation. Be conscious of food waste.
Inquiry Invitation #4:
Ms. Pam, Ms. Victoria, Ms. Hannah and Mrs. Karen decided to make a ‘Rainbow 🌈 Breakfast’!
What do you notice about the foods they chose to use?
How did they sort the different food?
🌈How might we make a rainbow meal? What foods would we use and how might we prepare it?
🌈Share the process of creating your rainbow meal using paper and markers, photographs or video.
Focus: Thinking Skills, Self-management Skills, Research Skills
What can we create with shapes?
A tangram is a puzzle made up of seven shapes that can be arranged to form many different designs. Follow the instructions in the video to create 7 geometric shapes: five triangles, one square, and one parallelogram. Move the shapes around like a puzzle to create new designs.
I wonder what your designs would resemble…
Here are a few designs to get you started!
Approaches to Learning (ATL’s)
understand that shapes have characteristics that can be described and compared
Focus: Communication Skills, Research Skills, Thinking Skills
“Trees have developed an intelligent way of living that means even though they always stand still they can feed, reproduce, communicate with each other, defend themselves, and even play together.” – Reggio Children
The weather in Nanjing has changed over time. How do these changes affect the trees?
I saw these trees during a nature walk.
🌳 What do you notice?
🌳 How would you describe the trees?
🌳 Do trees look the same all year round? Why or why not? Does it change? When do they change? Why or why not?
Let’s read the picture book ‘Tap the Magic Tree’ by Christie Matheson to explore change and growth.
I wonder what you notice about the trees around your neighbourhood. You might want to go on a nature walk to learn more about the trees.
While at school, we have learned that observing like a scientist and drawing what we see can support our knowledge. It also helps us share our understandings. Drawing can encourage us to observe carefully to notice patterns and connections, while developing curiosity and an appreciation for the world around us.
Inquiry Invitation #1:
🌳choose a tree and observe it (this can be a tree in your own neighbourhood or in a picture book). Notice the different parts of the tree, the textures, the fragrance
🌳choose a tree or trees to draw
🌳take a picture of your favourite tree (you might want to tell us why that is your favourite tree)
🌳use paint to share your observations about trees
🌳share your drawing, painted picture or favourite photograph with us!
Felix and his family went on a bike ride to ‘Skyways’. They saw two trees that looked pretty strange! One even had a number 🤔.
🌳choose a tree and observe it (this can be a tree in your own neighbourhood or in a picture book). Notice the different parts of the tree (bark, branches, leaves, fruits, flowers) the textures (rough, smooth, prickly)
🌳re-create a tree using any loose parts you have around you (leaves, twigs, stones, seeds, shells, Lego, fabric)
🌳take a pictureof your creation and share it with us!
🌳EXTEND: How many different loose parts did you use? How many of each item did you use to make your tree?
Inquiry Invitation by Ms. Anna Mila (Atelier) #3:
Do you remember this artist?
Piet Mondrian
His name is Piet Mondrian and he was an artist that painted thousands of paintings. One of the things he painted again and again was trees. Sometimes artists become very interested in one idea. They paint the same thing again and again, experimenting with different colours and techniques. This is called a series. Mondrian also painted a series of trees over many years.
Artists give their paintings names. This painting is called “Tree of Life”. It is by an Austrian artist called Gustav Klimt. Why do you think Gustav Klimt gave this painting this name?
This tree painting is also by Klimt. In this painting, Klimt paints from a different view or “perspective”. He also decided to paint it in a more realistic style. In this painting, Klimt decided to focus on the trunks of the trees. Artists think carefully about perspective. They think carefully about what their painting will show and if it will include everything or only some things. This painting is called “Birch Forest” and it is from a perspective that makes you feel as if you were right in the middle of a forest.
This painting is by a famous French artist called Claude Monet. It is called “An Orchard in Spring”. Notice the perspective he decided to use. In this painting he stood further away than Klimt did in the previous painting. Why do you think he made that choice?
Artists are often inspired by the seasons. This painting was also painted in spring. It is by a famous Dutch painter called Vincent van Gough. It is called “The Pink Peach Tree”. He also stood further away and made sure to paint the entire tree. That was the perspective he wanted to use. We have been talking about how artists use colours. Notice the colours in this painting. How do you feel when you look at it?
This painting is by a Chinese artist by the name of Qi Baishi. He called this painting, Bird and Magnolia. Notice the lines in his painting. Notice how he used colours.
When I first moved to Nanjing, I noticed the beautiful trees. We arrived in the spring and this was one of the first trees that made me smile. This tree is a Magnolia tree and it inspired the previous artist’s painting. Take a look at the picture and compare it. Do you think it looks the same or different from the photograph? Notice the perspective I used when I took the picture.
Yesterday, I went on a tree hunt. I looked at all the trees very carefully. I looked at them from all different sides. I touched them, I smelled them and I thought carefully about the things I could see and the things I couldn’t. For this picture I looked up and took a photo. The branches and the leaves look like they are reaching. I wonder what they are reaching for?
🌳 I wonder what tree will inspire you.
Approaches to Learning (ATL’s)
Research Skills
data gathering and documenting (drawing, photographing)
gather information from a variety of sources (people, places, materials, literature).
use all senses to observe and notice details
record observations—drawing, using emergent writing skills, when possible, annotate images
Notice how the pictures are illustrated. There are lines, patterns and shapes on the different characters and the environment.
Inquiry Invitation #1
You might want to act out the story using your own animals or props. You can even use boxes, cushions and blankets and any other suitable props to create a farmyard to go on your own walk. You can go across, around, over, past, through, andunder. Your own story can be in a different place such as a forest, an island or even a city. You might want to act out your story in the park or on the playground!
Inquiry Invitation #2
Rosie loves to go for a walk across the farmyard. Here is a map to help her on her way.
If you were to create your own maps, what would you include?
We would love to hear about your adventures, see your maps and creations!
Approaches to Learning (ATL’s)
record observations and ideas through drawings and maps
use mark-marking to convey meaning
use words and sentences to express ideas
take on pretend roles and situations
use imagination and original ideas to explore familiar roles, themes and stories musically and dramatically
engage with, and enjoy a variety of visual arts experiences
use their imagination and experiences to inform their art making
use everyday language to describe position, direction and movement of self and objects in relation to others
Mo Willems and Peter Brown are two of our favourite authors at NIS. They use lines, shapes and patterns to create the illustrations (or pictures) for their picture books.
Last year, we interviewed Ms. Grace. She was a Grade 2 teacher at NIS. Just like Mo Willems and Peter Brown, Ms. Grace loves to draw and create her own pictures.
Ms. Grace taught us how to create our own Zentangle pictures or doodles using lines, shapes and patterns. Let’s use our imagination and what we know about lines, shapes and patterns to create our own doodles.
Felix wanted to create his own doodle. He used lines, shapes and patterns to create a doodle of a ‘huge ice-cream”!
This invitation encourages children to:
express themselves creatively
enjoy a variety of visual arts experiences
select tools, materials and processes for specific purposes
use imagination and experiences to inform their art making
Peter Brown is another of our favourite authors. One of the stories we read often is ‘You WILL Be My Friend!‘. In this story, Lucy is searching for a friend in the forest. She approaches a pond, she needs to cross it. Can you help Lucy?
Here is a Lego Brick challenge for you!
Create a Lego Brick Bridge that Lucy can use to cross the pond.
How will you test your bridge?
Share a picture of your Lego Brick Bridge.
NOTE:This learning invitation will help children explore the concepts:
Mo Willems is one of our favourite authors. We have read his books over and over again. Some of our favourite stories are:
‘Don’t Let the Pigeon Drive the BUS!’
and
‘Should I Share My Ice-cream?”
How do authors and illustrators use lines, shapes and patterns in their picture books? Notice howMo Willems uses lines and shapes to create his drawing.
You might want to try drawing Piggie with Mo Willems.
You might want to try drawing Pigeon.
You might want to try drawing Elephant Gerald.
We can explore drawing, creating and designing through our exploration of lines, patterns and shapes. Invitethe children to make their own drawings or create stories using familiar characters or their own imaginative characters. The children may want to add their own details, speech bubbles and thinking clouds to add dialogue and thought.
Add 1 RMB coins , a few at a time to see how many your boat can hold.
Post a picture of your LEGObrick boat!
How many coins could your LEGO brick boat carry safely?
NOTE: This learning invitation will help children think about weight, engineering and design. You can give your child a certain number of Lego bricks for an added challenge.
Felixthe Engineer:
Felix LOVES Lego and was very excited to try the Lego boat challenge. He took parts of a space shuttle and modified it for his boat. After that Simon and Felix tried a lego boat. It worked great! They had a lot of fun, especially with the water 🤭. Look carefully to see how many coins his space shuttle could hold safely.
Lemingworked like a scientist, planning, designing and creating a boat that could stay afloat while carrying lots of coins. Leming then tested his boat to see if it works.
Focus: Self-management Skills, Communication Skills
Task: Make a Paper Helicopter
Follow the instructions in the video to make a paper helicopter.
This task will encourage your child to: • observe carefully • follow instructions in sequence to complete a task • develop small muscles in the hand •problem-solve • be patient They will need to measure, draw lines, cut on a line and fold paper.
Challenge: – Make a target on the floor using chalk, paper, or tape. – Decide how many points each area of your target is worth. – Play with a partner, take turns to see who scores the most points!
Follow the instructions in the video to make your own board game and dice.
You will need a dice, 40-50 counters [buttons, beads, seeds, stones or any other small loose parts]. A game board for each player.
Materials needed to make the dice.
Counters
How to play:
take turns to throw the dice
collect the correct number of counters and cover the spaces on your board until the counters are over.
The person with the most counters wins the game!
Extension:You will need more counters and a game board with numbers over 50.
Use 2 dice.
Add the two numbers and place counters to match the total.
The person with the most counters wins the game!
Jiwon and her brother Jake did not have and seeds or beans or other materials around. 💭 They decided to create their own version of the Dice Game! In their game, the person who circles the most numbers and reaches 80 the fastest wins the game! Can you guess who won the game?
Lemingdecided to create his own Dice Game! He used pistachios as counters!
Salt Tray Writing Sensory writing is a fun way for children to experience writing. The tips of your fingers are extremely sensitive. Therefore, writing in salt, sand, and rice can help children remember the shapes of letters, numbers, words and the strokes in different characters.
It is important to encourage children to be conscious of food waste. You can use regular kitchen salt or expired rice. The salt can be reused. Only a small amount is needed, and these sensory materials that can be saved for long periods of time if kept clean and dry. Please remember to wash your hands before and after using the salt writing tray.
Here are some resources you can use to explore writing.
Patterns
Through these sensory writing experiences the children develop with following skills:
draw simple shapes
use correct top-to-bottom left-to-right directionality for letters, numbers and other symbols
establish handedness for writing
develop mature grip for crayon/pencil
experiment with various ways to move and produce marks
Focus: Self-management Skills, Communication Skills
Children enjoy and have fun when cooking. Cooking also develops many mathematical concepts such as measurement and volume, while instilling healthy eating habits.
Other benefits include:
strengthening their fine motor skills through cutting, pouring and scooping
learning the concept of sequencing through reading recipes and discussing what comes first, second, and third in the cooking process
expanding their vocabulary as they are exposed to new words and terms
developing a greater sense of discovery with new foods
developing independence and self-management skills
learning about and developing an appreciation for the different resources and produce that are used when cooking
Do you like pancakes? This book is about all the steps needed to make them. Let’s listen to Ms. Anna Mila read ‘Pancake, Pancake!‘ by Eric Carle. Then, let’s make our own pancakes.
Ms. Heidi and her son decide to show their creativity in different ways through Performing Arts.
You can make up your own call and response song linked to cooking. It could be making scrambled eggs, making egg fried rice, baking cookies…. Choose objects to act out and perform your song with. Post a video on Seesaw of yourself singing your own call and response song’ with your chosen objects based on the ‘Pancakes call and response song’.
Curious George loves to cook. This is when he made pancakes!
You can follow along to make your own pancakes. Here is George showing us how to do it!
If you make your own pancakes or other delicious foods, don’t forget to let us know about your experience!
We have had a lot of excitement in the kitchen. We have had opportunities to watch others help out in the kitchen as they cook, clean and prepare healthy meals. Ms. Anna Mila and her daughter worked together to make pancakes. Ms. Heidi and her son were also busy in the kitchen! Here is yet another family preparing a meal together.
Focus: Self-management Skills, Thinking Skills (Mathematics – Shape and Space)
Jiwon and Michelle used scissors and paper to explore their creativity. They folded paper carefully and then used scissors to cut out different shapes. Jiwon created flowers and Michelle created monster masks.
Jiwon – Flowers
Here is one way to create art with paper:
You can create your own paper art!
You might want to cut out different shapes on your paper, or even different patterns!
Patterns
Shapes
Pay close attention to the way you hold a pair of scissors.
While cutting with scissors, the open and close motion allows children to build up the little muscles in their hands. These muscles are important because they aid in writing, drawing and painting.
Cutting develops eye-hand coordination as it requires children to use their eyes and hands in unison to accomplish the task of cutting. Eye-hand coordination is important for catching/throwing balls, eating with a spoon, and zipping a coat.
Cutting encourages your child to use both sides of the body at the same time while each hand is performing its own task (bilateral coordination). When cutting a shape, a child must hold the paper with one hand while the other hand is opening and closing the scissors and moving forward to cut.
Cutting improves focus and attention. These skills build a child’s capacity to pay attention to detail, not only in the classroom but in everyday life. These skills are essential to being able to read books, listen to instruction and complete tasks.
Gather some coins and use them to build a bridge. The chopstick should be able to pass under your bridge without touching the coins!How tall, wide and strong can you make your bridge?
Take a photo or a video of your bridge, reflect on (and share):
How many coins did you use to make your bridge?
What helped you create your bridge?
What other materials can you use to create different types of bridges?
Here are a few different bridges around the world. Feel free to share some examples of the different bridges you create!
Sophie has created a bridge using her toys!
The Bridge Test:
Lemingand his brother Leyang were wondering which material would be the most suitable to create a bridge.
They wanted to learn through ‘trial and error’, this is the work of a ‘researcher’.
They have gathered some materials to test their theories. They have paper, plastic and wood.
The Paper Bridge.
The Wooden Bridge.
Their Conclusion:
“1-wood 2- paper with more strength 3- plastic 4- paper with less strength”
You might want to try your own experiments to see which materials are best suited when creating bridges!
Approaches to Learning (ATL’s)
Thinking Skills
Analysing: Observe carefully.
Generating novel ideas: Make unexpected or unusual connections between objects and/or ideas.
Considering new perspectives: Ask “what if” questions, Identify strengths and areas for improvement.
Research Skills
Formulating and planning: Ask or express through play questions that can be researched.
Data gathering and documenting (audio recording, drawing, photographing): Use all senses to observe and notice details.

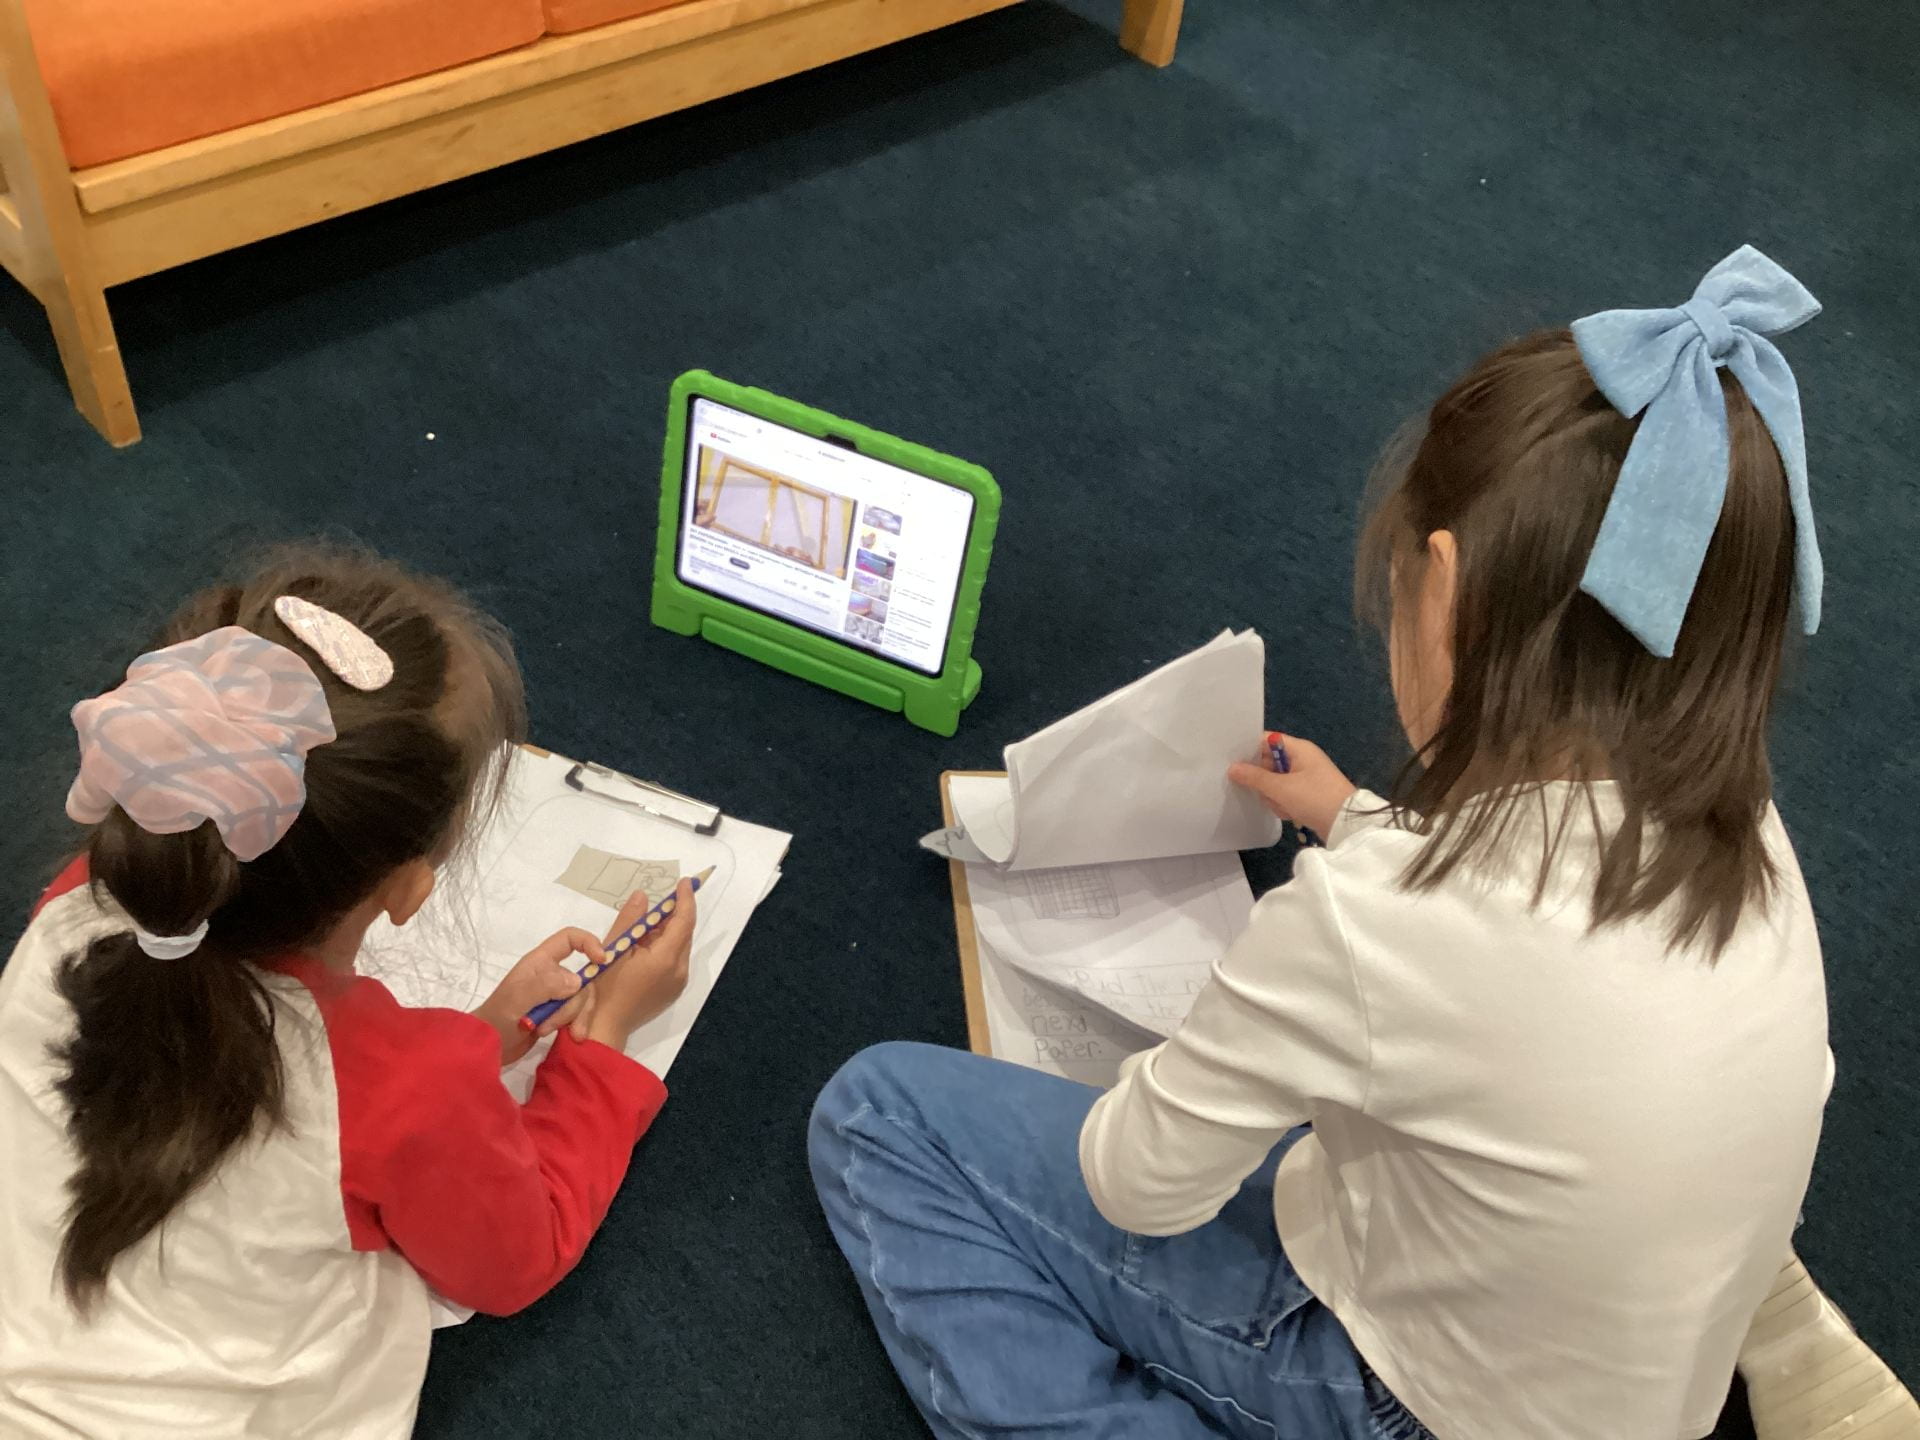 Isabella and Adalyn took notes as they watched the video, using pictures, words, and sentences to create their own ‘how-to’ book. In this information booklet, they provided step-by-step instructions on the process of paper-making.
  They were careful to include pictures for each step and detailed instructions that guide the reader through the process of making paper.
 Then, they turned the paper mixture into paper pulp, following different steps to ensure that the mixture of water and paper pulp was correct.


 What do you notice about the foods they chose to use?